Monday, June 15, 2015

Squirrel! A Finish all the same! :)

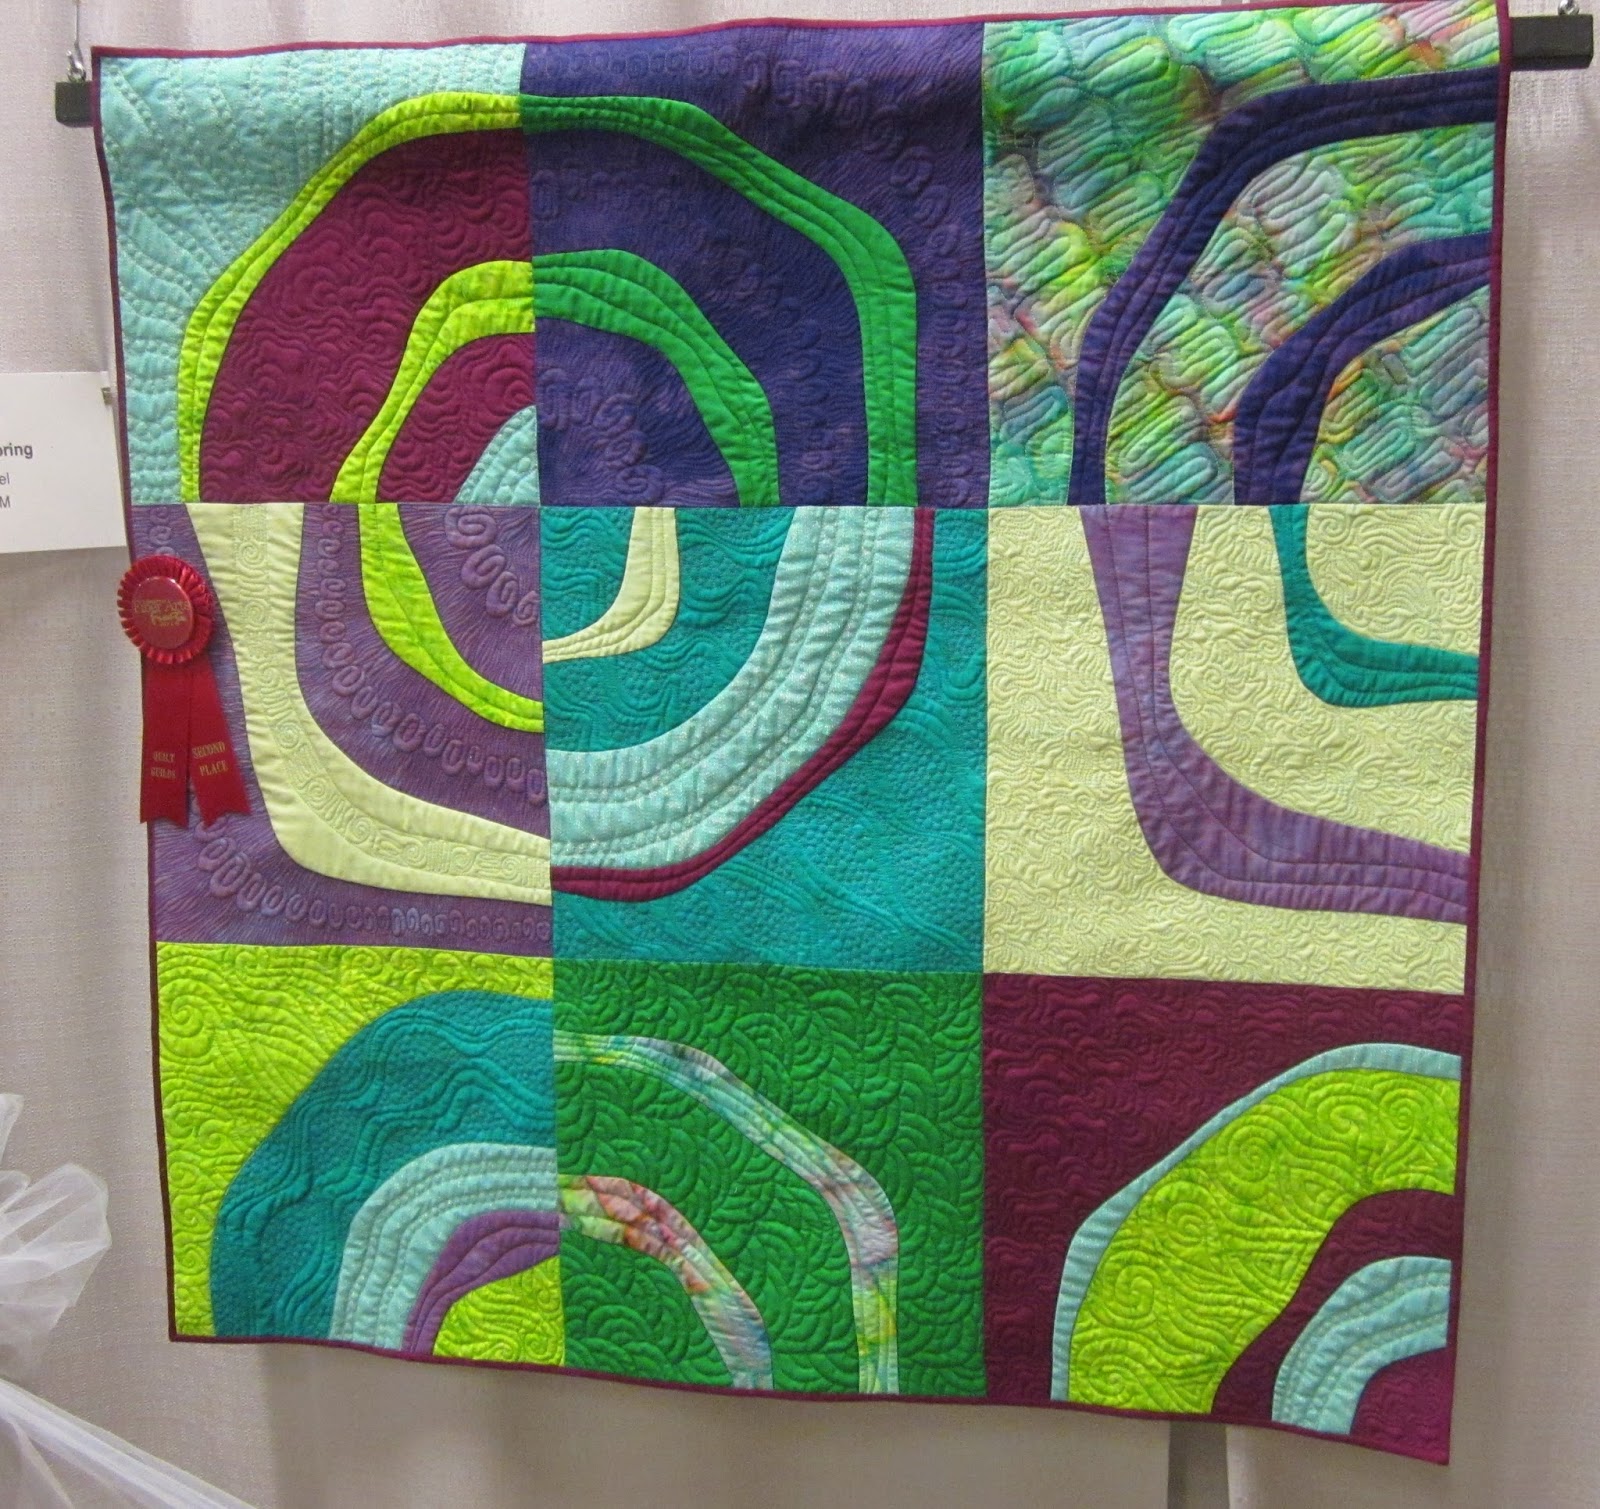
Squirrel? Yup. I saw one and got sidetracked. . . tends to happen a lot these days :) I was happily quilting along on Nod to Gees Bend when the paint dried . . . Paint? Yes, remember these?


Well, the paint was dry so they had to be cut out right? . . . and then I had to start playing with them right? . . . Yes! :) So here are a bunch of process pictures. And the final piece. Sit back and enjoy the show. . . picture heavy, word light . . . until you get to the end of course ;)


And the back. This is a piece of Voile left over from the backing of the Rose Linen quilt. Yes, I know, I have not done any updates on this in awhile. . . that would be because I saw a couple of squirrels and have not gotten back to it. . . soon. Very.Soon.


The quilt finishes at 21"x17" and I used only three threads. Aurifil (red) in 40 wt, Isacord (copper) in 50 wt, and Aurifil  (yellow) in 40 wt.

The red piece is from a fat quarter bundle purchased through Massdrop (Seriously need to stop looking at their emails!! It is is obvs that I have NO self control when it comes to their offerings....). I know it is from a line called Plaster of Paris, I have no idea what color it is. The purple pieces were painted (Shiva Iridescent Paintsticks) on a fat quarter of purple Kona. . . color? Ummm. . . not.a.clue.

This is my practice piece. I learned a LOT! While I have not painted another set, I am planning the next go around :) Here is what I learned:

The pieces were first backed with Steam A Seam II. I've never used it before this. I figured how hard can it be? . . . Well, thinking about the process and what exactly the product does, might have been a good idea. . . I cut a piece the same size as the fat quarter and figured I'd just cut the pieces out after this step was done. Glad I did it this way - cutting out those pieces more than once would not have been fun. First glitch. . . Ummm, I almost didn't share this because well, I feel more than a little foolish BUT in the interest of staying humble and hoping someone might learn from it. . . I started ironing and it wasn't sticking. . . so I held the iron longer. . . still not sticking. . . did I get defective product?? . . . What is the problem?? Steam a Seam has paper on BOTH sides. . . removal of one side is required prior to ironing. DUH! Also, if you repeat my blunder. . . it's a good idea to wait until all that previous ironing has cooled before you rip off the first sheet to expose the actual product. I'll leave it to your imagination as to what happens if it's not back to room temperature. . . Yes, it's as bad as you imagine!

That disaster is over, time to cut out the pieces. I think the best way to go for this (as confirmed by my friend, Wendy) would be a clear acrylic ruler and a rotary cutter. Marked rulers don't work very well because you can't see what's under the ruler as well as you would if the ruler was completely clear. I didn't have one so decided to use my scissors . . . Probably not the best idea especially if you are aiming for perfection/accuracy. Things aren't going to line up well if the pieces aren't accurately cut. . . Lesson learned. Clear ruler on order ;) Also, this was the part of the process that was the least amount of fun. And I'm putting that nicely. This part sucked IMHO. But the results are so amazing, must do another!

Time to play! When the other side of the Steam a Seam is removed, the piece has just enough stickiness to it to stay exactly where you put it. . . and if you don't like where you put it, just move it, it will still stick! Perfect for trying to determine layout and perfect for not having anything move while getting the piece back to the iron. I did mark some registration marks on the quilt before I started this. Marked center. Marked a circle in the center and also marked a line corner to corner and then another half way between the center and corner from opposite corner to opposite corner to mark diagonals. Additional registration marks that would have been helpful? Because of this layout, a couple of circles radiating out from the center.

This is the first time I have ever done aaakkkk plique. . . That is a real term, coined by Sandra, I believe :)I have to say. . . it wasn't so bad! I kind of liked it. . . and I learned a lot about the decorative stitches on my machine - not one of which I had used up to this point. . . don't judge ;). I learned much about turning corners, stitching around curves and generally making the machine stitch where I wanted it to stitch. It's not even close to perfect (not that I thought it would be) but it turned out way better than I thought it would :) I decided to sandwich the quilt and then do the applique stitches. It is worth noting that I would not have had to do this step - the Steam A Seam will hold the pieces in place through washing . . . but it needed stitches right?? :)

I used a short ruler for the echos around the pieces. I've never done that before, it worked really well! Again, more practice is needed but provided a little more consistency in the width of the echos. I will be doing that again. I learned that little trick from watching Gina Perkes doing a demo at the Phoenix Quilt Guild quilt show. She of course makes everything look very easy. This actually was :)

Have you ever looked at a quilting design and thought "I really like that, I don't think I would ever get it to look right...." I have said that many times about the design I used on the background. I was shocked. This is a very forgiving design. I was surprised by that. I toyed with many ideas for the background quilting. I did this in one of the smaller areas (third picture) first. Looked at it for a couple of hours, asked opinions and then decided to keep going. I'm glad I did. I'd probably still be ripping that area had I not pushed through :)

This sucker was NOT flat when I finished - not.at.all! One of the things that needs to be dealt with when quilting this heavily. Here's what I did - and it worked really well! First I pinned the quilt to my design wall, getting it as flat as I could. Then I steamed it. HEAVILY. Then I left it pinned up until it dried. It still had a few places where it did not want to lay flat. I laid it out on the ironing table and steamed the crap out of it again, this time ironing a little as I went. The batting in this is wool. Wool batting does NOT like a hot iron. It flattens out and nothing I have tried brings it back to the loft levels it had pre iron encounter. If you know a trick around this - please share!! Anyway, after going over it, letting it dry, repeat, repeat, it is laying very flat. I didn't think it was going to be possible. I wish I had a picture of how wonky it was. . . . alas, I did not photograph it. Oh, and I did this AFTER I put the binding on.

So there you have it! There were more lessons with this quilt, I'll spare you. . . this post is way too long already! This week it is back to work on quilting Nod to Gees Bend. And I may have pulled fabric for a new quilt. . . yes. I did. I pulled fabric for a new quilt. . . The question is, will the quilting be done prior to me starting that quilt??? . . . . I don't think that would be a safe bet ;) Stay tuned, I'll post in a day or two - even if it is just the fabric pull :)

Linking up with Beth for MCM and Judy for DWM! Also linking up with Amanda Jean for Finish it up Friday. Check out all the eye candy out there!!

Until next time, keep on quilting!
Follow on Bloglovin


Friday, June 5, 2015

Friday Finish! Wind Swept

It's Friday and I have a finish to share!! WOOHOO! Good thing I took pictures yesterday - it is pouring rain this morning - double WOOHOO :) We get excited about these things in the desert! And in case you are wondering, yes, we went bike riding in the rain this morning. It poured all the way down the mountain :)

OK, the maple leaf quilt? I'm tired of calling it that. So I named it Wind Swept. I thought it fitting as there doesn't seem to be much of a discernible plan in the layout :) I had mucho fun quilting this quilt! I initially was going to do some 'ghost' leaves in the negative space. And then I decided the quilt had enough leaves, it needs swirls and lines to get those leaves moving :) I used 11 bobbins of Glide 40 wt thread in light gray in this quilt. A multitude of various colors of Aurifil thread matching the leaves and Aurifil Salt and Pepper variegated for the negative space. I'm not going to apologize for the picture heavy post. Check it out! :)
The crinkle factor is seriously awesome!!! I kinda squealed when I took it out of the dryer :D
I did various spiral designs in the negative space. I'd get tired of one and do something else :)

I decided to do back and forth squiggle lines in the background fabric of the blocks. I think it works with the spirals to keep the eye moving.

I was a little worried about the amount of quilting I did in the leaves (too much.... who moi??) but when I pulled it out of the dry and saw how it crinkled - I was more than pleased!

I can't stop running my hands over those leaves!! :D

Yeah, I kind of had fun taking pictures of this one ;)

It was surprisingly hard to get a picture in which the quilting is visible on the back. I can assure you, it is visible! I used a wide backing for this one.

Detail shot. The quilting is a little more visible in this picture.

I decided to try laying it over the oleander bush. Kinda cool.

And one more. . . just cuz :D
Quilt Stats:
Size - Finished Flimsy - 61" x 73"; After quilting - 59" x 71"; after washing 56" x 58"
Batting - Quilter's Dream Wool. . . we don't even have to ask that question about my quilts - it's all I use. LOVE it.
Thread - Various weights and colors of Aurifil cotton. Glide gray on the back. I'm going to say that my machine doesn't like Glide. . . Every so often (it happened three times on this quilt) I'll get a good size thread blob on the back. No rhyme or reason as to why and not really any indication that anything is happening (no machine noise changes). It's the thread. I'm a good ways into quilting Nod to Gees and have not had this happen once with Aurifil in the bobbin.
Pattern - Hmmm. . . inspiration came from the many Modern Maples quilts around blogland. I decided to make 12" and 6" blocks for mine and then played around until I arrived at an arrangement that I liked.
Fabric - The leaves are all Handspray from RJR - this fabric is fabulous!! The background fabric is Quilter's Burlap in Pewter (Robert Kaufman). The backing is  Signature Collection Circles purchased from my new very favorite go to store for quilt backs - Back Side Fabric. Yvonne turned me on to this shop and I am in love! They ship FAST! I ordered Friday late morning, it shipped Saturday morning and I had the backing Monday morning!! Seriously gotta love that!! I may have gotten another order of wide quilt backs from there yesterday ;) Scrappy binding made from the Handspray fabrics used for the leaves.

This quilt is being boxed up and shipped off to my niece today :) I did a little inquiry about what colors she might like. . . I was told browns and blues, not a lot of color. . . oops :) There is a little blue and some brown in there! I'm pretty confident that she will like it ;)

I'll be updating you on the fabric painting and the quilting of Nod to Gees Bend in the next couple of days - I think I might just be on track for another Friday finish next week!!

Linking up with Crazy Mom Quilts for Finish it up Friday! Have an awesome weekend and until next time keep on quilting!!
Follow on Bloglovin

Thursday, June 4, 2015

Shopping at the Albuquerque FAF!!

What's almost as good as seeing quilts at a quilt show? The shopping!! :D It is amazing how many things can just jump right into a girl's shopping bag! 

The first thing we did was try out the Innova long arm quilting machines. . . I tried the sit down machine while Wendy tried out the long arm. Impressive. Very impressive. I might have fallen in love with it! So much so that I would want to use it over my Janome? No. Then, I tried out the long arm. Again, stitches are absolutely beautiful and Innova has a pretty awesome machine. After playing on it for awhile, I came away with the same thought that I had when I tried the Gammil in Phoenix back in February. I don't know that I would ever have the control I have with my domestic. The dreams of owning a long arm are slowly fading. I will still do the three days on the long arm with Gina Perkins in July. I'll keep an open mind ;) For now however, I do not think there is a long arm in my future.

Well, with that decision made, I just saved a LOT of money right?? So there were a few things (besides the paintsticks and the rubbing plates and the stamps I showed on Monday) that happened to jump into my shopping bag. . . one thing didn't fit in the bag. . . First up, I bought a new sewing chair!! LOVE this chair!
We all know I am not a flowery girl, but this fabric makes me happy for now and if their comes a time that it doesn't - I'll recover it :D
And there is storage!!
They only had one white one left. And it had a hexagon print with a white background. . . I was not loving it. When I said I wanted it, one of the guys noticed that the hinge was broken. He said no big deal, we'll just swap out the seat. . . Wait, whu whut??? Ummm, can you change out the back too? ;) There were a couple of black based chairs that had this print on them, and they happily changed both pieces for me! SCORE! :D I initially thought the wheels made the chair too high. But now that I have been using the chair for a couple of weeks, it is perfect! And I love the wheels! It's the little things people! 

I bought three 3.5 yard pieces of silk/cotton blend fabric. This is as yummy as fabric gets AND it is washable! :) Not sure what it will become. . . I'm thinking whole cloth quilts will be made from this for sure but I also think it will be cool to throw some pieces into a quilt to add interest. . . Ideas are still forming for this.
The warp and weft are different colors so it has the same depth as a shot cotton. These have black in the other color - makes them glisten!! :D
I bought these pieces at the same place I bought the paints and stamps. I might have gone on her web site when I got home and bought more stuff. . . for my new painting addiction. LOL 

Last but not least, I spent the time to actually listen to the entire pitch of the Martelli Mat guy. . . We all know I do not need a cutting table and he really wanted to sell both Wendy and I one - but neither of us were interested. But those mats! And the rotary cutters. . . now those proved to be a little too tempting! We both bought the extra large mats (60" x 36"!!!!!!). They are on back order so I won't have it for about another month but that's OK, I have a mat that is doing just fine until then :) Part of the deal was the rotary cutter and the strip cutter. . . if you have not seen these mats in action, take a minute and watch this video. The first 4 minutes is on the strip ruler that I have. . . only mine is white. OMG! I used the mat and cutter to cut the binding for the maples quilt (I really need a name for that!!) and not only was every strip exactly the same, it was FAST! I was cutting 5 and six layers at a time!! How did I live without this strip cutting mat and the rotary cutter??!! And seconds before the show closed, I bought the square templates. Wendy made me do it. ;) And after using the strip cutting mat, I am SO glad I did!! Here's a short video on the cutting templates. I am not affiliated in any way with Martelli. I am a happy customer and you know I'm going to share anything that makes my life easier! 

OK, that's it. That is everything I bought. (Oops, I bought a left handed rotary cutter too. . . I am left handed, but I can and do cut with both.) Doesn't sound like much does it? And it really doesn't sound like much when one considers I saved my self thousands of dollars by not buying a long arm!!! LOL I will say that the Marelli products are expensive. But I will also say that I have no buyers remorse :) 

I'll be linking up with Kelly for NTT.

Until next time, keep on quilting!!
Follow on Bloglovin

Wednesday, June 3, 2015

Albuquerque Fiber Arts Festival

OK, enough with the procrastination on this post!! I wish I could say I have gotten a lot done due to not being on the computer for the past couple of days. . . I cannot. I did get Nod to Gees Bend basted and started quilting. . . and then ripped it all out! Do you ever have a 'great' idea and then get into it and decide, nope, not right? That's what happened and now I am back at the 'drawing board' waiting for a little inspiration to hit. . . maybe it will hit today while I play with my painted fabric ;)

I went to Albuquerque to the Fiber Arts Festival! What a feast for the eyes! I had to walk around with my hands in my pockets - it is SO hard to resist the urge to touch all of that quilty goodness!! :) I had two quilts juried into the show:
Off Course
Renaissance
After seeing all of the quilts hanging in the show, I was truly honored to have my quilts accepted! I didn't win any ribbons but honestly, with the quality of the quilts hanging in the show, I felt like having my quilts hang in the show was a huge win! I took some photos of my favorites, but if you really want to see the majority of the quilts hanging in the show, Sophie over at Sophie Junction has added her photos to a Flikr photo album. She has a TON of pictures and quite honestly, I am pretty sure I saw all of the quilts more than once and she has photos of quilts I don't remember seeing! And they are awesome photos with really great detail shots - it is definitely worth a look to see all of the amazing quilts that were hanging at the show! I am more than a little sad that I didn't meet Sophie at the show :( It didn't click with me that we were both going to be there (I'm sure we passed each other on more than one occasion!) or I surely would have made arrangements to meet up. There is always the next show in two years! :D

First, I went to the show with Wendy (my quilty friend that I met at Cindy Needham's class in January). Wendy had three quilts hanging in the show. . . and they ALL got ribbons!! How awesome is that??? Wendy's work is spectacular and she has the ribbons to prove it! :D Here are my photos of her quilts, but seriously, check out Sophie's album for some spectacular close up shots!

Umm. . . I've been through all of my pictures. . . I am red faced. . . I don't have a picture of Wendy's third quilt :( Sorry Wendy, I'm going to blame it on the sheer excitement of seeing all of those beautiful quilts. . . and the ensuing shopping frenzy! LOL

On to more pictures! The most exciting thing about going to the show? Meeting Renee (Quilts of a Feather)! We met up at the show on Friday and had dinner on Friday night and we were able to walk around on Saturday looking at the quilts! Meeting blogger friends in person is SO awesome!! If you ever have the chance, DO IT!! :D 
Renee with one of her entries, Crystal City :)
And here is Renee's other entry, Flying North
Renee also quilted the banner for the Albuquerque Modern Quilt Quilt booth! It is AMAZING! Check out her post for pictures :) Renee's quilting is even more amazing in person! The talent is just oozing out of her!! OK, enough gushing, I don't want to embarrass her, but she really is an amazing quilter and just an all around sweetheart!

Here is a taste of some of the other quilts that were at the show. I have listed the information on maker when I was able. Again, Sophie did an awesome job of getting the names of makers and quilters for all of the quilts she photographed. 
This quilt won for best HAND quilting. . .
Umm, yeah - HAND quilted!! The detail was amazing. I can't imagine how long this must have taken!
Gail Garber made this beauty. First place in small art quilts. I stood in front of this quilt with my mouth hanging open for a long time! They almost called security ;) LOL
This was the first quilt I saw when I walked into the door! I might have started hyperventilating a little and there might have been a skip involved ;)
My slant toward the love of modern quilts might show through in my pictures :)
All Kaffe Fasset fabric - LOVE!!
Gotta love the curves in this piece!

And the quilting is spectacular!
Afton at Quilting Mod had three quilts in the show. This is the only one I captured. I briefly met Afton as well, she was busy at the AMQG booth :)
This quilt was hanging next to Off Course. I could not stop looking at it!! Beautiful colors!

And the quilting!! Oh my!!
I have seen this quilt on the net. It is amazing in person!!
And the quilting!!! OMG, the quilting!!!!
That concludes my little mini showing of the quilts at AFAF. Please do go look at Sophie's pictures - they truly are awesome and it really is worth the time to take a look :) Check out the best home machine quilted quilt. . . That's some serious quilting and this was NOT a small quilt!! :)

This post is long enough. . . maybe too long! :) I'm going to write another post on the shopping spree that ensued! :D I think it is deserving of its own post! LOL

Until next time, keep on quilting!!

Linking up with Lorna for Let's Bee Social! In need of more inspiration? Head over and see what everyone is working on!!
Follow on Bloglovin

Monday, June 1, 2015

DWM - Painting and Quilting`

Memorial weekend I went to the Fiber Arts Festival in Albuquerque. I was humbled that two of my quilts were juried into the show! Seriously humbled! Wow, the talent displayed at the show was astounding! I will post pictures of some of the amazing quilts I saw tomorrow. . . .

After being completely overwhelmed by the beauty of the quilts, we just had to see what the vendors had to offer. . . and support them as best we could :) As I was walking through I saw these quilts:

These blocks are not sewn!! They are painted. Cut into pieces and then attached with SteamASeam. Find out more at Laura Murray Designs (these are her quilts shown in her booth)
Ummm. . . O!M!G! Must do this! Maybe not that exact quilt but must try this technique! I bought some Shiva Paintsticks, some rubbing plates, some stamps. . . and a couple of 3.5 yard pieces of absolutely beautiful cotton/silk blend fabric might have been purchased. . . OK, not might, were grabbed and added to the list of fabric I must use soon! :)

I finished the maple leaf quilt on Saturday and yesterday I busted out the paints! I have no idea what these are going to turn into. My goal was just to play with a couple of the rubbing plates and stamps to see how this works. This is seriously cool!! I did two pieces and it took me all of about an hour. Mostly because I had no idea what I was doing and was totally playing with the colors to see how they mix directly on the fabric, how hard to press (or not press) and getting used to not doing the back and forth coloring that seems to over take me when I get a "crayon" in my hand ;) Strokes should go in one direction.
I used the stamp, all of the rubbing plates and of course the Shiva Paintstiks

Results of all of the rubbing plates being positioned next to each other and covering with a piece of black Kona. Be still my heart!!!
This picture is very washed out.... desert, sun, to excited to wait to take pictures. . . The contrast is much better in person. These will but cut out and made into stars :D
I might need more paints. . . and a plan!! :D SO much fun!! I have no idea what either of these pieces will become, but I think this first test is a success. . . at least in terms of me loving it!! Laura has a learning page on her site. If you are interested in learning more about how this works, she explains it way better than I can ;) And, there are lots of Youtube videos on this subject as well.

I bought my rubbing plates and grip mat (this is put under the stamps/rubbing plate to keep them from moving around) at Dharma Trading Co. If you are interested in any kind of fiber art, this online shop is worth a visit! Shipping was fast and the prices are good. No affiliation here. Just a very happy customer after my first purchase!

As I said, the maple leaf quilt is finished. It needs to have its photo shoot and then I will post the finish. Look for that post later this week. I am now going to get Nod to Gees Bend basted and commence quilting :) Why not play more with those painted pieces? Well, the only downside for a more impatient type like myself is that the paints need to dry for 2-3 days! That seems like an eternity!! But then I will heat set them with my iron and those paints are permanent. Awesome!! :D 

Linking up with Beth for MCM and Judy for DWM. Head over to these blogs for more inspiration!

Until next time, keep on quilting!
Follow on Bloglovin