
I am so excited about this finish! My head is still wrapping itself around all of the things I learned in Cindy's class - both from Cindy and from the other students. That was another wonderful thing about a live class - the sharing of information was constant! Talk about information overload!! In a really good way :D Here are the pictures and then I will share with you some of the major lessons I learned in the process. Umm, this post is a little picture heavy. . .


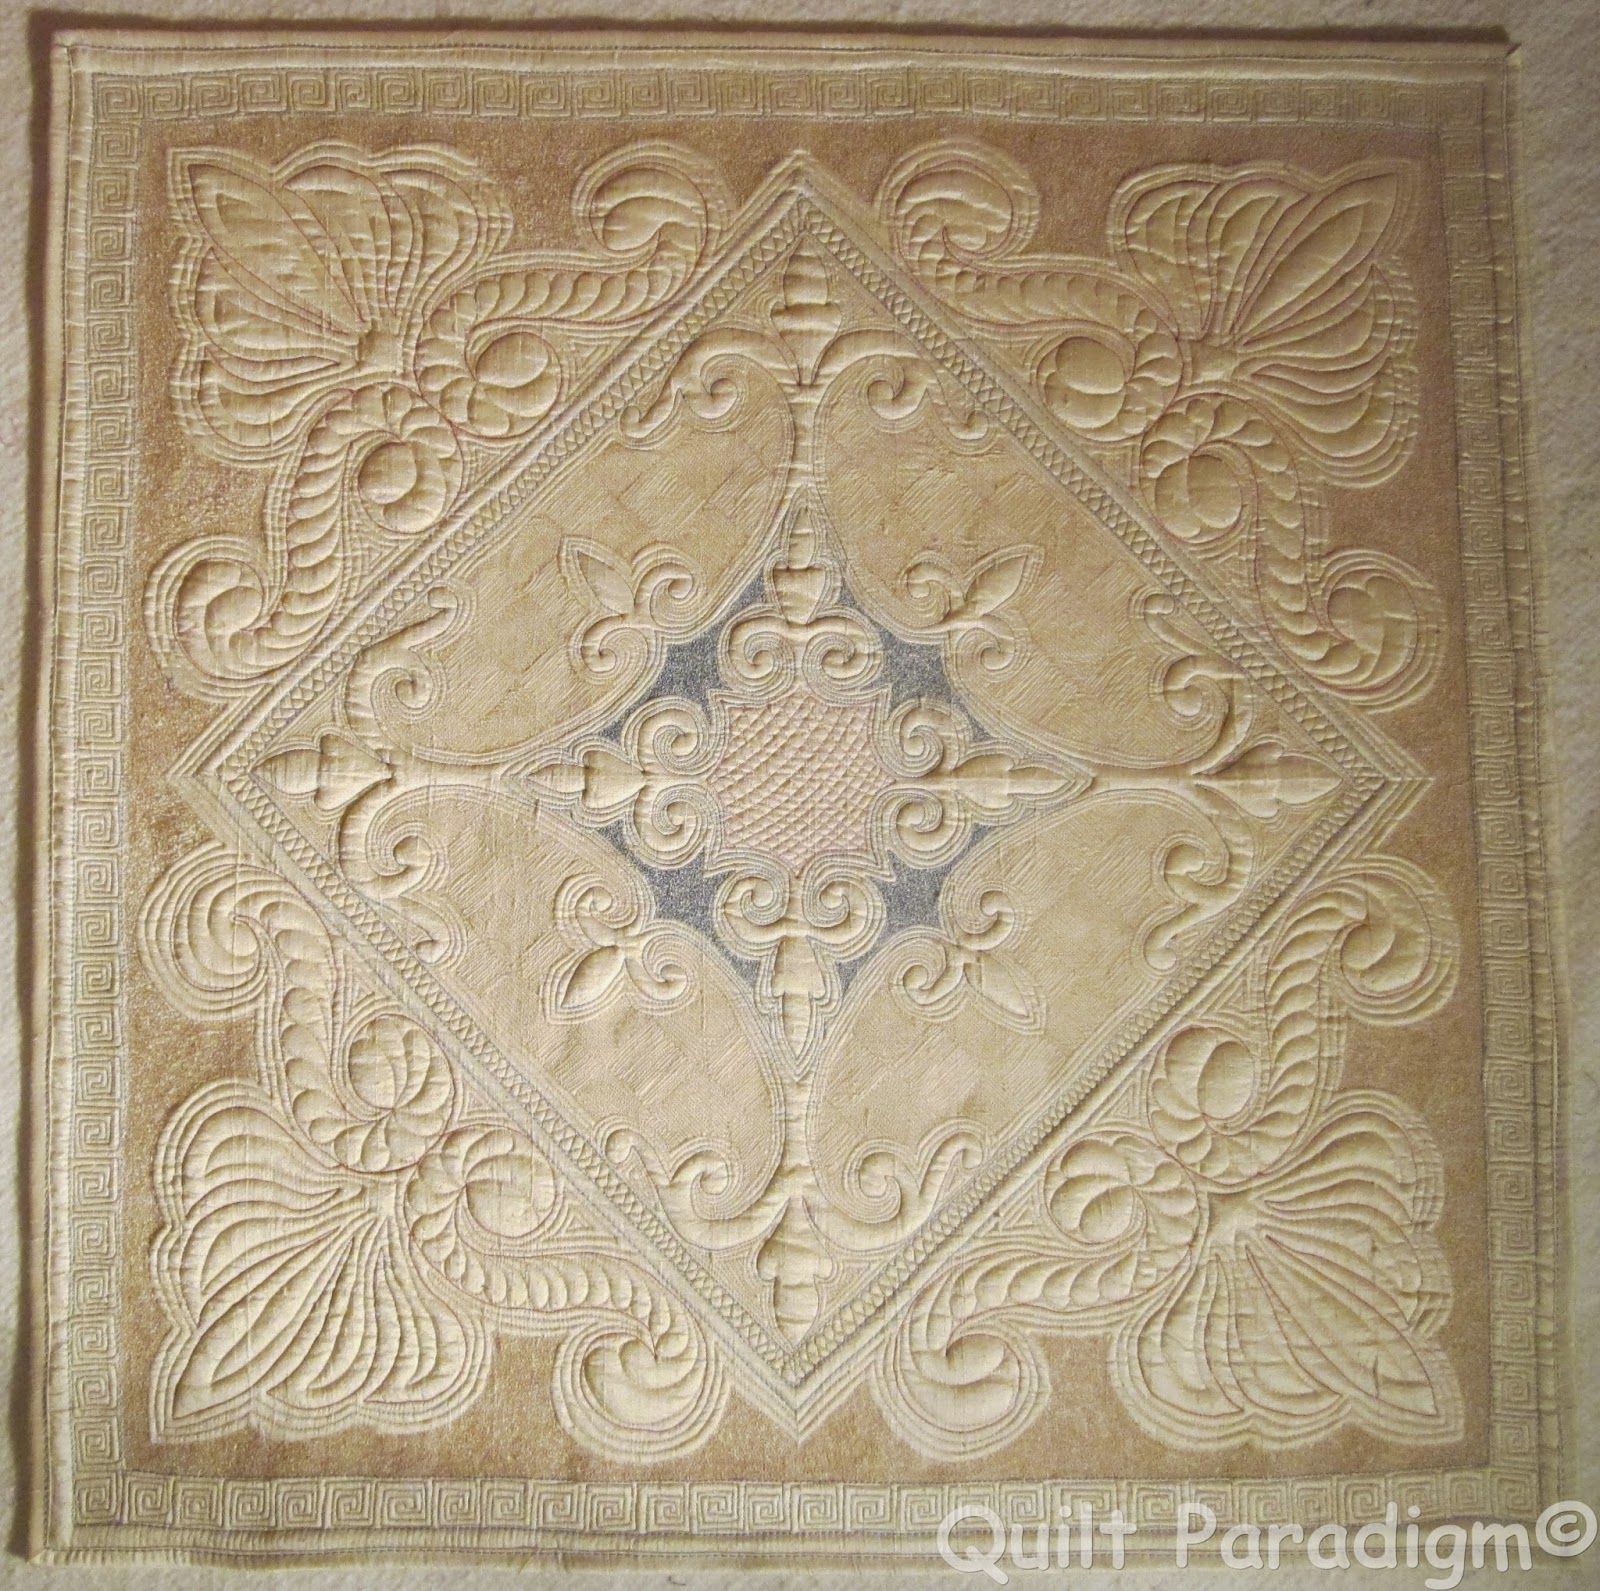


Size: 30" x 30"
Fabric: Dupiani Silk for the front and binding (I used every inch of a 1 yard cut and got REALLY lucky that I had enough for binding! No left overs with this one!!) and the backing is from my stash.
Thread: Let me count the ways! Middle lavendar and blue just outside of that is Isocord 50 wt. The scrolls were outlined in a Superior Thread Rainbow. The blue border outlines were done in 12 wt Aurifil (LOVE!!). The ribbon candy and square spirals were done with Superior Thread Metallics. The red outlining the palm prongs is King Tut 40 wt.
Batting: Quilter's Dream Wool. . . of course ;)
What did I learn in making this quilt? Biggest lesson, if you have a chance to step outside your box and comfort zone, DO IT!! I came very close to deciding not to go to the class. I would have missed out on so much!
This quilt design was done 100% with stencils! Isn't it amazing what you can do with stencils?? I had tried stencils in the past with way less than spectacular results! I now find myself looking at them in an entirely different light . . . and yes, there might be one or two new ones on their way to my house ;)
The order of quilting when doing a WCQ is important. . . I wish I had known that when I did the family tree quilt! The rule of starting from the middle and working out (on a domestic) is thrown out completely. The 'big bones' of the quilt are done first (for this one I did the inside scrolls first and then the palm prongs around the outside). Then go to the secondary lines - like the blue borders in my quilt and the echoing. Then the fill can be started. At this point the quilt is completely secured so it doesn't really matter where you start filling.
Fills take time. . . and thread. . . and patience! :) And they can be done too densely (I think the scribble fill that I did in the blue and around the palm prongs could have been a little less scribbled) but once you have started it one way - you are committed. . . ripping is NOT an option. Especially on silk. I also think that the lines on the cross hatch fill could have been a little farther apart.
Doing some semi dense quilting around the outside border of the quilt helps with getting it squared up and with binding. I mean quilt where the binding is going to cover - tack that outer edge down enough so it is not bobbling around just looking for the chance to form a tuck when the binding is attached.
There were many more things learned while making this quilt. It's my first one and I certainly was not expecting perfection. It has been a wonderful learning experience! I already have my next several in the planning stages. . . they will involve linens!! More on that soon. . .
Linking up with Finish it Up Friday. Always SO much inspiration to be found on Fridays!
Until next time, keep on quilting!

Judy, this is incredible! And your pictures really show the texture. Is it cream or a golden tan? Looks like your machine got fixed quickly. I totally love it!
ReplyDeleteThis is just spectacular! I would love to take a class like this! Just beautiful.
ReplyDeleteThis was just wonderful to see. what an achievement! It sounds like you had wonderful fun with an amazing class and ended up with a spectacular quilt. Great!
ReplyDeleteWow, Judy!!!! This is so stunning. I love that you stepped out of your comfort zone to take the class and jump right into this beautiful quilt. :)
ReplyDeleteFirst word that comes to mind STUNNING, then CLASSY and DROP DEAD GORGEOUS! You should proud and excited--Masterpiece!
ReplyDeleteYou should be very proud, it turned out fantabulous!!
ReplyDeleteOMG that is spectacular. It is certainly a masterpiece and I can see more in your future. Hope it has a pride of place to hang.
ReplyDeleteJaw droppingly beautiful Judy! You must be so thrilled! I'm so surprised at the tip about not working from the center out. Who knows kiddo - someday You might be teaching one of these classes.
ReplyDeleteYour quilt is beautiful. I love the touch of blue thread! Can't wait to see what you do with the linens.
ReplyDeleteWhen I saw the thumbnail of this on my feed, I sucked in my breath. When I opened this up on the laptop (no iPad for this beauty; needs the full screen) I said audibly, "ohhh..." If I could see it in person, I'd probably starting crying. This, like Paula Nadelstern's kaleidoscopes, is orgasmic quilting. Just sayin' . (you can remove that if you like, but it's so true) Utterly takes your breath away. There's so much to look at, admire, appreciate. Where are you going to hang it?
ReplyDeleteWow, that's a lot of work. It makes me think of tapestries hanging in castles. Great finish!
ReplyDeleteWOW! this is gorgeous!
ReplyDeleteStunning!!
ReplyDeleteWHooooooo how beautiful!! was this done with a standard machine or longarm?
ReplyDeleteWow!! Stunning, just simply stunning! Well done!
ReplyDeleteThat is just SO amazing!! I am glad you shone lights on it. It is just... Wow!!! ... I Love it!!!
ReplyDeleteOh this is gorgeous! You are amazing! Thanks for all the great tips too!
ReplyDeleteWell, you've done it again, Judy...!!! Amazing quilting, and great tips.
ReplyDeleteDid you keep track of quilting hours? (How are your shoulders?!?) Spectacular!
Beautiful!
ReplyDeleteWow this is amazing. I love the detail and it looks even more regal to me now! Great stuff and really inspiring!
ReplyDeleteWow it is gorgeous!
ReplyDeleteOh wow what a incredible job you have done!
ReplyDeletewow, what a wonderful.
ReplyDelete