Wednesday, April 15, 2015

WIP - Linen and Product Review

It's Wednesday (very observant of me don't you think??). We are half way through the week and it is tax day in the U.S. I hope you all have wrapped up your 'tax stuff'' and can enjoy the day :)

I am continuing to work on the linen. Not much has gotten done since my last post but I really wanted to share with you this new to me amazing product. No, I'm not being paid, not being sponsored, not in any way affiliated with the company. I'm keeping it real here folks. Not only is the product amazing, the customer service is nothing short of spectacular! You are saying enough with the build up already! What the heck are you talking about??? Blue Line Eraser. It.Works.
Great product, great customer service. I'm giving it two thumbs up :)
I don't know about you, but as soon as I'm done quilting marked areas I want those marks gone. Right.Now. I have had some hold my breath and hope the heck it comes out this time moments with the Mark B Gone marker. Spray, dab, yup, blue is gone but then when it dries. . . blue is back. Uh, no I said BE GONE! Repeat spray, dab, yup, blue is gone. . . dries, blue still there. . . I don't know about you, but I get REALLY annoyed!! And a little freaked out - what if it doesn't go away??? I remembered this review at Late Night Quilter. I headed over to Blue Line Eraser and ordered some on Saturday morning. Within the hour I received the notice that it had shipped!!! What?? Now that is service!! 

Here are the before pictures. 
This is after three tries to remove the marks with water.
Notice one side is echoed, one is not. . . Oh yeah, this part is about the blue! ;)

There were blue spots like this all over the quilt. You get the picture. I was not happy.
Here are the after pictures!
Yay :) You might notice a bit of blue on the left in the middle of the two smaller leaves. That was a stain in the linen. I have no idea what it is, could be ink, could have been from candle wax. I was hoping maybe this could be removed as well (I have tried a LOT of different things to get this out). It is lighter. I might just keep spritzing it and see if it goes away altogether :)

I even turned on the industrial lights for these pictures :) No.Blue.Lines :D

And one more. Three before, three after ;)
YAY!! :D I don't think I need to say any more, a picture is worth a 1,000 words! Except that I wish I had taken a picture of where the blue bled onto the white scroll lines. . . I didn't take an after picture because I have no idea where those places were now! Yes, I'm a happy camper and wouldn't hesitate for a second to recommend this product. 

Just a few pictures as an update as to where I am with quilting. The last couple of days have not been extremely prolific in the quilting department. . . but there is some progress :)
Here is a picture of the roses prior to my quilting in the leaves.
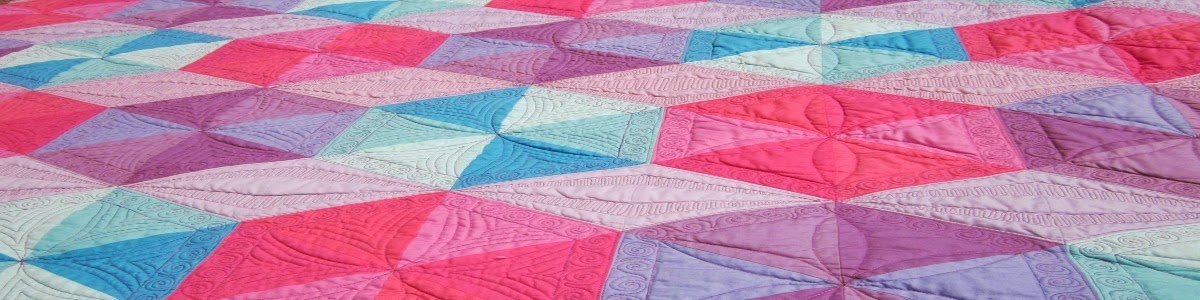
And after. The dimension just that little bit of quilting in the vein lines is pretty amazing.
Here it is at the same angle as the first picture. I took this picture prior to using the Blue Line Eraser so if you are seeing blue, that is why.
And one more picture. . . just because I can :) OH, look at the white scroll on the right side, BLUE! It is gone now :)
As you might have noticed  in the before blue and after blue pictures, I have also finished some echoing. I want to finish one side of the quilt with the echoing and then share with you the difference between the two sides. Angela Walters said in a recent post, echoing is your friend - I could not agree more!! :)

Linking up with Lorna for Let's Bee Social and Lee for WIP Wednesday. And Amanda Jean for Finish it up Friday - this product will help you finish it up perfectly!! :) Head over and check out what others are working on this week! 

Until next time, keep on quilting!!
Follow on Bloglovin

Sunday, April 12, 2015

Linen and Quilting

Before we get to quilty stuff, I just want to welcome new followers and thank my followers that have been around for awhile. I am approaching 200 followers for Bloglovin'! I am humbled and amazed! The quilty blogging community has been so accepting and so giving. I am grateful to be a part of it and have you ride along on my journey :)

This post is picture heavy and maybe word light. . . I don't know - I haven't written it yet! Because I have been taking a ton of pictures as I go with this one, I know it is picture heavy :) A short background (if you already have heard this, feel free to skip it I won't feel bad I promise!). I took a whole cloth quilting class with Cindy Needham (live and in person! EEK!) and during the class I called my mom and asked her to go through her linens and see if there was anything I could quilt. About a week later, I received several linens including this one:

I really wish you could see this in person. I have no idea how the roses or the gray was 'printed' on the linen but it is fabulous! The linen is quite heavy so did not require any underlay or secondary fabric behind it to make it more substantial.
I pulled this out of the package and squealed :) Lots of negative space (you know that gets me excited) and those flowers are just SO beautiful! After this picture was taken I starched and ironed it. Then started playing with how to quilt it. Stencil(s) would be used. I knew that. After asking for opinions (thank you again for all of your comments!!), I chose the main stencil and started drawing. I ended up with this:
I know it is hard to see but you might get the idea of where I was going :)
Let's back up to shortly after I received the package. I was talking to my mom and she casually tells me that she received this table cloth as a bridal shower gift. . . wait, what??? Are you kidding me?? I asked for linen you didn't care about! Something I could play with. . . this does NOT meet those requirements! This is when the doubt and yes, more than a little fear took over! And it stayed on my design wall in this state for awhile. . . I started and finished another top (A Nod to Gees Bend) and finished piecing and quilting Shock Waves (check out the post and Yvonne's fabulous pattern!!) .  . and looked at this linen every day thinking "How in the heck am I ever going to do this justice??" Once again, I received a lot of cheering from the 'bleachers' :) Thank you for that! Deep breaths. Time to baste. I used a double bat, wool and 80/20, both Quilter's Dream. I decided on Voile for the back (have you ever used this stuff for backing??? OMG! Slides through the machine like a hot knife through butta!! And it is 60" wide - no piecing the back!). I spray basted AND pin basted. . . paranoid? YES! More deep breaths. More walking around it. . . . drank some water. . . toweled off . . . pep talk. . . here we go! :) The rest of the post will be pictures with the steps described in the captions. So much for not being a word heavy post!! LOL

Middle portion of stencil work outlined. That didn't go so bad! And I LIKE it!! :) Next up, outline those roses. . . umm, following a drawn stencil line is pretty straight forward. . . outlining? More deep breaths. . .
First one went pretty smoothly! I actually think I got this part! And look how those roses just jump right off the linen!! AWESOME!
Different view. That might look like a big wrinkle in that large rose - it is the angle of the camera, there are no wrinkles so far. . .
Umm, yeah, lots of threads to bury. . . I used this technique and it went pretty quickly and there is no sign of where my starts and stops are - HAPPY DANCE!!
On to the outside border portion of the stencil work. You might notice I am working around the quilt in a balanced way to reduce the chances of it going wonky during the quilting. Going 'big bones' to 'small bones' as Cindy teaches. The quilting so far is all considered the big bones.
Stencil work outlined!! Seriously loving how this is looking! What's next? Umm, do you see that little white scroll boarder? Yes, that needs to be outlined. . . Are you kidding me???
No. . . not kidding. This was my test run. O.M.G. My eyes are not made for this!! Add shadows from the needle and that not so distinct line between the gray and white and using thread that pretty much matches perfectly to a border that is just under a half inch wide (but those skinny little bits? About an 1/8"....), and you get sore eyes, headaches and fatigue...
BUT, you get AMAZING results!! :D It took about five hours total to do this border. I had to separate that out over two days. I need to go get my eyes checked ;)
And this is what it looked like yesterday afternoon :) SOOOOO much more to do. Sometimes it makes my head hurt :) But it is on to the next part!
I'll be posting again later in the week. Still working on tacking down those big bones. . . I thought I was done - turns out doing some work in the roses and leaves is going to need to happen before filling in the gray areas in the middle of the bouquets. I tried one little section, it pulls in and curls. It wouldn't do that if the area around it was quilted a bit more. I'm learning as I go here. And designing as I go (nothing new there right??? haha). So far I am absolutely loving the process. I may need to take a break from it at some point but I don't see that happening in the near future. It's so exciting to see it transform right before my very eyes!

Linking up with Patchwork Times for DWM and Cooking Up Quilts for Main Crush Monday (this is definitely my main crush right now so I thought it only appropriate!). Hop on over there and check out all of the awesome things other people are working on this week! 

Until next time, keep on quilting!!
Follow on Bloglovin


Tuesday, April 7, 2015

Triangle Transparency Blog Hop - Shock Waves - The Big Reveal!!

Today is the day! I have teased this quilt a couple of times, the latest was the finished back. In that post I discussed in detail the quilting. We aren't going to talk about that in this post. In this post, we are talking about the front and the pattern I tested,. Yvonne, over at Quilting Jet Girl, called for testers for her fabulous pattern, Triangle Transparency. My hand flew up so fast even I was surprised! If you have been following me for any length of time, you know that I am not a pattern follower. I couldn't resist the urge to test this pattern. Yvonne's quilt is just that cool! Luckily for me, my hand went up fast enough to get in on the testing :) Happy dance commenced!
Triangle Transparency
Yvonne's Triangle Transparency - LOVE!!!
 First, I followed every direction in the pattern (Stop laughing, I did!). It is so clear and well written and before I knew it I had all four 30" blocks made! I chose to do my quilt in two colors. I also chose to do the alternative layout in the pattern with the triangles pointing out (of course I did!). This decision was based solely on my husband's preference of the layout and marked the beginning of his intense interest in the design of the quilting. You can read all about that in the post about the quilting. Yvonne's instructions regarding fabric choice and color transparency is excellent. I spent more time agonizing over my fabric choices than I did piecing the top! But it was SO worth every second! The quilt came together perfectly. Maybe there is something to be said for following directions! ;) So without further chatter, here is Shock Waves!

Worth the wait? :)
Close up of quilting. The texture on this quilt is amazing! I used wool batting - even with quilting this dense, the quilt is still soft!
Another close up of the quilting. I did trapunto (a first for me) in the dark triangles. LOVE that extra pop!
And one more at an angle. Love this shot with the blue of the pool next to it :)
Quilt stats:

Fabric used (I've given as much info as there was on the salvage and bolt):
Background - Timeless Treasures Sketch in gray (Sketch is quickly becoming my absolute all time favorite background fabric!).
Light Purple - Kate Knight for Quilting Treasures
Light Blue - Salty Sand by Alexander Henry
Medium Purple - Scratch, Purple by
Medium Blue - Graffiti by Andover
Dark Purple - Painter's Canvas
Dark Blue -Essentials by Wilmintong

Batting - Quilter's Dream Wool

Quilt size: The flimsy was exactly 60" x 60" as the pattern indicated it should be :) After quilting and washing the size is now 57 1/4" x 57 1/4" - I really thought there would be more shrinkage due to the density of the quilting!

Threads - I forgot to put this in my quilting post. I used Glide (40 wt) for the gray and in the bobbin for the entire quilt. All of the colors are Aurifil, some 50 wt, some 40 wt, and the light blue is 28 wt. I used 20 bobbins. . .

Time spent: I didn't count hours methodically. The blocks were sewn in an afternoon. We then played around with layout for a couple of days. Sewing the four blocks together took about 30 minutes. How many hours in the quilting? My best guess is not a very good one. More than 50 hrs, less than 75 hrs.

I give this pattern two thumbs up, and two big toes!! ;) Seriously, if you have ever wanted to play with transparency, this is the pattern for you! I really think this pattern will appeal to the quilter that doesn't follow patterns to the quilter that wants every detail. There are so many ways to make this quilt all your own!

Here's the 411 (how long has it been since you hear that??? LOL) on where to find the other quilts on the hop and info on where you can buy the pattern and make a Triangle Transparency quilt all your own!


The Triangle Transparency quilt pattern is currently available for sale in Yvonne's CraftsyEtsy, and Payhip stores for $6 through Sunday, April 12th, which is a savings of 33% off of its regular price.
My advice? Go get this pattern! Thank you, Yvonne for allowing me to be a tester for this awesome pattern!

Linking up with Amanda Jean for Finish It Up Friday. Check out the great projects people have finished this week!


Until next time, keep on quilting!
Follow on Bloglovin

Friday, April 3, 2015

A Nod to Gee's Bend or Tribute to FLW?

Don't faint! Post number three for the week!! :)

Remember this post? It's OK, if you haven't seen it, check it out - I'll wait :) There were a lot of really awesome suggestions. Do you ever get tunnel vision with a quilt? That happened to me with this top. I was stuck. When I read many of the suggestions, I thought, wow, I never thought of that! So I tried all of them. And finally settled. I decided this quilt is going to be a LOT to look at. Might as well go for it right? I believe Jasmine was the first to suggest putting the square panels together. OHHH, I really liked that! Then I started moving strips around and decided on the final layout. Pictures please!!
Yup, I sewed all those panels together into one panel :)

The color is so hard to capture but this is a pretty good picture of all of the colors.
The lower portion, you can kind of see the shimmer of the Oakshotts in this one :)
One more, different position. . . this is a big top, it's hard to get a good picture.
 I was surprised at how square it turned out after the nightmare of putting those triangles together! I was also amazed that there are no 'puffy spots.' Because I don't have a fence or any other structure tall enough to get a good full shot of this top, it is kind of hard to tell in the pictures. But I don't think I am going to have any issues with quilting due to sagging and bagging :) 

This one is now folded up and waiting its turn for quilting. I finally bit the bullet and put the rose linen quilt under the needle! I've made very little progress as of the typing of this post. Mainly because the stencil does not lend itself well to continuous lines . . . I'm trying to figure out how to get as much quilting done as possible without starting and stopping every five inches. . . Burying threads is not my favorite activity no matter how cool a burying technique is ;) Stay tuned. I have a feeling once I figure this out, it will go much quicker. . . and I'll post an update when I have something worthy of showing! 

Back to the top. Do you think Gee's Bend when you look at it? Or do you think Frank Lloyd Wright? I can see both. And for the quilting, what color thread would you use? I'm thinking maybe black. . . crazy? Probably!! LOL I used black in this one. Talk about scary!! But I think it turned out well! I have a plan for the quilting design. That could change. . . OK, it always changes from this stage to the stage I am actually quilting!! Or maybe gray in the color portions and color thread in the gray portions? Multiple colors. . . match three or for colors in the top? Spread the color craziness? Too much? Wow, that's a LOT of ? marks! :) What color would you use?

OK, back to quilting! I might take breaks from the linen quilt to work on quilting this one. . . I'm kind of excited about getting this one finished! Have an awesome quilty weekend and I hope you come see me again next week! :)

Linking up with Amanda Jean over at Crazy Mom Quilts. Yup, she's back! Check out her post from yesterday. . . I'm seeing that block as a one block quilt. . . would that not be awesome??? Some people are all about that bass, 'bout that bass, 'bout that bass. . . I'm all about those big blocks!! :D

Until next time, keep on quilting!
Follow on Bloglovin


Thursday, April 2, 2015

AQG Quilt Show

Last weekend was the Arizona Quilter's Guild show. It was not far from my house, how could I not go?? :) For some reason, I have never gone to this show. I was quilting last year. I remember it being advertised. I didn't go. I have no idea why. 

On to the show! They had a Modern category!! I was so excited LOL I'm going to be brutally honest here, there were over 200 quilts hanging in that show (it might have been over 300). I saw every.single.one. There were probably 10 - 15 that stopped me in my tracks. I thought that was a low number. Am I wrong? There were not that many entries that were amazingly quilted. Maybe that was the problem. I seem to be a little hung up on quilting these days. . . have you noticed? LOL I guess this is the reason I didn't take that many pictures. . . I did however, get pictures of all of the winners in the modern category. :) I am still kicking myself for not taking a picture of the quilt that won for Best Quilting on a Track (Long Arm) and it also got Best in Show. It.was.amazing!! You'll have to take my word for it. . . I seriously am kicking myself for not getting a picture :( BUT, here are the Modern Category winners - they were all pretty amazing!

First:
BEAUTIFUL! I concur with the judges on this one! :)
Close up of quilting - yes, I had to get a tissue out and wipe the drool off my face! Seriously, WOW!
More of the quilting and the seriously well deserved 1st place ribbon :)
Second:
Such a visual treat! Honestly, now that I'm looking at it again, I would not have wanted to pick between the 1st and 2nd place winners! They were both spectacular!

Close up of the quilting - again, totally drool worthy! So much to see in this quilt.
Third:
OK, now people are looking at me like I have issues. . . so much drooling going on!! LOL

Again with the quilting!! Swoon :)
Honorable Mention:
Seriously would not have wanted to be judging these quilts! I couldn't pick. You all win ;)

Googly eyed over the quilting. . .
I guess the judges had not gotten the memo that winning modern quilts need to be straight line quilted... ;)

OK, last post I teased that I spent two hours gawking at something. . . what was that something? Uh, just the quilter of the heart stopping winning quilt (you know, the one I didn't get a picture of. . . UGH), Gina Perkes, doing a free teaching/demo of the Gammill 18 inch long arm. There were never more than 5 or 6 people standing around the frame. We were all able to ask questions and she demonstrated whatever people asked!! It was amazing to watch her. I walked away with SO many tips and ideas. And I might just be taking four, count them, one, two, three, four, days of classes from her in July!! Here she is demonstrating:

Total concentration in her quilting stance :) I can't even tell you how fun it was to watch her quilt! I could have stood there for days weeks.
First, she is the sweetest person ever!! Sense of humor? Check! One of the first things she talked about was her 'nut sack'. . . OK, I got the giggles because I was the youngest by far (and I am no spring chicken people!) of any of the women standing around Gina. She is younger than I am by about 10 years. I could tell a couple of the ladies really wanted to laugh but most of them were in shock. LOL The nut sack is a bag filled with crushed nut shells that she uses as a weight close to the hopping foot to reduce bouncing. As she said, it is filled with crushed nut shells so it really is a nut sack! 

I got to gush over the quilting of the winning quilt directly with the quilter - awesome! I asked several questions as she was demoing and once the two hours were up and everyone walked away I got to ask her about the classes in July. I might have also gotten a chance to show her a picture of a portion of the quilting on Shock Wave on my phone . . . It was a total thrill to see her eyes get real big and have her say "Wow, you're good!" Wha wha what??? I'm still smiling :)

Yup. I'm going to take two full days of classes on a long arm. One day of quilting on a domestic and the last day is applique on a long arm. But wait, I don't have a long arm, right? No, I don't. I did try one at a quilt show a little over a month ago. I'm not convinced that I would ever get good enough with a long arm to have the control and obtain the level of detail that I can get on my domestic. So I decided to sign up for some classes. I got lucky that Gina is the one teaching those classes! I figure after spending that much time on a long arm, I will be able to better determine whether or not purchasing a long arm would be a wise investment. . . I'm not convinced. There are a LOT of very accomplished quilters out there that quilt on their domestic sewing machines. I think there are pros and cons to both ways. And even if I decide not to pursue long arm quilting, I will get four days of instruction from a nationally known teacher who also happens to be pretty darned personable! :) Wins all the way around, don't you think?

I went to the show partly because I knew that Gina was going to be there at some point. I was hoping to catch her while she was at the vendor booth (she helped Gammill in developing the user interface on the 18 inch machine she was using during the demo) just so I could see her in action. I had no idea she was going to be teaching or that there wouldn't be hoards of people standing around her. I also got lucky as just as I was finishing looking at the quilts an announcement was made that she was going to start her demonstration in 10 minutes. I'd say it was meant to be :) And once I started watching her, I couldn't stop! 

So yes folks, I stood and gawked at a quilter for two hours like a lot of people would stand and gawk at a rock star! :) 

OH and I have to show you one more quilt. This quilt was not in the modern category but it is just too darn cute and I could not resist taking a picture (or two) of it!


Is that just too stinkin' cute or what?? :)

OK, that's two posts for this week. Come back tomorrow - I have a finished flimsy to share! Yup, been a long time since there have been three posts in a week on this here blog. Don't get used to it, #1 Fan, it probably won't happen again soon ;) LOL

Linking up with Gemma over at Pretty Bobbins for I Quilt. She has a great post on modern quilting, check it out and all of the quilty goodness linked there! 

Until next time, keep on quilting!
Follow on Bloglovin