Tuesday, March 31, 2015

Blocks for Kids :)

Hey! Don't faint, I am posting twice in a week!! :) After finishing Shock Waves, my machine is back in piecing mode for a bit! Which means I have something to share!

Yvonne, over at Quilting Jet Girl, requested blocks for a quilt for two very deserving kids. I had to jump on the bandwagon and whip up a couple! I love this project, not only do two kids get quilts that I'm sure will be loved but they will be helping with the making of the quilt - how cool is it that they will learn how to make a quilt in the process?! What an awesome idea to pass this craft/art on to two children that obviously have some talent in this area :)

I decided to do a little internet search for boat and musical note blocks. Yvonne had provided a link to a great PP music note but variety is the spice of life, especially when it comes to music, right? Here are my blocks:

I thought the birds added a little touch of whimsy to the sail boat :)
I had just barely enough of this music print left from my black and white quilt to add to the music note. . . maybe scraps are not a bad thing ;)
Both blocks are paper pieced. The patterns are free (bonus!). The boat can be found here and the quarter note can be found here. There are no instructions, just the pattern so some knowledge of paper piecing is required. My knowledge is very limited basically nonexistent so after ripping out stitches that were set at 1.4 (I know, glutton for punishment!) to try and get the 1 and 2 spots covered for the note, I just left them out. . . I think it looks fine and I wanted to get these blocks in the mail. . . and my frustration level was rising so I just decided to see how it looked. I think it turned out just fine, frustration gone, blocks done ;)

If you have a little extra time and a few scraps of fabric that are just screaming to be used for a good cause, check out Yvonne's request for blocks and join the fun :) While you are over there, check out Yvonne's quilts! You will not be disappointed, I promise, pinky swear even! :)

I'm off to the post office and to finish the Oakshott quilt top (not at the post office of course, I'll come back home to do that!!). Decisions have been made and it is mostly sewn together. . . oh my, another post this week?? Potentially so :) OH and I went to the Arizona Quilter's Guild quilt show last weekend! Stay tuned, I have pictures of the modern quilt entries and find out what made me stand in place gawking for two hours! :) Holy Hannah! Three posts in a week??? Been awhile since that has happened, but it could. . . Stay tuned!

Linking up with Jen over at Quilter in the Closet for Building Blocks Tuesday. This is a first for me! If you are looking for some block inspiration, check it out. Also linking up with Lorna for Let's Bee Social and Lee for WIP Wednesday

Be back soon and in the mean time, keep on quilting!!
Follow on Bloglovin


Saturday, March 28, 2015

Shock Waves - Just the Back :)

In my last post I showed you the corner of the back of my latest quilt, Shock Waves. It is now finished, washed and blocked :) I'm only showing pictures of the back as the front is a pattern that I tested and I won't be able to do a full reveal until my day on the hop - April 7th is my day, make sure to come back and check out the front of the quilt! Yes, I am giving this pattern a HUGE thumbs up! :) It is extremely well written and the resulting quilt is amazing! Come back on April 7th, I just know you are going to agree!

OK, on to pictures. After the pictures, I'm going to share what I learned while quilting this quilt. The lessons were many and since the final reveal will be more about the pattern than the quilting, I thought this would be the perfect time to share them with you. But first, the pictures!!


My husband had a huge role in the quilting design for this quilt. He saw shock waves in the piecing and began searching for inspiration for me to translate to the quilting. I was the lucky recipient of lots of information regarding flow studies, jet propulsion, engineering, theories and the like (lots of head nodding and smiling like I understood every not one word. . .). I told you, he really got into it!! I started with the middle motif for the quilt. It is called Sacred Geometry. If you do an images search for this, you will see some very cool images. I picked this one to use as my motif. 

My first lesson. Light tables are all kinds of awesome when transferring an image you want to use as a motif to your quilt! I bought one after Cindy Needham's class. I just knew it would come in handy and it did! Drawing the motif onto the quilt took very little time or effort. This has opened up a whole new world of possible quilting designs!

Second lesson, I marked the design with an air erasable purple marker late one night and then went to bed. . . it was gone in the morning!! Alrighty then! Apparently the time it takes to disappear depends on temperature and humidity. I'm in the desert, no humidity. I'm just guessing that is the reason it disappeared so fast. Lesson, I will only use these pens for marking on the fly. . . mark, quilt. Marks gone.

The third lesson had to do with curved rulers - there is a LOT of straight and curved ruler work in this quilt. Anyway, when using the curved ruler, it was much easier for me to control when I used the inside curve of the ruler! I had much less ruler movement as I found I was able to stabilize the ruler better from the outside curve. My consecutive curves got a LOT more consistent, and that makes me smile :)

I'm not sure when this one hit me, but it was pretty soon after I started quilting - a heavily pieced back is going to cause some issues when quilting this dense. . . you are thinking, well duh! LOL There were several places where the seams on the back came together exactly where multiple seams on the front came together. One is not going to be aware of what is coming up on the back . . . because it takes a little lot more to get that through the needle, I had some, ok, ok a lot, of inconsistent stitches in those areas. Some real small, some real big and when I was using the ruler and this happened, there was NO way I could keep the line straight. . . . And no, for the most part I did not rip them out. SO, in the future if the plan is to quilt densely (and let's be honest, this is probably going to be the plan for the foreseeable future lol), the back needs to have a lot fewer seams - or at a minimum, no seam intersections.

I tried trupunto for the first time!! I have to say, it worked out well :) I put an extra layer of batting in both the big triangle and the smaller triangle right under it. I didn't have any water soluble thread so I used a poly thread with the biggest stitch my machine would make. It actually worked out well. I removed the thread right before I quilted the triangle. Both threads came out easily and because I stitched it right after removing it, I did not experience any shifting. . . I might have gotten lucky! 

This is the first time that the quilting designs just kind of flowed . . . I didn't have specific ideas of what I was going to use as fillers before I started. It probably had to do with the conversations I had with my husband before starting quilting but the designs kind of just flowed as I quilted. That was kind of cool! Hmmm, there is something to be said about having a theme when quilting by the seat of your pants ;)

And finally, sometimes random takes some planning :) My husband picked the outside border quilting design from Christina Cameli's book Step by Step Free Motion Quilting (love this book!). It is called Port Holes. I wanted to have varying sizes and I knew if I wanted larger circles and had any hope of them being even remotely circular shaped, I would have to mark it. I used one of those circle templates that has multiple sized circles on it. I think they are used for architectural drawing. Anyway, I pulled out my air erasable marking pen and filled in the circles from the corner to the center, quilted, marked, quilted repeat repeat - you get the idea :) This worked out well and the resulting texture is nothing short of amazing. Did it take longer? Yes. Was it worth it? I totally think so :)

One more tip, I am not fond of burying threads and I'll admit I do just clip them on occasion (Yes, more than I'd like to admit). I watched this video - changed my life!! I might be the last one to the party on this but holy wow people! If you did know this, why didn't you tell me??? LOL

When I was sewing on the binding, my machine stopped stitching. . . like needle going up and down, feed dogs and walking foot functioning properly and stitches are not happening. . . Seriously?? Panic ensued. I called the shop, Joan assured me that I could come in the next morning and finish the quilt on one of the machines. That morning I went in and saw the repair guy, begged him to fix my machine. . . he was swamped. There were TONS of machines sitting around him :( I explained the issue and he said it sounded like I had knocked the timing out. . . moi??? ;) He said he would have it back to me the next day (today). Then, I ran to the other store where Joan works and sewed on the binding :D And. . .  Good news! Ken delivered on his promise and I have my machine back!! And it works! YAY :D 

Working on the Oakshott top. . . will be sharing the finished flimsy soon :) Will start quilting the rose linen tomorrow or Monday. Seriously stoked!! :) I'll be posting lots of updates on that one :)

Linking up with I Quilt over at Pretty Bobbins and DWM over at Patchwork Times. Check out what is happening with all of the creative people linking up!

Until next time, keep on quilting!!
Follow on Bloglovin


Wednesday, March 18, 2015

WIP Wednesday

WIP. Top. Secret.

A sneaky peek of the back :) One corner done. Three to go.
I did not mean to quilt so heavily. . . I really didn't but this has been SO much fun!

That's it, I'm going back in. . . Those other three corners will hopefully go quicker now that I have the designs set :) Stay tuned for the big reveal in April!

Linking up with Lorna for Let's Bee Social and Lee for WIP Wednesday, check them out for some really awesome inspiration :)

Until next time, keep on quilting!!
Follow on Bloglovin

Wednesday, March 11, 2015

What? Another WIP??

Helloweee! So I get a text from my number one fan yesterday, "Ya know, it's been like 2 weeks since you've done a blog post...." Really?? :) Who is my number one fan? My nephew. He literally is my number one fan, he was my very first follower. He also provides me with design consultation. He is an engineer. I like wonky. He lets me know if I have taken wonky a little too far! LOL I told him to write up a post and I would let him guest post. . . he thought I was joking. I wasn't. :) So #1 fan, here is your morning reading (you really should be working and not reading this young man!).

I'm going to let the pictures tell most of the story of this WIP . . . ummm, yeah, I started another top. . . What was I thinking?? I don't know, maybe I figured I whip this baby up and then get quilting . . . maybe I was avoiding actually starting to quilt the rose linen. . . maybe. . .

Remember this bundle? It was my first introduction to Oakshott's new ColourShotts.
Aren't they purty?? :)
They were staring at me. . . calling to me. . . I didn't have a plan. But they would not be ignored and neglected any longer. So I started looking through my file of quilt patterns. It's a big file. There's a lot there :) I wanted something that would use all of these great colors in one quilt. Kind of a tall order. Might be why they sat around for so long before I cut into them! I decided on this pattern.
"Spring" Free pattern by Valori Wells found of the RK web site.

BUT, I was going to make mine wider, so I could use up all of the fat eighths. I did the math, and decided that 1.5" strips would make the best use of the fat eights - and it did. I only had very slim slivers left. . . like barely a quarter inch on both sides. I had a LOT of strips. . . 
Side view - how awesome is that?? :) You can see the different colors in the warp and weft in this shot. Ahh, love this picture! OK, back to the story. After cutting the strips, I wasn't done, now to subcut them. I decided to cut three different lengths. Because these were cut from wider fabric, the fat eighths measured 27" and I must have been feeling a little over zealous. . . I ended up with this. . . 
That shouldn't take long to sew together right??? Yeah, I underestimated big time on how long that would take! There are 6 strips in each of those piles. . . 30 colors. . . I'll let you do the math ;)

I started sewing. . . and sewing. . . and realizing two things - a) this is going to take a lot longer than I thought and b) I can't do anything else until these strips are sewn together. . . so I kept sewing. 

And started to audition background fabric. . . and kept sewing....
Different background fabric. . . much better. Leftover pieces from Off Course. BUT. . . I am not liking how this is looking. At.All. Crap. This is only half of the strips. . . The next panel of strips was supposed to be all of the rest of the strips sewn together. . . what to do? Well, if you are slightly off kilter, like me, you start slashing and sewing. . . :) I needed to figure out what this was going to be when it grew up before I continued. So, I took several deep breaths and started cutting. . . and sewing . . and came up with this:
MUCH better!! It was at this point I decided to sew duplicate panels to these. I sewed the narrower one first. Cut it up, sewed it back together. Then sewed the wider one. As I was cutting the triangles for the second panel, I had a sinking feeling. . . these angles are not looking the same. . . but, being the impulsive person I am, I just kept cutting. . . flipped the triangles around and yes, should have listened to that little voice. . . the angles did not match up and therefore if sewn together the panel would have been veering off in different directions. Not.good. My design alteration (as if I had a design I was working with at this point LOL) was to add some fabric into the gap in two places. Then I would have enough length to chop some of the overlap in the other seams. . . I'm happy to report, it worked. The panel is straight. but now the triangles are not lining up as I had intended:
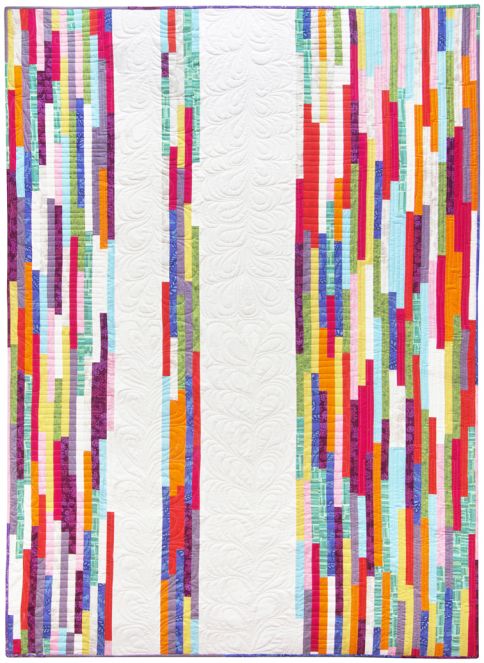
Bummer. That's pretty busy huh? :) My number one fan did not like. Said it made his eyes go crazy. Hmm. I like it! If I use this layout, I would add borders to either side. Time to start playing with alternative layouts. . . 
I kinda like that. . . BUT, what about this:

Like. But, not enough to sew it together :) It is currently on the design wall like this. I haven't decided which layout is going to win out. . . what do you think? I would love to see which layout wins the popular vote. OR, if you have suggestions for an alternative layout - please share!! I'm open to suggestions :)

I am in process of quilting the test quilt. That will likely be finished today or tomorrow. Then, I will baste the rose linen. It is completely marked. Wanna see? Of course you do! 
I know, it's hard to see but hopefully you can get a good idea of how this is going to look. I have the backing, I have thread, I have it marked. It is ready to go :)

Time to get back to quilting! I'll share some pictures of the back of the test quilt when I'm finished quilting. Keeping with my trend, the back could be the front. . . except with this one, the front is so darn cool, it's kind of hard to stop looking at it. Stay tuned, at the end of the first week of April, the pattern will launch and I'll participate in a blog hop and share it with you.

Linking up with Lorna for Let's Bee Social and Freshly Pieced for WIP Wednesday. Head over and check out all of the awesomeness shared at these great linky parties :)

Until next time, keep on quilting!! I know I will be ;)
Follow on Bloglovin