Saturday, May 31, 2014

Paper Piecing Flying Geese Tutorial

Good morning, good afternoon, good evening. . . fill in the correct time of day for your current time of day :) Hey did you notice? I've been doing some cleaning up around here!  I've added some things, taken away some things, generally cleaned the place up a bit.  Why have I been tweaking the looks of my blog instead of blogging or sewing? Well, it needed it and I am taking part in the 2014 New Blogger Blog Hop being wonderfully orchestrated by Beth over at Plum & June!  
http://plumandjune.blogspot.com/p/2014-blog-hop-for-new-modern-quilters.html

This will be my first blog hop so I want things to look tidy over here ;) My hop day is June 11th.  Between now and then, there will likely be a few more tweaks to the blog (I cannot tell you how much I am learning from this wonderful group of bloggers!).  Please feel free to comment and let me know what you think! Love it? Hate it? Would like to see ___? Tell me, I can take it and I would really appreciate any thoughts.

OK, on to my Gaggle of Geese. . . quick recap, here is my design:


I ran out of fabric before I even started (this is a common theme on this blog.... sometimes flying by the seat of my pants when quilting bites me in the seat of my pants).  This actually gave me the time try every method of making geese known to man and settle on paper piecing as the method I found most accurate and for this quilt, I want everything spot on.  In my last post, I showed how I made my template and went about cutting the fabric. And of course I shared my biggest fears. . . if you haven't read that post hop over, I spilled my guts about my deepest quilty fears. . . it's ok, I'll wait for you :)

Welcome back (now you know I really am crazy haha) and now on to sewing these little babies together!  I don't think I did anything out of the ordinary for paper piecing. . . but I wouldn't know cuz this is the first project I have ever made using PP.  So here's what I did in pictures :)


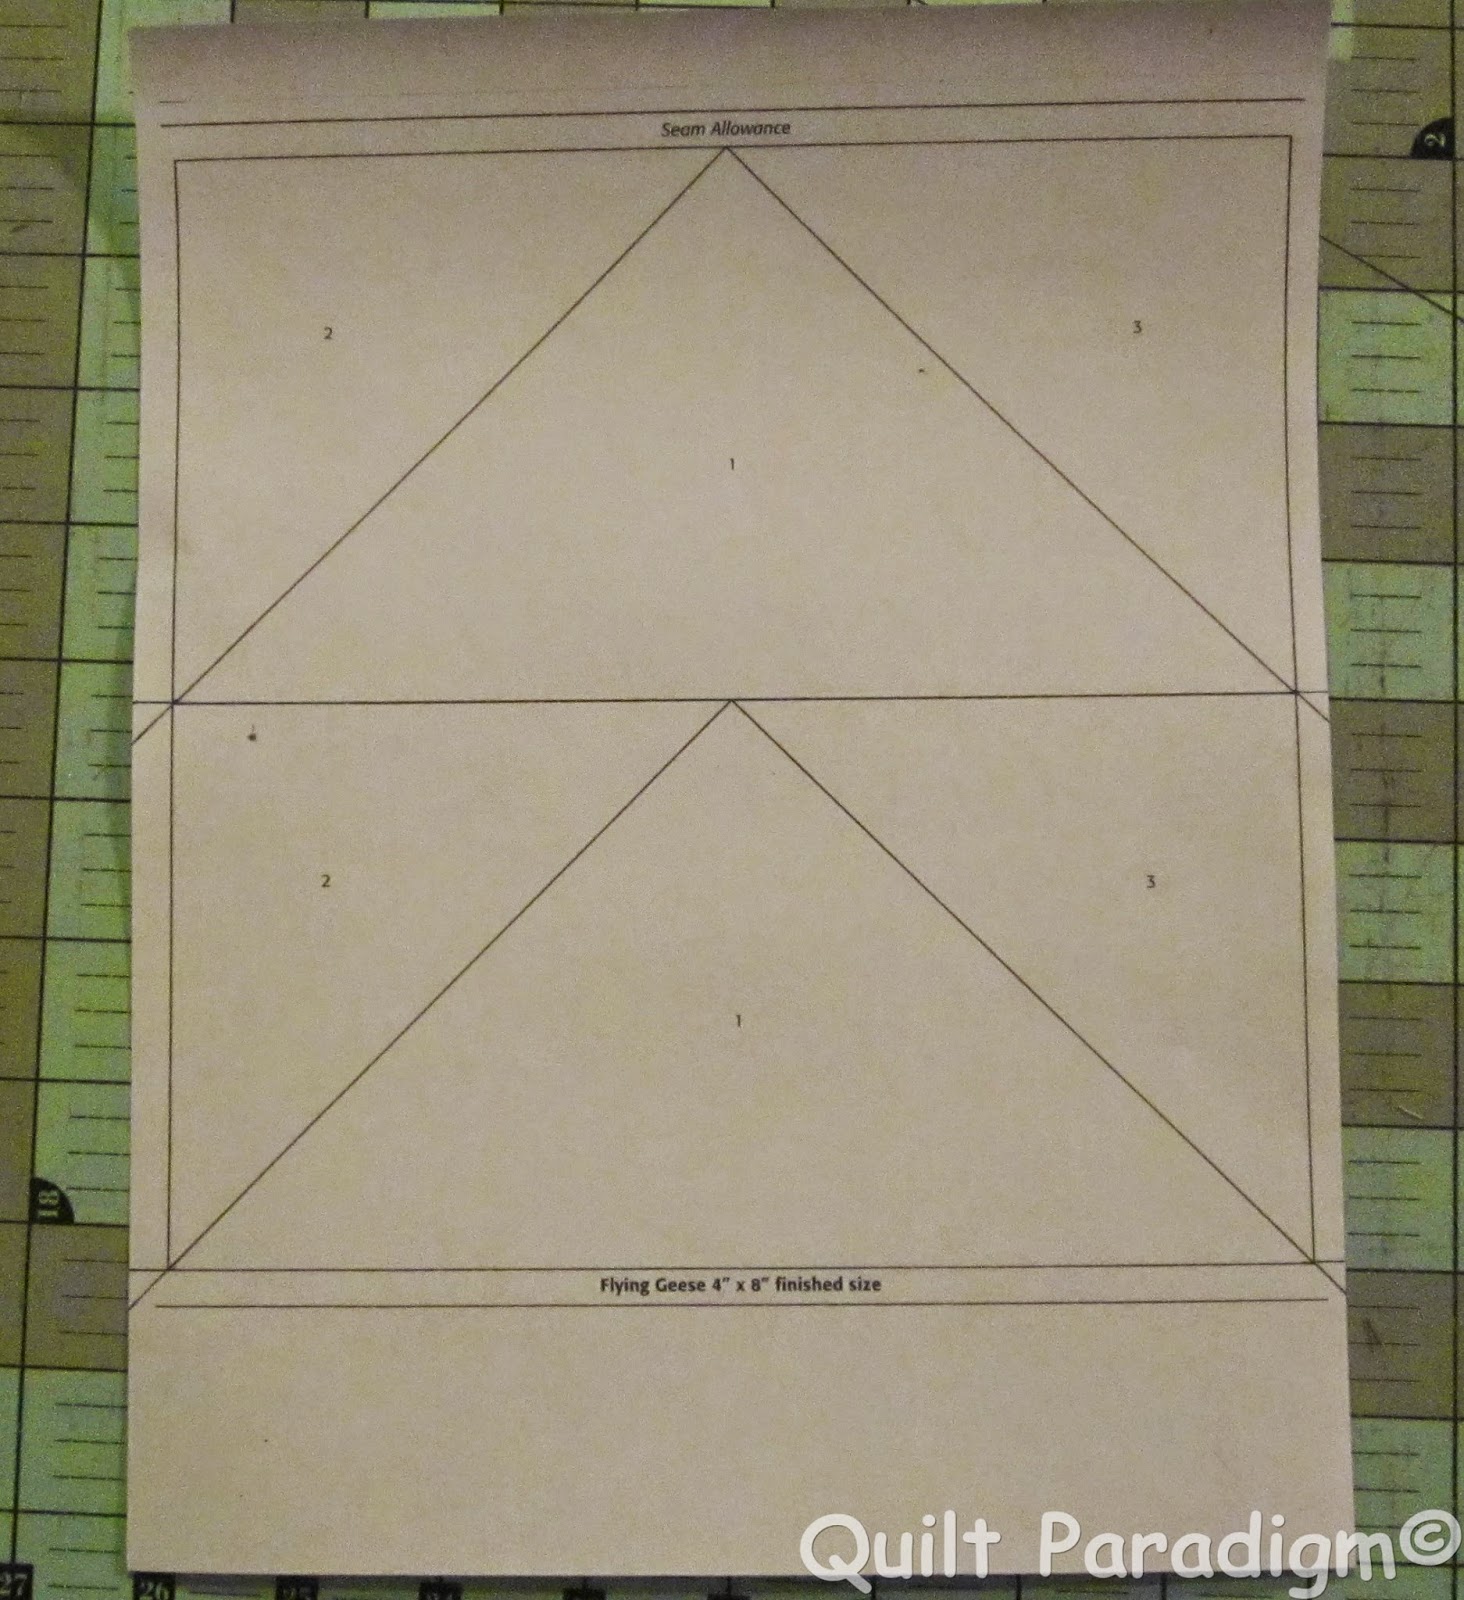
Here's my foundation.  When I talked about worrying about whether or not the foundation was copying straight, I realized that I really must have sounded crazy.... The only reason I am concerned is that this unfinished block is 8.5 inches square (as is the width of the paper).  If the copies were not exactly centered, I wouldn't have the correct seam allowance.  I did however measure my quarter inch with my ruler from the sew line and it worked like a charm :)
I lined up the triangle as close to centered as I could get it (this is where a totally opaque paper would be extremely helpful but I didn't have that). And I put a schmoodge of glue on the three corners of the triangle to keep it from moving around.  These are pretty large pieces, they don't really like to stay put. . . and here's my proof:


Yeah, that happened twice . . . I knew third time would not be a charm so I started gluing the fabric to the foundation.  And those floppy wings got a schmoodge of glue in the corner to make them stay put. . .
Put the wing on the left side (yes, I did it backwards but I did them ALL backwards so at least I was consistent grin) sew on the line and then put the right side on and do the same.  I would flip the piece over and see where my wing corner was coming off the paper in relation to the sew line.  I would place the wing as close to a quarter inch from that line as possible.  Reason? I might have had to rip one or two seams (maybe even the same seam more than once, might have uttered some not so nice words at that point) because the wing was not placed down far enough and when it was flipped back it did not cover the paper....
 
MAJOR TIP COMING HERE!!  I have no idea what this little gadget is, where it came from originally but it is awesome for getting that seam flipped back pretty flat and then there is no problem with pressing the seam and having that annoying little flap of material between the seam and the iron crease. . . these make me crazy!

Here is a side view of this little wonder.  I found it in my junk drawer. . . do you have a junk drawer? Obviously I need to clean mine out more often LOL
After each seam was sewn I would fold back the paper and cut the fabric back to 1/4 inch and then take it to the ironing board to press it :)  Alright, you observant people see that this foundation has already been sewn. . . that might be is because I sewed the geese colors in the wrong positions. . . proving that not only can I not follow patterns, I can't even follow my own! grin
Once the bottom Flying Goose was done, I put the appropriate (ahem) color goose across the top.  It was helpful to feel where that point was to figure out exactly where I wanted to position the goose.  Sew along the line, cut the quarter inch seam, iron and repeat the process above for the wings.
When I sewed the top goose on, I was in awe (no really I was awe struck) at how as long as I stayed on the line and sewed directly across where the two wing seams crossed - those points turned out perfect every time. I did not rip one of those seams! 

After it was all sewn together and ironed, I took it to my cutting table, measured a quarter inch from the sew line and squared these beauties up.  Easy peasy and I was also very surprised - not a lot of waste.  WAAY less waste than the sew the rectangle on to the square and lop the corner off method.

I did sew the 'rows' together.  I was again shocked at how those points lined right up! YAY!  Yes, I did have to rip one or two of those seams but that was only because I wanted them to be as perfect as I could get them.  I might have been a little over zealous ;)  So what does it look like?


TADA! :) The paper is still on, except for the paper between the row seams.


I did change the colors around a little.  Do you see the difference between the top and the design picture?


Check out those points! ;) Look mom, I can sew on a line!! :) LOVE the accuracy PP provides!


This picture is a little more true to the colors.  Cannot wait to get this baby put together so I can take it outside and take pictures :)
So you might ask, "Judy, why don't you have the rest of it sewn together?" Well, because ummm yeah I didn't buy enough of the background fabric. . . I used the measurements from the other design. . . so again . . . I am waiting for fabric.  I called 15 quilt shops within a 60 mile radius of my house.  All of them were listed on the New Beginnings web site as carriers of New Beginnings fabrics. . . None, not ONE of them, carried the Modern Solids!! SO what's a girl to do? I'll tell you what she does, she gets on the phone and rings up Pink Chalk Fabrics (that's where I got all of the other fabric) and asked them a couple of questions as I thought I might have an idea for that negative space (more on that later), asked for recommendations on matching Aurifil threads for quilting and asked very nicely if there was any possibility that the order could go out that day (this was yesterday).  Within 15 minutes of placing my order online - I had shipping confirmation!! How is that for service with a big old smile on my face!! I will have the fabric on Monday!  Stay tuned - I can't run out of fabric for this anymore because after that background fabric is sewn on this baby is ready to be sandwiched and quilted.  And oh the plans I have for the quilting!! :)  BTW I am in no way affiliated with Pink Chalk Fabrics.  I am just one happy camper customer!

Linking up with Show Off Saturday, Design Wall Monday and Anything Goes Mondays being hosted by Karen over at The Quilt Yarn.  If you are here from one of the linky parties, welcome!  If you haven't been, go check them out and be inspired!

Until next time, keep on quilting!
Follow on Bloglovin

Monday, May 26, 2014

Getting it together

Last week I talked about my new WIP and a glitch. . .  In the intervening days I did some paper piecing, practicing with more ways to make those geese and finished the back (which I think looks way to good to be a back, it might be made into a top but I'll post about that later) for the strip quilt and finally on Friday afternoon the fabric arrived (but seriously, I ordered it Wednesday morning and it arrived on Friday - I'd say major speedy!!).  And I immediately got to work.  First, I starched the fabric (yup, soaked it just like I did with the other fabrics) and then I got to the business of cutting.  Let's back up a moment.  I decided that the most accurate way to make the flying geese is to paper piece them. . . I figure there are only 38 geese, that's 19 sets of two geese.  I can do that!  And I tried every method of making flying geese known to man, making one at a time with the square and a rectangle and no waste style, making them Eleanor Burns style, and finally. . . paper piecing. . . I had never done paper piecing until last week. . . So I found this foundation for 4" x 8" geese (last page)! No fuss, no muss! Just had to make sure my printer would print outside of the 'normal' margins.  Yup it does.  Taped two of those babies together, copied, oops not straight, retaped, copied, uh, not right, third times a charm right? YES, yes it is!! :) 

I added sew lines to the end of the paper. . . the beginning and the end of the seam is where my straight sewing seems to drift. . . but not when I am sewing on a line ;)
And then I started cutting, adding a half inch to the size of the triangle ala Sharon over at Fabric and Flowers instructions for paper piecing. First I thought about the fact that I wanted at least one of the sides to be with the grain of fabric. . . so here's what I did:


First I cut strips WOF 5" (added a half inch to the triangle top and bottom).  Then do you see that very faint line on the left side and the ruler is set on the half inch line ready to draw another line?  I marked the strips so that I could line the bottom of the template on the line and easily cut on grain geese :) (Thank you to Sandra over at Musings of a Menopausal Melon for mentioning the 'grain thing' in an email)
Then put the template on the strip and put a smoodge (like the technical term?) of glue on the template to keep it from scooting around when I put the ruler on it to cut.
Lay the ruler on the template at the half inch mark.  Make sure your angle is right ;) and make the first cut.  I really thought I had a picture of this but then, flip the template so that the base of the triangle is on the left side of the strip, glue it so there is a half inch on the cut side, and then cut leaving a half inch allowance on the other side.  I was able to cut 6 triangles (I cut two at a time) WOF.
I SERIOUSLY wish I had a picture of the cutting of the wings. . . but I don't :(  It went so fast - I was done and thought darn it, I was supposed to take pictures!  But I did the same thing.  In very little time, I had this:

pretty geese waiting for their wings :)
Back to the foundation. . . I was kind of concerned worried obsessed with the template.  What if it copied crooked in the printer? What if there was a variance sheet to sheet? These are things that can keep a girl up at night!

Here is the conclusion I have come to: the sew lines are matched up perfectly.  When I square them I will square them measuring a quarter inch from the sew line.  That way, I'll have my quarter inch and it will be squared perfectly from the sewing lines. . . as long as I cut straight. . . Good logic?  That's not a rhetorical question, I'm really asking!  Sometimes my logic is a little off ;)

The other thing I have been obsessed about is getting them sewn together without losing the points. . . worried even.  Another nightmare maker!  My conclusion on this is that I will leave the papers on until after the quilt is sewn together.  I had never thought of doing this. . . but I saw this amazing quilt and read with great interest how she put it together. She left her papers on.  I will as well. Really, go look at that quilt.  Holy wow! And that comes from someone who is not so much a scrappy lover but this is all kinds of awesome.  I would not have wanted to rip all of the papers off of that one but again, I don't have that many geese, I have just a small gaggle ;)

Just a little note about the paper I am using.  I bought some Carol Doak paper.  It's better than 20 weight copy paper, I still can't see through it, but it is much easier to tear away.  I did order some newspaper paper from Amazon.  I figured for about 4 bucks for 500 sheets I could give it a whirl... it hasn't come yet.  Sloooowww shipping on those! I'll have the top done by the time they get here!  I will however try them out when they get here and let you know what I think :) 

And finally, here is a picture of what I have on my wall so far :)


Picture is bad, it is just before sun up here and good light is no where to be found. Insert colors from picture of pieces above :)
I am on my way! Next post I'll talk about sewing these little beauties together. . . I have had a mishap. . . or two grin nothing major, just a little frogging involved.

Linking up with Judy over at Patchwork Times for Design Wall Monday and Marelize over at Stitch by Stitch for Anything Goes Mondays.

Until next time, keep on quilting!!
Follow on Bloglovin


Saturday, May 24, 2014

Ummm. . . OMG!

Blog land is abuzz with postings about quilts entered into the 2014 Spring Quilt Festival over at Amy's Creative Side.  I entered a quilt, visited a TON of web sites seeing SO many beautiful quilts and wonderful stories.  And then I went over to check out the Viewer Choice nominees today. . . HOLY CRAP! (yes I said it but I can tell you there were other words inserted there when I saw it!) My quilt is there!! Are you kidding me??? THANK YOU to everyone who voted to nominate my quilt (oops, my niece's quilt)!  I am still kind of in shock, is this really true? 
My original post about this quilt is here and the post for the Quilt Festival is here.  I entered my quilt in the Home Machine Quilted category.
So head on over to Amy's Creative Side and vote for your favorite in Viewer's Choice, and don't forget to vote for your favorite in all of the different categories too! Voting is easy, just click on the little heart in the upper right hand corner of the picture of the quilt for which you want to vote.  Voting is open until May 30th.

OK, can I tell you that I am still in shock?? What an honor to be nominated by the viewers! I have clicked back at least a bajillion times to see if Anna's Quilt is still there. . .  Amazing, every time I do, there it is!

Thank you, thank you, thank you!   I am going to go do another happy dance now.  Or maybe go check and see if it is still there ;)

Until next time, keep on quilting!
 Follow on Bloglovin

Wednesday, May 21, 2014

New WIP. . . Glitches

I am starting a new project. . . previous posts have discussed my attempts at sewing Flying Geese. . . I have had some successes and some well, what I would consider not so successful :) I decided to document my entire process with this one so I am going to show you my craziness right from the start.  I saw a couple of different calls for quilts from MQG.  I started thinking about a design.  Then I started thinking about whether or not I wanted to put myself out there to be judged. . . and then I decided I'd try it once and see what happened.  And then I decided (the practical side of me finally kicked in haha) how about make a quilt and then decide if it is 'good enough' to submit. . . Now there's a plan. grin

So here we go, the design process - done my way ( Think "My Way" lyrics by Frank Sinatra)! I have EQ7.  I would not call my skills proficient but I can get around and I can pretty much end with a picture of how I want a quilt to look.  I typically end up with a bajillion . . . OK maybe 3-5 different designs and/or color options.  I have been admiring quilts with Flying Geese.  I have never in my life made one but how hard can it be?? grin I came up with the name of the quilt first. . . I know right? Weird.  "Off Course" . . . which is what my sewing sometimes turns out to be. . . Anyway, over the span of several weeks (yes, really it took that long and I was changing it up until yesterday) here are what I decided were the top three contenders:

This was the first design that popped out of my creative dark side.  I played with colors and the like for days.  I like it, will likely make this one too but I need to find the 'perfect' fabrics.... Oakshotts?
And then I came up with this:

I'm liking this. . . but maybe it needs more. . . hmmm . . .
 So I pondered and played and consulted (my husband has a great eye for color, DOES NOT share my love of modern).  Generally we agreed it needed more color.  By this time I had ordered the fabric (gutsy right? Kinda wish I had not been so hasty. . . thus the glitches part in the title of this post), and this is what I came up with:

Now this is a design I can get behind and was SOO excited to start sewing and cutting yesterday. . . read on to find out why that didn't happen...
 Yesterday morning I pulled the fabric out of the two bundles of In the Beginnings Modern Basics bundles I purchased from Pink Chalk Fabrics for this little fiasco adventure.  I bought the Beaujlais and Summer Sky bundles.  I thought I had enough of a combo to make whichever design I chose. . . 

I start by starching the fabrics.

The fabric is SOAKED with starch at this point.  Dripping wet actually.  I like my fabric to be the consistency of construction paper :)

I use Niagra starch - I've tried Mary Ellen's Best Press.  It is good but honestly, no better than the cheap stuff near as I can tell. . . Saved money = more $ for fabric :)
 When they are dry enough (I let these get TOO dry and the wrinkles didn't come out) I ironed them.

The blues and the grays for the geese.

I think this picture shows the gray colors a little better.
 And then I sat down to figure out just how many squares I needed to cut for the project. . . OK, yes, it would have been smart to figure this out before I did this but that's just not not how I roll . . . there are sometimes problems with rolling this way ;)

And now for the fiasco. . . glitch. . . air turns blue with words typically used by sailors (do you think sailors get a bad wrap with this old saying?? I'm thinking maybe they do!) I did not have enough of the lighter gray.  Bummer.  Now what? Cut what I have and buy more yardage? Hmmm. . . Normally, that is exactly what I would have done but I had bought and used most of the Beaujlais bundle before. . . NONE of the colors were the same.  I decided not to take the chance, different dye lots and all that.  I ordered more of the lighter gray (metal) yesterday. . . and now I wait. . . Don't you just hate it when that happens??? I was all ready to go! Whoa ponies :)

While I wait, I will put the back together for the string quilt.  I'll post on that soon.  I will also continue with paper piecing. . . can you believe I actually like paper piecing??   I DO!!  More posts on that to come too :)

For now, I'm linking this post to Lorna over at Sew Fresh Quilts for Let's Bee Social, Lee over at Freshly Pieced for WIP Wednesday and Kelly over at My Quilt Infatuation for NTT.  Hop over to these great linky parties and check out all of the wonderful inspiration! :)

Until next time, keep on quilting!
Follow on Bloglovin

Monday, May 19, 2014

Paper Piecing. . . ME??

Check it out! I keep thinking someday I am going to try paper piecing. . . someday . . . Well that day happened this morning!  I saw this post by Sharon over at Fabrics and Flowers.  Once you finish reading my ramblings, go check it out.  I really really like the looks of this block!  I have not started my flying geese creation. . . more on that fiasco in a bit.  So I thought, Self, why don't you give it a whirl?  And I did. . . with what I had which did not include paper piecing paper. . . it included regular paper.  I decided to make two pieces to start just to see if it was something I thought I might like to do. . . The first thing I did was cut one piece backwards (you really didn't think this little adventure was going to come off without a hitch did you?) . . . It was a small enough piece and I had cut the piece big enough that I was able to use it anyway with a little creativeness. . . why not cut another? Because . . . I am lazy :)  And I'm playing over here.  I followed directions (yes I did!) and this is the result:

Not too bad for a first attempt and not having paper that was even remotely see through LOL
 I used Kona cottons.  And, I figured out I could cut both pieces at the same time (I can be brilliant that way sometimes haha) so I doubled the material, put the templates on the fabric and cut both pieces at the same time.  I'm thinking if I were to make an entire quilt, I might just cut 4 at a time. . . maybe more.  

Do you want to know what I think? Too bad, I'm going to tell you anyway HA!  I kinda liked it! I kinda liked it so much that as soon as I finish writing this post I am going to run to Joanne's and get me some perfect piecing paper :) And I can't believe I am actually typing this for the world to see (ok, maybe not the world but everyone that reads my blog lol), but I might just try a New York Beauty block!! GASP I have admired NYB quilts from afar for months and had pretty much decided there was NO WAY this chicky was even going to attempt it. . . but now. . . maybe . . . 

OK, now on to flying geese. . . Seriously, I know people say they have no issues with making flying geese.  I'm having issues over here!! I have tried three different methods.  I don't find that any one of them give me more accurate geese.  Maybe I am being too much of a perfectionist (nah, me??).  I did try the BlocLoc ruler for flying geese.  I found that it does work even though I press my seams open.  What I don't like is I bought the 4"x8" ruler.  Now I'm not so sure that I want that size for my quilt! Seriously? I need to plan better!  That's another thing about these rulers -  they are only good for one size, meaning if you want to make different sized flying geese and use these rulers you have to buy as many rulers as varying sizes you have. . . and the rulers are not cheap.  I used my regular Creative Grids ruler (6.5x12.5) and it works just as well - actually better because I'm not limited to size.

Here is another block made of the same material as the first.  I used the no waste method.  I have to say of all of the methods I think I like this one best.  I just don't want to have to deal with those extra triangles when using other methods.  So here is the result:

Middle points - pretty much nailed it.  I laid the block on a pony wall in my back yard, it is curved. . . that probably was not a wise choice, I'm not sure that you can see that there might be issues with the seam allowances with the outside wings of the geese.
I so love the look of flying geese in quilts.  I am going to get this right if it kills me (that's a little dramatic, maybe even if it turns my hair gray or I pull it all out)!  I have a dream and it must be realized! OK, not a dream but a quilt design that I have completely planned, I have the fabric, I am ready to go. . . I just have to figure out this geese thing!  38.  That's how many I need to make.  38.  I can do that right?? Yes I CAN! 

Linking up with Patchwork Times, Stitch by Stitch, Freemotion by the River and Quilt Story.

Until next time, keep on quilting!

Follow on Bloglovin


Friday, May 16, 2014

Blogger's Quilt Festival

Hey everyone! I am entering "Holographic Hexagonal Triangles" into the Spring 2014 Blogger's Quilt Festival over at Amy's Creative Side in the Home Machine Quilted category.  If you are visiting from there and new to my blog, welcome!

Check out the AMAZING quilts in the many different categories!! See the major eye candy, vote for your favorites and most importantly - BE INSPIRED! (first read my post though! LOL)

Lots more pictures to come!! :)
This quilt started out to be something completely different than the resulting quilt (those who have been following me know this is a common occurrence) in a very big way :) I made the quilt in connection with the Triangle QAL over at Sassy Quilter.  I knew I was going to make a triangle quilt and the quilt along started at exactly the same time I was going to start the quilt.  This quilt was intended for my niece, Anna, from the beginning.  I have been making quilts for my nieces and nephews and Anna and her sister Lilly were the only two in their family that had not received quilts from me.  They were patiently waiting :) A little birdie (named Grandma) had told me that Anna's favorite color was purple.  I had downloaded this pattern from Freshly Handmade.  I intended to make this quilt. . . and ordered the fabric but threw in some pink fabric and took out some of the blue.  And then I saw this quilt. . . Oh my! Ideas started forming and I started cutting :)

My nieces read my blog.  I was trying to keep the design under wraps and wanted to have this quilt finished and in Anna's hands before I had to reveal the design.  That did not happen but Grandma did a good job of keeping the girls busy and off the blog :) As I was sewing the triangles together a quilting plan started to form. . . and form . . . and form ;) I spent a lot of time on Judi Madesen's blog Green Fairy Quilts.  And by a lot, I mean I looked at every picture on her blog. . . obsess much? LOL

I quilt on my domestic sewing machine.  It is a Janome 7700.  Love this machine! I had recently discovered that Janome made a ruler foot for the convertible FM foot.  I purchased it immediately! I also purchased both the arc and straight Fine Line Rulers and had been practicing with them prior to starting the quilting on this quilt.  By the time I started quilting, I knew exactly how I wanted it to look and it turned out exactly as the picture I had in my head :)  Don't you just love it when that happens? :)  More pictures:

I used Superior King Tut Egyptian Princes 40 wt thread for all of the quilting.

I used the arc ruler for the flowers in the center of the hexagons.

I used the straight rulers for all of the straight lines.

Because of the color of the backing matched the color of the thread so well, it is difficult to photograph the quilting on the back but it looks really cool!

A close up of the back which is a wide backing flannel batik.

The spirals and the echos are free handed.  I did not mark anything on the quilt.

I think the alternating designs on the diamonds and the hexagons grouped in echoed and open flowers in the middle added some interest.

What is the very, very best part of making a quilt? For me, it has been giving it away and hearing about the reactions of the recipients.  Anna's reaction went like this:

When Anna received the box in the mail, she knew what was in it.  It was from me and even though I had mailed them on the same day, her sister Lilly had received her quilt the day before.  As she was opening the box she said, "I hope it has purple in it." And of course she was wearing purple jeans ;) And here is her reaction:

I'm thinking that smile says it all :)
Anna is my 'little' brother's daughter.  He is convinced that I did not quilt this quilt on my domestic sewing machine. . . I think it might  have something to do with the fact that he can't imagine that his big sis might have a little bit of creativity flowing around in that crazy brain of hers!  Honestly, I started on this journey of quilting just under a year ago and I'm pretty sure that there is no one more surprised than me about the creative side of me that I had never tapped into before! :) 

This quilt gave me the confidence to 'go crazy' with quilting and think outside the proverbial all over meander quilt box :) I learned that quilting this dense truly does 'hide' those little glitches in quilting and totally takes the eye away from any pesky points that might not have been perfect :) 

Thanks for stopping by and enjoy the show! So many amazingly talented quilters out there!

Follow on Bloglovin


Thursday, May 15, 2014

Flimsy Finish

The strip quilt is DONE.  Well, the flimsy is done.  If you read my first post about this quilt on Monday, you know I did not like making this quilt.  I found it boring. I did follow some advice from Marly and sewed all of the panels together.  Forced myself to sit there and sew them together until they were done.  And then I cut them all. And then I arranged them.  And then I sewed them together.  And when I say forced, I mean tied myself to my sewing chair and fought off thoughts of "Oh, I should go file my nails" "Oh, I should go do laundry" "Oh, I should go pet the dogs" "Oh, I should go waterboard myself. . . it might be more interesting" LOL I'll talk a little more about the process in a minute, first the picture.


I know this picture is sideways. . . why is it that I flip the picture before I upload it, save the file and then it uploads sideways... Someday I will figure it out.   I think the picture shows the richness of these batiks well.
I used seven different fabrics in this quilt.  All of them from the Timeless Treasures Tonga Batiks Falling Leaves collection.  I think this is an old fabric line, I got a great deal on it many months ago :) 

I cut strips at 1.5", 1.75" and 2" from all of the fabrics.  I had three fabrics that were more gold dominant and 4 that were more black dominant.  I alternated the strips gold/black/gold/black and on and on and on . . . haha Then I sewed the strips together WOF until I had a strip panel wide enough to cut three rows of squares.  I used this method.  My blocks were 6.5" x 6.5". 

I have A LOT of scrap pieces of sewn together strip panels.  Most are triangles and I am likely going to sew four triangles into a square and add them to the back.  

I have the back pretty much planned but I am going to put this top aside for a bit. I am going to go back to making flying geese blocks... I have an idea for a quilt and it must be made!  Does that ever happen to you?  I tried more flying geese yesterday.  It was a miserable failure. . . so bad, I couldn't even attempt to try my new BlocLoc flying geese ruler.  I'm going to post more on that in the next day or two though. 

Oh, and check out this totally cool tutorial over at my friend Preeti's blog.  She has come up with another very cool block that will leave you wondering which of the many many different ways it can be laid out to chose!

I'm linking up with Kelly over at My Quilt Infatuation for NTT and Crazy Mom Quilts for Finish It Up Friday.  

Until next time (when we will be flying high with the geese!) keep on quilting!

Follow on Bloglovin

Monday, May 12, 2014

New Beginnings Monday :)

It's Monday! SO excited about participating in the 2014 New Quilt Blogger Blog Hop! I wasn't sure what to expect.  I can tell you this, it has well surpassed any expectations I might have had and the email group has only been active for a few days!

http://plumandjune.blogspot.com/p/2014-blog-hop-for-new-modern-quilters.html

I am working my way through all of the blogs and introduction emails.  I can't wait to see where this hop takes me! One thing is for certain, I have already found awesome blogs to follow and I have a feeling that there will definitely be new bloggy friendships formed out of this hop! 
 
On to new beginnings on my design wall.  After playing with the left over Oakshotts from the Triangle Log Cabin quilt for a pretty short period of time, I got bored. . . So I went digging in my stash and found a stack of material I had bought months ago with no real quilt in mind.  It is black and gold batik.  It is beautiful.  I decided to do a strip quilt.  Here's what I have so far:


I love it.  I hate making it!! SOOO boring! I'm beginning to think I have adult onset ADD! :) I started by cutting a few strips of varying widths and then sewing the blocks individually.  Those who have been around for awhile know that I have control issues and just putting the strips together was not going to happen.... it took an entire day to do four blocks! (and by blocks I mean the small blocks that make up the diamond....) That was not going to work.  I then sewed strips together width of fabric to the width I needed to cut one set of squares from the strip set. I got the idea from Molli Sparkles. That netted me four blocks in one go.  Not bad but seriously - sewing strips together is kind of boring.  Again, LOVE the look, don't like being bored :) By sewing panels together width of fabric, I have triangle 'scraps' that I am either going to sew together into squares and put them on the back -here are the squares I have so far:


Or I can sew them together to make a border for the front:

That decision will be made for me when I finish the blocks for the front - if it is the correct length and width to use the triangles as a border, that is what I will do, but I don't think I am going to spend a lot of time figuring out the math (we know I really blow when it comes to math) and cutting down the triangles significantly. . . so that part will be up in the air until I finish the blocks.

So today I am going to sew a bigger strip panel.  I want to get more blocks out of a panel so I can get the strip sewing part over with and get on the the more fun part of putting the top together ;) I'll talk more about the panel process in my next post after I actually cut from a bigger panel.

The postal person was rather prolific with packages since I last posted. . . My new Oakshotts are here!! Oh my! They promised thicker fabric, richer colors and general all around improvement (I really didn't think there was much to improve to tell you the truth) and they delivered beyond my wildest imagination! Check this bundle of fat eighths out!!! 

The weight is AWESOME and the colors - FABULOUS! That shimmer is just so yummy!!!

I also got the BlocLoc Flying Geese ruler - I have not had a chance to test it yet but I will be posting on my experience soon (first, I have to get the blocks done for the strip quilt). I press my seams open, I have heard from several of you that the ruler doesn't work well with seams pressed open. . . hmmm.  I'm gonna give it a whirl and I will be posting about it.

I also received Judi Madsen's new book "Quilting Wide Open Spaces" . . . Oh my! I don't know that I will ever make the quilts in the book but the quilting designs and her explanations are more than worth the price!! Some major eye candy and while I was reading it, Judi is so encouraging I actually believe her when she says you can do this too! :) 

Welcome to all of my new followers and readers! I am linking up with Judy at Patchwork Times for Design Wall Monday and Marelize at Stitch by Stitch for Anything Goes Mondays. If you haven't been over to check out these parties - do! SO much inspiration!!

Until next time, keep on quilting!
Follow on Bloglovin