
 |
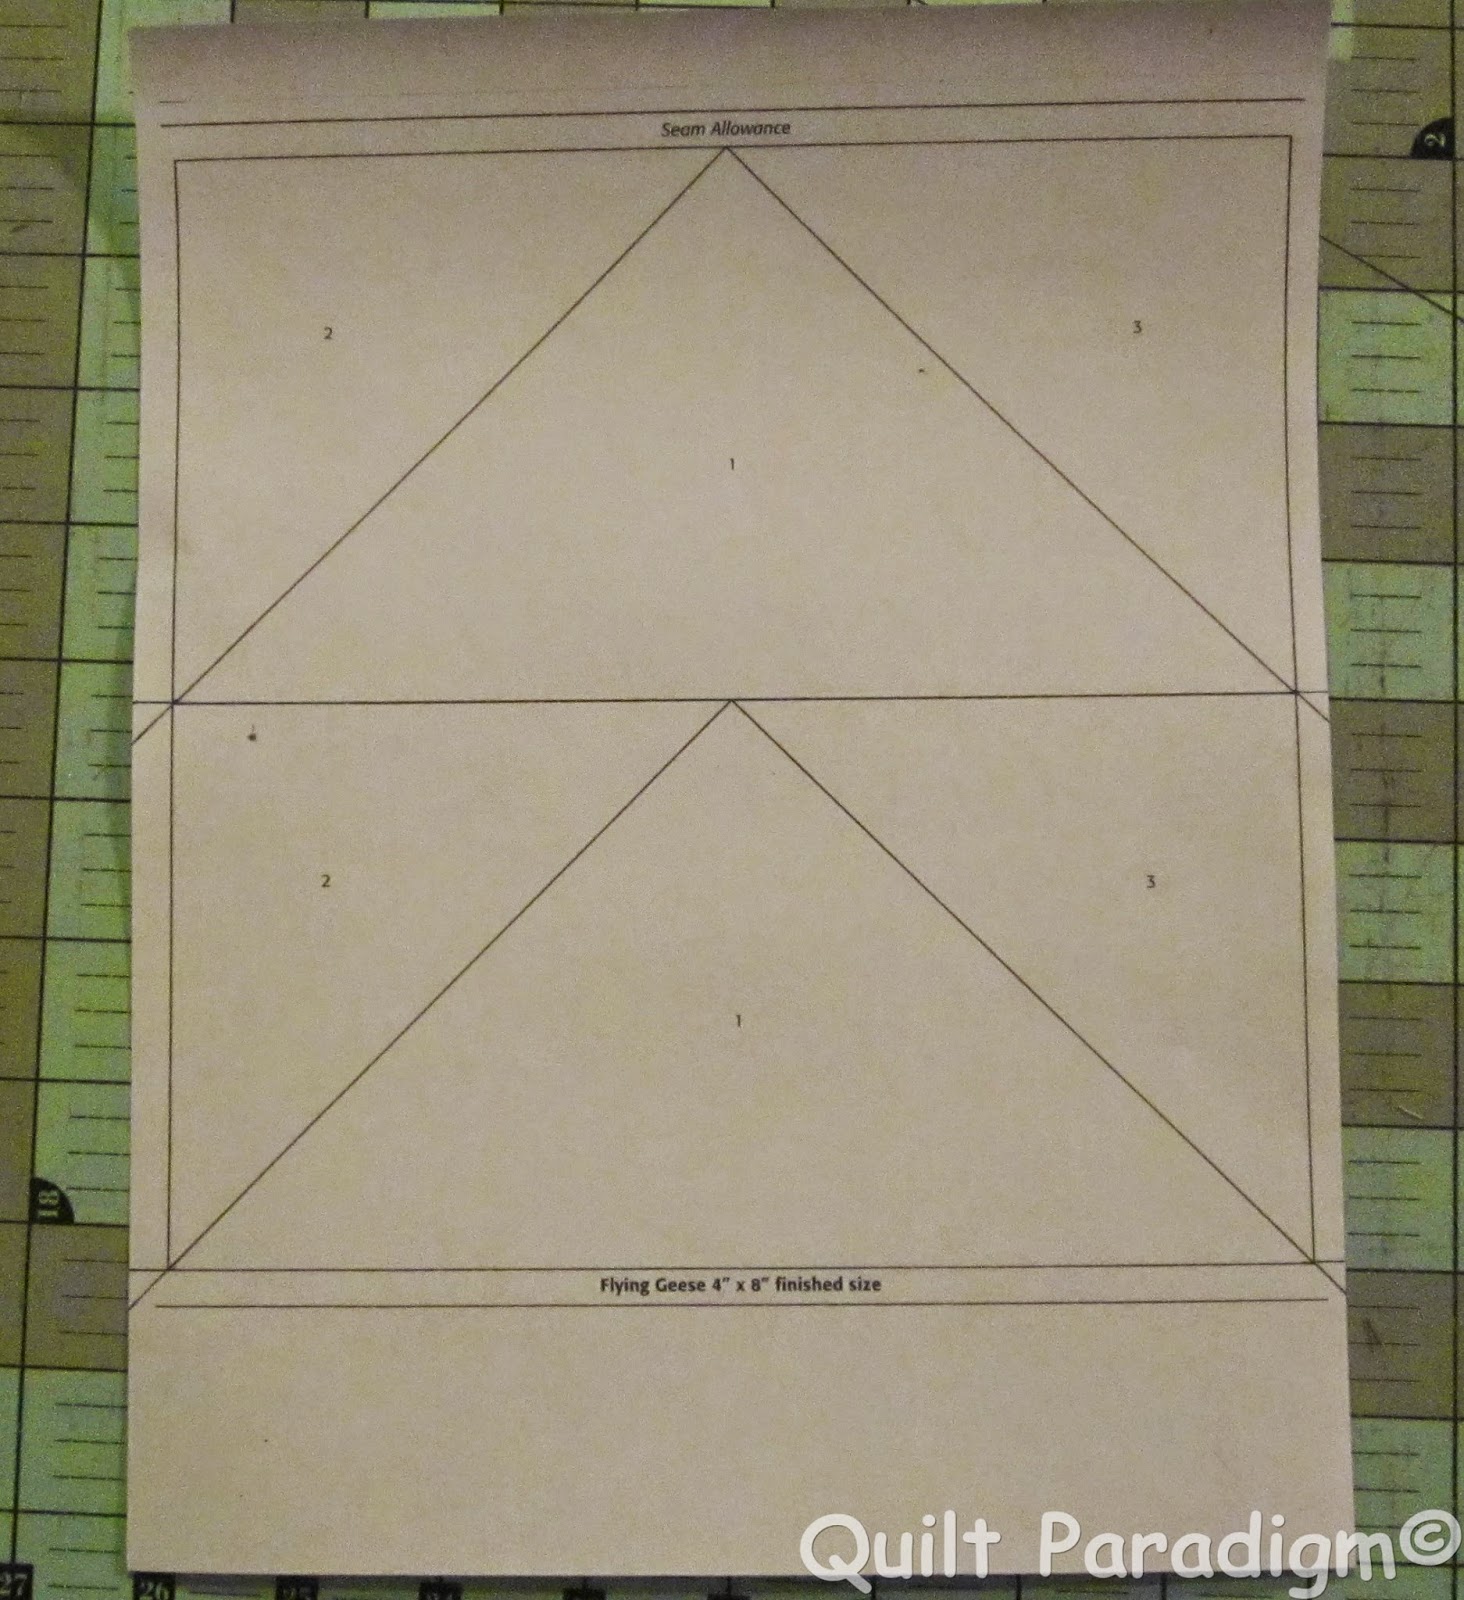
| I added sew lines to the end of the paper. . . the beginning and the end of the seam is where my straight sewing seems to drift. . . but not when I am sewing on a line ;) |
 |
| First I cut strips WOF 5" (added a half inch to the triangle top and bottom). Then do you see that very faint line on the left side and the ruler is set on the half inch line ready to draw another line? I marked the strips so that I could line the bottom of the template on the line and easily cut on grain geese :) (Thank you to Sandra over at Musings of a Menopausal Melon for mentioning the 'grain thing' in an email) |
 |
| Then put the template on the strip and put a smoodge (like the technical term?) of glue on the template to keep it from scooting around when I put the ruler on it to cut. |
 | |
| Lay the ruler on the template at the half inch mark. Make sure your angle is right ;) and make the first cut. I really thought I had a picture of this but then, flip the template so that the base of the triangle is on the left side of the strip, glue it so there is a half inch on the cut side, and then cut leaving a half inch allowance on the other side. I was able to cut 6 triangles (I cut two at a time) WOF. |
 |
| pretty geese waiting for their wings :) |
Here is the conclusion I have come to: the sew lines are matched up perfectly. When I square them I will square them measuring a quarter inch from the sew line. That way, I'll have my quarter inch and it will be squared perfectly from the sewing lines. . . as long as I cut straight. . . Good logic? That's not a rhetorical question, I'm really asking! Sometimes my logic is a little off ;)
The other thing I have been obsessed about is getting them sewn together without losing the points. . . worried even. Another nightmare maker! My conclusion on this is that I will leave the papers on until after the quilt is sewn together. I had never thought of doing this. . . but I saw this amazing quilt and read with great interest how she put it together. She left her papers on. I will as well. Really, go look at that quilt. Holy wow! And that comes from someone who is not so much a scrappy lover but this is all kinds of awesome. I would not have wanted to rip all of the papers off of that one but again, I don't have that many geese, I have just a small gaggle ;)
Just a little note about the paper I am using. I bought some Carol Doak paper. It's better than 20 weight copy paper, I still can't see through it, but it is much easier to tear away. I did order some newspaper paper from Amazon. I figured for about 4 bucks for 500 sheets I could give it a whirl... it hasn't come yet. Sloooowww shipping on those! I'll have the top done by the time they get here! I will however try them out when they get here and let you know what I think :)
And finally, here is a picture of what I have on my wall so far :)
 |
| Picture is bad, it is just before sun up here and good light is no where to be found. Insert colors from picture of pieces above :) |
Linking up with Judy over at Patchwork Times for Design Wall Monday and Marelize over at Stitch by Stitch for Anything Goes Mondays.
Until next time, keep on quilting!!

I once went to a tailoring class. The instructor showed us the way she does things and then told us to do all but the special technique we were there to learn the way we liked best. There's a reason there are multiple ways to do things. I generally don't like to paper piece, but a quilt I did with "fat flying geese" using paper piecing was the best way.
ReplyDeleteI'm curious to see what you are making so I'll look back to older posts to find out!
Helen
The blocks look great!
ReplyDeletePaper piecing seems to be my go to more and more.
ReplyDeletePaper piecing can be a life saver for some projects. Your flying geese look great.
ReplyDeleteI enjoyed reading your process, Judy, and almost snorted iced tea out of my nose when you started losing sleep over your copies! Your blocks look great. I'm with you about not wanting to remove papers...it's one of the reasons I am not in love with PPing. Avoid, avoid, avoid! I'll be interested to hear how your newsprint works.
ReplyDeleteNext time you make a template to use to guide your cutting, rather than gluing try using some contact paper. (you know the shelf paper with sticky on the back?) It is easily repositionable and you can reuse it many times. This looks like quite a project.
ReplyDeleteYour blocks look great, flying geese are not my favorites to make. What I do is I make them oversized then trim them down using my flying geese bloc-loc ruler.
ReplyDeleteLooks like you got it figured out. I can't help with your logic, because I have still not tried paper piecing. Your quilt will be amazing.
ReplyDeleteI think your logic is sound - but its always worth a test. :D I've used the newspaper print before, and for me at least, it was a one shot deal. If I had to rip out stitches, the paper wasn't usable again. I just stick with standard copy paper and I hold it up to a desk lamp near me to see through it. I almost always keep the paper on until the very end, or at least till the block has been completely surrounded, otherwise pulling the paper off can distort your block and cause problems. Hope that helps!
ReplyDeleteYou are amazing, and these look terrific!! Sorry to add to your worries by mentioning about the grainline!!! "before sun-up" "nightmare maker" "keep a girl up at night" oh no!! What have you done to yourself, and I added to it?! I love the accuracy of paper piecing, but detest taking the papers off, especially if using regular copy paper. I'm interested to see what the Carol Doak paper is like. Can't wait to see this baby tout fini!
ReplyDeleteF9F09B9472
ReplyDeleteTakipçi Satın Al
The Forest Hile Kodları
Gardenscapes Can Hilesi
Pasha Fencer Hediye Kodu
Ücretsiz Beğeni
Wordle TR
Mp3 Dönüştürücü
Cami Şamdanları
Minecraft Premium