Thursday, November 26, 2015

Pillow finish and WIP

Yup, another finish. This one was not on my Q4 list. . . next one isn't on the list either. . . there have been a couple of squirrels visiting my house ;) First up, I had some left over animal fabric and I knew I probably wouldn't be using it any time soon so I decided to sew up a cushion cover to go with the quilt. Very quick. Big chunks of fabric, and this time even though the quilting required a ruler, it required NO marking so it was quick - but very effective. . . IMHO :)

I love how the mustang fabric looked in the quilt BUT are those pigs not just the cutest thing you have ever seen??

I really really like how this design looks in a bigger block. Now to remember it when I'm wondering 'hmm, what should I quilt here. . . ' :)

Happy little piglets ;)

The last bit of flannel leftover from the backing of the quilt.

I just liked this picture, so I put it in ;)

And one more look :)
 I used the left over flannel for the back of pillow. So soft! AND there is NO flannel left! I'm not sure that I'm so excited about that - I might have to order more of it in different colors. ;)

I used the same Angela Walter's design from her Shape By Shape book in the animal squares and used matching thread. This design is SO cool on large blocks (these are 9" blocks) and they don't take long to do because they can be done with no marking - bonus :D I did use my circle template for the circles in the sashing, not because I wanted them perfect, I just happened to have the right size that would evenly space them. And the marking took no time, another bonus, gotta love that! This pillow is a little bigger than the others I've made. It finished at about 23" square. The pillow form is 24"x24". I always use the Amanda Jean's tutorial for envelope back pillows. The only thing I do differently is that I bind mine. I kind of dig how it looks. I also put a piece of fabric on the back of the quilt sandwich when I quilt. I don't know why. . . it really is not needed. I am finding however that this practice is using up some of the fabric in my stash that has me thinking "what were you thinking?!" :)

What am I working on now? Another pillow :) This one is for my husband. He has decided he needs more things made by me. . .and I think I have finally convinced him that garment sewing by me is not happening ;) Here are a couple of pictures of where I am at right now. This stage will hang for a day or two more as Roseanne (my sewing machine) is in the shop for a much needed spa day (or three). I had drawn out several free motion designs on paper and none seemed to thrill him much. Then I remembered a stencil I had purchased right after taking that class with Cindy Needham last January. I brought it out and showed it to him. The smile said it all :) This looks really wonky right at the moment. I think it will be OK once all of the thread is applied ;) Oh, and it is going to be a cushion cover so it will have good support for straightening it out - probably a good thing! LOL
Still pondering the face. . . this is a bit wrinkled but I'm thinking if I leave it unquilted, the face will pop out. . . kinda creepy for sleeping on but it might look kinda cool :)
Every other space between the rays will get sunshine, moonshine, sunshine, moonshine :) For the sunshine, I'm using first a red thread, then an orange and finally a yellow thread. Kinda digging how that looks!
The moon portion of the face is a light blue Aurifil 50 wt cotton. I just kept going back and forth until I was satisfied with the 'thread saturation' . . . I think that is a technical term isn't it? ;)
My machine comes back home tomorrow. . . or Saturday. This will be finished within the week (OK, a few days, there's not much left to quilt and once that's done, putting the pillow together is a snap. I have #4 on my list ready to quilt. I'm going to be scrambling to finish #5. . . I can do this even though there have been more than a couple of squirrels visiting!!

Linking up with Amanda Jean for Finish it Up Friday. If you are here from there, welcome! :) And if you haven't been yet, go check out all of the fabulous finishes that are linked up to this great party. If you are looking for me, I'll be spending Friday afternoon checking out the links!

Friday, November 20, 2015

Q4 - 3rd Finish

Happy Friday!! Goal #3 on my Q4 FAL list is done! I had a few fights with this quilt. A few fights with my machine. . . UGH! And a few fights with myself - just get it done!!! :) This quilt was commissioned by a dad, to gift to his daughter for Christmas. The only input into design was, her favorite color is pink, she loves lambs and sprinkle in a few chickens, pigs and horses for good measure. . . pink! To read about fabric, pattern and the making of the top, go here. When I was coming up with a quilting plan, I kept saying to myself, keep it simple, just keep it simple. . . grin Well, it looked simple originally and then once I did a few blocks I realized just how long all of the marking was going to take. . . like a lot longer than the actual quilting! OK, I know, pictures, we need pictures to see what in the heck are you rambling on about!! :) I'm going to tell the tale in pictures :)
Simple right? ;) LOTS of marking. . . Ruler work. . . Did I mention marking?
I made a template for the heart, so yes, each was drawn out and every one is pretty much exactly the same. And I measured for placement for each one. . . the marking took longer than the quilting!
For the triangles, I marked a line across the height of each and a line down the middle so I'd know the placement of the points. Every one measured and marked. So they should be mostly identical. Again, marking took longer than quilting!
I didn't want to do much for the center animal blocks so I just outlined them and used my curved ruler to go around the block again. . . more ruler work. . . but no marking :)
The dark pink frames got more ruler work, marked the inside of the frame for 1 inch circles and free handed it from there. Frames are the same size. . . circles may or may not be ;) The horses got a design found in Angela Walter's book, Shape by Shape. More ruler work. . . Seeing a theme here?
Corners and setting triangles were all free handed, free willed, free form, just free!! I needed to let go a little and just quilt!! :) For the feathers in the larger corners, I drew the spine in using my curved ruler as the 'template' and then just filled that bad boy in - FUN!! :D
The back!! LOVE!!! It is a fluffy heavy flannel quilt back. The quilting just POPS!
I wish you could feel this!! It is SO soft and fluffy! The thread isn't real obvious on the back but oh man, the design is definitely there!
I don't usually add this many pictures of the back but I just had to include this one :)
On the side setting triangles, I did spirals, paisleys and feathers. Went a little wild ;) In the smaller triangles I did a single heart and echoed it.

I didn't try to make the two larger corners exactly the same. I might have been sick of consistency by the time I got to them ;)
Final picture :) I'm kind of digging how it looks like those horses are galloping across the quilt!
Quilt stats:
Pre-wash the quilt was 67.5 x 78". After wash: 66" x 76.5" - not bad on the shrinkage huh? I was shocked. Why? Because I did not pre-wash the flannel backing. . . gasp! I think this is the least amount of shrinkage I have ever had with a quilt.
Batting: Quilter's Dream Wool. My client asked if this quilt was going to keep his daughter warm. . . yes, yes it will ;)
Thread: Aurifil Poly in Mango in the bobbin. Aurifil 12 wt (Yup, I FMQed with it and had no issues) for the frames around the animal prints, Aurifil 50 wt for the horses and Aurifil Poly for the dark pink frames and the hearts and triangles. The setting triangles and corners were quilted with YLI 40 wt cotton variegated thread.
See my last post for fabric and pattern link (FQ Shop Welded pattern was the hopping off point but I did tweak it. . . almost beyond recognition! LOL)

My machine decided to be a PITA during the quilting of this quilt. It started making an odd noise and then it would deposit a nasty mess of thread on the back of the quilt. Thanks for the warning . . . I guess. So I did a good amount of stopping and ripping. About half way through I decided I had had enough and took everything apart (no, not literally!! LOL), vacuumed it out (Ummm, no lint from the thread because at that point I was only using poly but holy wow!! I had forgotten how much lint flannel produces!!) and put it all back together again. Pretty sure it was the lint build up. I didn't have the issue again! Note to self, flannel backings are going to require several bobbin area cleanings!

My patience ran a little thin towards the end of the quilting. . . marking got really old, really fast. In the end, definitely worth it but slogging through it was not much fun. Will need to consider that next time I come up with a brilliant design ;) It took me a full two weeks to quilt this one. Yes, it was time intensive but it was more about making myself sit down and just do it! Oh, and in case you are wondering, I used a purple air erasable marker. I wasn't going to take a chance with anything else. That also meant that I marked only as much as I quilt quilt in about an hour - that's about how long I get before those marks are GONE at my house.

OK, I think enough has been said ;) I'll be linking up this post with Adrienne's linky party at the end of the quarter for the Q4 FAL. Three down. Two to go. . . I know I'll get one more finished. Yup, Renee, yours is next! I can't wait! Free form free motion quilting! It will be a nice break from the restraints of this one!! ;)

Linking up with Finish It Up Friday too. If you are in need of inspiration, you might want to head over there!

Until next time, keep on quilting!!
Follow on Bloglovin

Monday, November 16, 2015

Lambs, Pigs, Chickens and Horses! OH MY!

Sorry, it's early and the post title just kind of came out :) I have finished the flimsy and almost finished the quilting on goal number three of my Q4 FAL list! I have to admit, when I made that list I thought I would have the first three knocked out easily by the end of October. . . best laid plans, eh? This quilt was commissioned and will be given to a college age young woman from her dad. She is going into agricultural veterinary something or other and has a special affinity to lambs. . . and pink. :) Do any of you have any idea how hard it is to find animal prints that are not baby like? Oh, we won't talk about the new line that came out within the last couple of weeks that would have been perfect (Homestead by Emily Isabella for Cloud 9). . . had I known about this I would have waited. Alas, I did not know and so I worked with what I had. I think I did OK :) How about you take a look and see!

The pattern I started with is Welded from the FQ Shop. I did a little tweaking :)

The lambs, chickens and pigs are all from the Timeless Treasures line called Babes in Farmland. The horse fabric is Cotton and Steel Mustang. The 'flowy' (technical term right there!) dark pink fabric is from my LQS and I'm sorry but I don't know the name. The pink and gray is Zizzo by Erin McMorris.
The gray setting triangles is Sketch in Graphite. It was right about here in the process that I realized there were some consequences additional design decisions to be made as a result of adding an additional block to each row. . . corners are going to require a little thought. . .
After discussing it with the client, the decision was made to do the corners in a solid triangle. . . and then quilt the snot out of it ;)
TA DA! Finished flimsy :)
All of the animal squares were cut on the bias. . . and fussy cut. . . the bias cut was not something I had really thought about prior to commencing the cutting but it became very clear very early in the cutting process :)

I decided on setting triangles because I wanted the center to float. I think that worked out well. This is not my first on point quilt. It has been awhile though and I had forgotten about the pinning. . . all that pinning!! LOL As you can see from the first picture, I made all of the blocks, had all of the sashing pieces cut and put everything on the wall prior to sewing it together. I was actually able to sew the entire top together with no upside down animals! :) Even though there is a good amount of bias in this baby, it came out square and without ripples too - double bonus! haha

The top is now mostly quilted. I just have some sashing pieces and half of the setting triangles left to quilt. The quilting has been slow going but I'll save that story for the finish post. . . which will be later this week :) It has been a love/hate relationship with this top during the quilting. I am currently in a love place and can't wait to get it finished up and washed so I can show you! Oh, and of course deliver it to the customer ;) Finish post here!!

Linking up with Beth for MCM, Judy for DWM and Amanda Jean for Finish it up Friday. Needing a little inspiration? Check out their linky parties! I'm off to finish up the quilting on this one! :D

Until next time, keep on quilting!
Follow on Bloglovin


Thursday, November 12, 2015

Online Trunk Show!

Have you seen the Trunk Full of Quilts linky going on over at Whims and Fancies?? How much fun is that? I have been over there several times this week enjoying all of the sharing that is happening and I can resist no longer, I must participate :)

Online Quilt Trunk Show | Whims And Fancies

If you haven't seen this (and how is this possible, so many great bloggers participating!!), or haven't checked recently on new links, check it out! So much inspiration and so much fun seeing other people's progression in their quilt making journey :) Here's mine! (A little note about where to find 'the rest of the story' about the quilts shown. For the first two, click on the caption and you will be taken to the final blog post for that project. For the remaining quilts, just click on the picture.)

Yup, microfiber suede and . . . ready? That striped fabric is Burlap!! Not kidding. And not one stitch of quilting in that huge space. . . This quilt still lives on our bed in the summer.
This quilt taught me two very valuable lessons. It was the first pattern that went totally awry and quite honestly, I didn't even realize it until it was completely sewn together. . . And it didn't matter, I lived it anyway! Secondly, this was the quilt in which I really fell in love with quilting! I was starting to figure out right about here that the denser the quilting, the more I like it :) This quilt is used by my husband daily. Every time I look at it I have to resist the urge to grab it and quilt more, specifically something in those squares! ;)

http://quiltparadigm.blogspot.com/2014/01/out-of-square-quilt.html
This quilt was my first attempt at curved piecing. LOVE this quilt. It is currently folded up next to me, sometimes I use it as a pillow for a nap. . . Why is it still folded up? Because it definitely needs more quilting! I'm thinking that will happen in the first months of 2016 :)

http://quiltparadigm.blogspot.com/2014/01/first-finish-of-2014.html
My first pieced backing!!

http://www.quiltparadigm.blogspot.com/2014/01/my-favorite-to-date-qayg.html
My first commission and my first QAYG!
http://quiltparadigm.blogspot.com/2014/01/ride-wave.html
First use of shot cottons (these are Kaffe Fassett) and first use of contrasting quilting thread. . . really contrasting - BLACK! :)
http://quiltparadigm.blogspot.com/2014/02/doing-happy-dance.html
My first (and only) scrap quilt and my confirmation that maybe patterns are not my thing. Click on the picture to go to the final post - it was quite the ride this one!! And I LOVE it! I sleep under this one every.single.night!! :)
http://quiltparadigm.blogspot.com/2014/03/ta-da-triangle-log-cabin.html
A lot of firsts with this one! First triangle quilt, first attempt at improv (none of those logs are the same size as are none of those inside triangles), first quilt made with Oakshott Cottons. . . this is when the love affair started ;)
http://quiltparadigm.blogspot.com/2014/05/halographic-hexigonal-triangles-its-wrap.html
First online QAL! First time using rulers while quilting on my domestic! Yes, I now use them often :)
http://quiltparadigm.blogspot.com/2014/08/spin-finally-finished.html
First show quilt! First time using double batting (wool and cotton). To read about my first show experience, go here.
http://quiltparadigm.blogspot.com/2014/12/pastel-nightmare-over.html
Biggest lesson on this one - don't enter a challenge if you hate the chosen fabric!! I don't do pastel. :)
http://quiltparadigm.blogspot.com/2015/01/whole-cloth-heaven.html
My first 'live' class! First truly successful use of stencils First use of 'scribble quilting' - LOVE!! :D
http://quiltparadigm.blogspot.com/2015/04/triangle-transparency-blog-hop-shock.html
First pattern testing! Yeah, me!! ;) And first use of light table for quilting. Definitely won't be the last!!
http://quiltparadigm.blogspot.com/2015/08/family-tree-quilt-finished-for-reals.html
Family tree quilt. Recently added more stitches to this one. Lesson? Sometimes more stitches is exactly what a quilt needs and sometimes the quilter just needs a little more time to develop her skill before adding those stitches :)
There are SO many more quilts I could add to this show . . . I am restraining myself :) If you want to see more, click the tabs above to see pictures of all of the quilts I have finished. This little trip down memory lane spans a little over two years (my entire quilting journey to date). I have recently had several conversations with different people about my quilting journey. A common question is, how did you get to where you are so fast? There is only one answer to that, practice. Time on the machine. I am lucky. I can quilt every.single.day. And in the beginning, I did! :) There are still times that I will slap a practice sandwich together and just quilt. Sometimes I just need to stitch :) What I regret the most is throwing out those initial practice pieces. I really wish I could show you how I started out and promise you - it looked just like any beginner - bad tension, toe hanger stitches, jerky movements, nests, oh the list just goes on and on! So for those of you who think you can't, or stop because those initial pieces are so 'awful', please, keep going or just give it a try! It's not for everyone, I get that. But please don't say I can't before you even try! OK, stepping off of my soap box ;)

Climbing back on. . . ;) Chuck that fear aside! Most times I had no idea that I wasn't supposed to be able to do what I was doing! LOL Sometimes, ignorance really is bliss and most rules were meant to be broken!! I'm off the soap box, go forth and quilt!! :D

Go check out the linky party at Whims and Fancies!! I promise, you are going to see amazing quilts and read very amazing stories!! And if you are so inclined - share your trunk full of quilts!! :D

Until next time, keep on quilting!!
Follow on Bloglovin

Friday, November 6, 2015

Q4 Finish #2 - Twirling #2

Be forewarned, this is a picture heavy post!!

This is my second finish on my Q4 FAL list for the Finish Along being hosted by Adrienne over at 
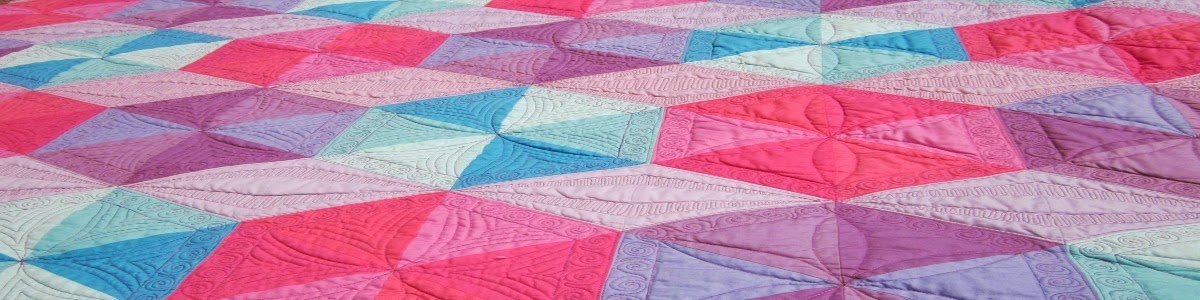
On the Windy Side. I finished this quilt last week. It is now at its new home. I'll admit it. I had a hard time handing this one over. I think it might be my favorite quilt to date. I had a total blast quilting this quilt. Yes, I quilted it to death but it went surprisingly fast. Very little marking (only the feather spines) and flying by the seat of my pants mostly ;)

In my post about the finished flimsy, I mentioned a mistake and asked if you could find it. . . have a look again, can you find it? Yup, it's still there. . .

The texture. . . Awesome! I swear this quilt is square. . . I obviously need to do some work on getting my photographs to show that!
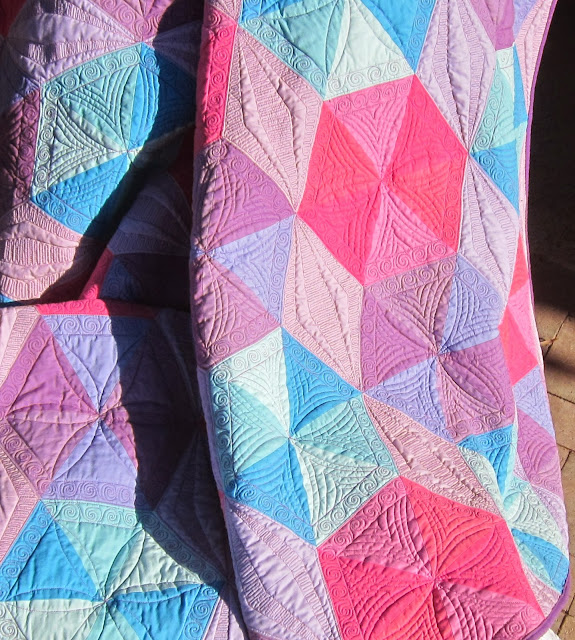
I used the same thread in the color spiral. King Tut Lapis. I chose a darker thread because I wanted those lighter colors to show a little darker. who knew finding lavender/lighter purples would be such a challenge!
The thread in the gray spiral is Aurifil Poly in French Lilac. The corner design is a portion of a stencil. I used it in all four corners but in the bigger corners chose to use just a portion of the stencil and then fill it with feathers, spirals and paisleys. YLI 40 wt cotton in Plum was used for the larger corners.
This smaller corner is the entire stencil design with some echos.
I could not stop running my hands over this quilt!!
And I obviously couldn't stop snapping pictures either!!
In the gray, I just did a gentle curve alternating directions in the triangles. I had no idea when I started this design how effective it would be! And it was QUICK to quilt - always a bonus! :)
The color portions got feathers, spirals and paisleys. I did mark the spines using my small curved quilting ruler.
I was kinda just digging the way this feather curved around the corner :)
Another full shot for good measure. Did you find the mistake yet?
And the backing. Prisms by Studio E.
That piecing mistake. . . Here's the story. The flimsy hung on my design wall for almost a week before I started quilting. Did I (or my QA dept head, otherwise known as my husband) notice the mistake? No. I didn't notice it until I had quilted over it!! It is there, in the darkest ring on the bottom right. Two purple triangles together. . . I can't even type what came out of my mouth when the realization hit. And the sinking feeling. At this point that portion of the quilt was completely quilted (including ditch stitched) except for the gray solid corner. I stared a long time and emailed a couple trusted quilty friends, Sandra and Yvonne, and asked for their opinions about pulling out the seam ripper or leaving it. After much deliberation, I decided it would be OK if left. BUT, only if my client agreed. I happened to be meeting her for lunch that day. We talked. I showed her the picture. She couldn't find the mistake initially. And then said, do not rip it out. Not going to lie, when I got home, I almost broke out the seam ripper anyway. . . and then the reality set in. . . ripping it out would be a pain, no question. What was questionable was, how is the quilting going to look . . . would I be able to blend it in and make it look like I had not taken stitches back to a spot and then started again. In the end, I decided that the disaster this could become was much greater than the current status of the quilt. So I left it in and after quilting, I think it might be even a little less noticeable :) It's OK, lie to me and tell me you can't see it ;) haha

My client decided she wanted a matching pillow. Yup, I can do that and I have become more than a little smitten with making pillow/cushion covers :) I was going to do a miniature version of the quilt and my head started hurting at the thought of trying to figure out the math AND the thought of working with miniature HSTs. . . that idea was sidelined quickly! Remember those extra squares I cut? Some of them turned into this:


LOVE!! :D Those center squares are 1" finished. YIKES! I have a new respect for all of you quilters out there working and loving piecing with miniature pieces of fabric!

I'm delivering the pillow cover today. I will be sad. Every time I walk by it I have to pet it. It makes me smile :)

So that concludes the show and tell portion of this post :) Item #3 on my FAL list is currently under the needle :) Stay tuned, I'll share the flimsy in a few days. Quilting is going to take a bit. . . You know I couldn't keep it simple ;)

Linking up with Finish it up Friday and with the FAL linky party over at Adrienne's when it goes live :)

Until next time, keep on quilting!!
Follow on Bloglovin