Friday, August 21, 2015

Jason's Quilt Finished

It feels really good to have this one finished! This is finish number four of my list of seven for the Q3 FAL over at On the Windy Side. I don't know if I'll finish everything on the list, but I'm going to get darn close! :)

I did it. . . I was actually able to restrain myself and do only straight line quilting on this quilt! I know! I can hardly believe it myself!! You can read about the flimsy finish here and find the information on how you can make these blocks here. But before you check those links out, let's have a look!
Now that it is finished, I'm still not in love, but I think I might like it ;)


I used Prisms on the back again. My love affair with this backing fabric continues. I bought mine from Backside Fabrics. This link is to all of their modern wide quilt backs. I'm not affiliated, just a really happy customer. The prices are great and the shipping is fast!

Quilt Stats:
Finished Size: 64" x 71.5" after washing
Fabric: FQ bundle of Doe and background fabric is Kona Charcoal. Backing is Prisms in Royal by Studio e.
Thread: Aurifil 40 wt 2250 on top and King Tut Lapis in the bobbin. Yeah, another shocker - only two threads used! :)
Batting: Quilter's Dream Wool. My new roll should be delivered Monday!! Woot woot! :)
Yup, that's red thread :) I was a little nervous about this decision but I have to say, I like it! :)

Just another gratuitous picture from another angle ;)
The only part I haven't talked about is the quilting. I quilted the entire quilt with my walking foot. I thought using my FMQ foot would be quicker to fill in the triangles and it was. . . except that my tension decided to go wonky and I didn't check it after I started quilting the quilt. I did after some stitching on a practice piece, but not on the quilt. . . and it was off. . . way off. So I spent a couple of hours ripping. Since there were relatively big loops on the back and this was straight line quilting, the ripping went relatively quickly but that didn't relieve the frustration of having to do it in the first place! I have had Rosanne for a little over a year now, it is probably time to take her in for her tune up. . . but that means I have to go without my machine for a few days. . . That seems like torture!

Hmmm, thought I got all of the Nug hair off of it before I started snapping. . .
I did some marking and then followed the marked line with the walking foot. I did not SITD first which means there is some distortion of the blocks. I made a very conscious decision about not SITD first. Chalk it up to lazy and just wanting to have this top done. Not a very good or technical reason but it's the truth :) When I got to the triangles on the left and right I decided to go random :) I can only be restrained for so long, people! They are still straight lines, and I'm pretty sure all of the shapes in those areas are triangles. I just kept slashing through with more straight lines until there was enough quilting to balance out the straight line more conventional triangles in the top and bottom quadrants of the quilt. That part was fun ;)

I decided to go scrappy with the binding using some of what was left of the FQ. I'm still not in love with this quilt. . . but I'm not the one that has to love it, right? :) There is still the matter of the 200 resulting HSTs from making the blocks. . . What to do with them. . . I can't believe that there were no takers for my request plea for someone to square them up! ;) They will have to wait. Nod to Gees Bend is next. It has awaited its finish long enough! My hope is that there will be another Friday finish next week! I just need to keep this sewing mojo flowing!

Linking up with Crazy Mom Quilts for Finish it up Friday and I'll be linking up with the linky party at the end of the quarter over at On the Windy Side. Lots of inspiration to be found in both places!

Until next time, keep on quilting!!
Follow on Bloglovin

Monday, August 17, 2015

On My Design Wall... Last week....

I started this post to publish last week. . . then I got sidetracked with finishing this flimsy. . . then our internet went down. . . after a trip to the store, a new modem and a few choice words it is back up. The flimsy is finished and can be seen here. As promised, a post flimsy finish break down of how  the blocks came together!

I am obsessed. I have to get all of those items checked off my Q3 FAL list! I am seeing the ingeniousness of setting goals and publishing them for the whole world to see! I have three down, four to go. . . now I know one of those is going to roll over, even said that in the post but I'm starting to think that the first six might actually get finished!

This is a process post, not a finish post. I spent hours, no days really, looking at the Doe fat quarter bundle I have for Jason's quilt (#6 on my list). When this line came out, I had to have it. I even pre-ordered it! I have never done that before. . . and I waited. And Waited. And finally I got it in my hot little hands. . . immediately pulled the bundle apart and inspected every piece. . . and I did not like it. Really did not like it. And I was sad. Don't hate on me. I know this is not a popular stance and that much love has been shown all over the internet for this line. I just was not feeling it. So I put it in a drawer. . . True. Didn't even put on my fabric shelves. I kinda didn't want to look at it. Every now and again I would pull it out and look at it again. And put it back in the drawer. And wonder if I would ever use it.The thing is, it is perfect for a masculine quilt. So I bit the bullet and started searching for the perfect pattern.

That process took awhile. . . then I saw this post from Cindy over at Hyacinth Quilt Designs. I had saved it in my Bloglovin feed. Oh yeah! Cindy's blocks were made with 3.5" x 6.5" rectangles for the print, 3.5" squares for the background and 1" x 3.5" rectangles for the middle strip. The finished block is 6.5" x 7". You know me and 'small' blocks. . . I made a test block using 4.5" x 8.5" rectangles, 4.5" squares for the background and 1" x 4.5" rectangles for the middle strip. That worked out well:
I have NO idea why this picture decided to upload horizontal.... Yup, four bonus HSTs for every block... Umm, that's a LOT of HSTs!
Then I decided that the best use of the FQ was to do 5" x 10" rectangles, 5" squares and 1" x 5" rectangles for the middle strip. Those of you math geniuses out there know this is a recipe for a block that is not going to work out so well. . . the middle strip was not long enough. . . I should have put a little more thought into that huh? BUT not only was it not long enough, I could see if I made the background strip and the print strip the same length, it was not going to line up right. . . WTF? Why? Why when the dimensions are reduced to whole numbers instead of half, does it change the halfsies rule for the middle strip?? I don't know the answer to that question. I just know it is. So I went with it. My blocks are made with 5" x 10" rectangles from the print fabric. 5" squares from the background fabric. 1" x 5" rectangles of print fabric and 1" x 5.5" rectangles from the background fabric.

Here's the rub. . . before I made my first block. . . yeah, I cut ALL of the pieces I needed out of the background fabric and my rectangles were cut at 1" x 5". . . Note to self, test block again when changing dimensions. . . oh well. The other thing is that my blocks turned out square. 10" x 10" unfinished. This opened up a whole new world of opportunities for layouts :)

Sewing the block together went relatively quickly. I ironed all of my 5" squares of background fabric in half on the diagonal. It is now that I am wishing I took some photos of this process. . . darn it! Then I placed them on my 5" x 10" rectangles - lined them up perfectly - both diagonal lines should slant the same way on the rectangle - one rectangle should have ironed horizontal line going right to left / and the other should have the ironed horizontal left to right \. Clear as mud? :) After sewing the first line, I sewed a second seam on all of them so that when I cut the corners off. . . I'd have HSTs! . . . and of course I could use them somehow in the quilt right? . . . No. LOL They will become a quilt themselves. . . there are 200 of them!! I'm not really excited about this - I'm still not even in like with this fabric line. I was hoping as I worked with it I would change my mind. Nope. Not happening. :)

OK, back to these blocks. I pinned. Yeah, me, I pinned. It really does just look better if the joins meet in the right place :) I did not pin anything when I made that first block. And it turned out perfectly. . . beginner's luck! I needed 49 blocks, 7 x 7 layout and then I figured I would put a row of HSTs at the top and the bottom of the quilt to make it not square. . . but when I put the HSTs up on the design wall, no. That didn't look good at.all. So I put a 4" strip of the background on the top and on the bottom. That works :)

After getting them all sewn together I started playing with layouts. If you read my flimsy finish post on this quilt you know there was an alternate layout that my #1 Fan was rather partial to. . . This was his vote:
I have to admit, I really like this layout. . . but I like the one I went with better :)
Sewing the blocks together was accomplished with more pinning. . . A couple not so great matches but not many - which is good enough for me!

I really like this block. I may do it again. In solids. I'm thinking one could get some pretty cool 3D effects with this block. . . but that is for another day. And this is also for another day:
200 HSTs that will square up to 4". . . someone want to volunteer for that job? :D
Quilting has commenced. My practical side won. I'm straight line quilting it and I have yet to go completely crazy with it. . . Notice I said yet! :)

So there you have it. If you have any questions about my less than stellar explanation of how these blocks are made, please leave me a comment or shoot me an email. I'm happy to explain further! Linking up this week with DWM over at Patchwork Times. A week late. . . better late than never right? :)

Until next time, keep on quilting!
Follow on Bloglovin

Friday, August 14, 2015

Flimsy Finish - Jason's Quilt

I have a flimsy finish to show you today :) I have a post started about the process of making these blocks, the fabric and all that good stuff. I got so into getting this finished . . . I haven't finished that post. Does that ever happen to you? I am going to finish that post and I'll link this post to that post and that post to this post. So this one will be relatively short - just the brief facts folks :)

The quilt is made from a fat quarter bundle of Carolyn Friedlander's line, Doe. The inspiration came from this quilt made by Cindy over at Hyacinth Quilt Designs. She sent me the dimensions of the block. And then I did some tweaking. . . which resulted in a square block (hers is not) and a few issues with that middle strip which resulted in a morning of me pulling my hair out in frustration. . . But I got through it and here it is! :)
Some of the colors are a little washed out but I think overall the distribution of color is relatively balanced.
I took a little closer picture to show the navy blue blocks closer. I knew these two blocks were going to fade into the background but finding a background that worked with all of these blocks was not easy. . .
My #1 fan is not impressed with this one. . . I showed him a different layout - and he liked it. Then I sent him a picture of this layout, he said "Looks the same... " followed by three thumbs up. My husband liked this layout better as did Nora, one of my nieces. When I finished sewing it together, I sent a picture to my number one fan. The text sequence went like this:

Me: You didn't notice the diamonds. Sewn together now (with picture attached)
#1 Fan: Gah, nooooo!!!
Me: LOL I take it you do not approve
#1 Fan:You were spose to leave it and sew it!
#1 Fan: U let right brain run rampant again. . . Lol
#1 Fan: Feel free to put that bit in ur blog post. Hahaha
Then I sent a couple of texts telling him that I just flipped a few blocks and pictures would have to wait because it is hotter than Hades out there today (decided inside pictures will do for this post - the finish post will go outdoors). And then he texted this:
#1 Fan: Judy and organization are like oil and water.

I have been laughing throughout the day about this exchange.

If you are interested in how I constructed this quilt and there isn't a link here to take you to my post on the making of this flimsy, come back, I'll be posting it in the next couple of days :) And just because I have one more, here's another picture ;)
I added borders just on the top to knock the quilt out of square :)
I am well on my way to being able to cross off the fourth of the seven items on my Q3 FAL :) YAY! Linking up with Amanda Jean for Finish it up Friday.

Until next time (with the deets on the making of this flimsy), keep on quilting!
Follow on Bloglovin

Thursday, August 6, 2015

Family Tree Quilt Finished. . . For Reals this time!

I am on a roll people! I'm not sure what has happened over here but things just got a lot more productive! :) It might be that I decided to play along and set some goals for the quarter and link up with Adrienne over at On the Windy Side for the Q3 FAL. Or it might be that the nightmare of purchasing a new vehicle is over. . . after a month of madness. Or it might just be that it has gotten so hot outside that I don't want to leave the house. . . I'm guessing it's a combination of all three :)

Goal #4 on my FAL list was to add a name to the Family Tree quilt. Seems simple enough right? Yeah, things are never as 'simple' as they sound around here :) First, here's the back story. I was talking to my mom and she mentioned that she was going to send this quilt to someone to have someone else add my nephew's step son's name. . . Someone else!! This is an edited version of what my response was "
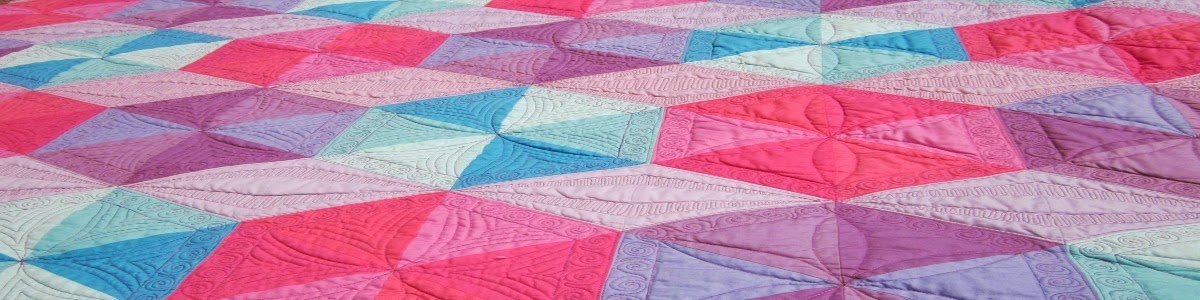
Hell NO, you are not letting anyone else touch that quilt!" Her response was "You never would have known had I not said anything." Seriously?? Before I start hyperventilating again, we'll move on... I told her to send the quilt back to me. Which she did. It' has been sitting here for umm.... a couple of months :) I have been itching to get my hands on this quilt again! I was not happy with how puffy the background was and knew immediately after binding it that I should have quilted the snot out of it. . . The before and after pictures of this quilt are the perfect example of why evenly distributed quilting (whether dense or not dense) is important. So let's start with the before and after pictures. Then I'll walk you through the sometimes very painful process to get here ;)
I think you can see pretty well in this picture that the background is really poofy. I used a double bat (wool/cotton) so think major poof! :)
OH YEAH! So much better... IMHO :)
What a difference, huh?? I am SO happy with the end result! I can send this back to mom and she can hang it back in its spot and I won't cringe at the thought of everyone seeing this quilt with a 'naked' background ;)

Here's what I did. First, I had to remove the quilting sleeve and label. This was very painful for me. . . not because it took a long time, it took no time really. It was painful because they were hand sewn on . . . you all know that hand sewing is not much fun for me and the thought of having to sew them back on was daunting. So I just took took the parts off that were over the background. .  . :) And when I sewed the binding back on, I sewed the label into the binding on two sides - tricky huh? Learned that little trick from Jasmine. I don't always remember until after the binding is on. . . but not this time! :)
The label even lays SO much better now that the background is quilted :)

Speaking of binding. . . it had to come off too. I had machine sewn the binding onto the front using a very large stitch - thankfully! :) Then I looked at the stitching which attached the binding to the back of the fabric. . . hmmmm, must have forgotten to reset my stitch length. . . I had used my 1/4" foot and my machine has a 1/4" setting. . . with a stitch length of 1.8 for piecing. Ugh! It took about an hour to remove the binding. BUT, once it was off, I could quilt the background! Now that is what I call motivation! :D

But first, I needed to figure out the best way to get Jason's name onto the quilt and have it look like it had been there all along. After staring at it for awhile, I figured out where I was going to place his name (thankfully there was a perfect spot for it!). Now I had to start ripping. I did not realize until that moment. . . metallic thread kind of binds itself to the quilt. I don't think those stitches are meant to come out! Oh, this is going to take some time. So I started quilting the background :) And occasionally would go back and rip some more. Here is a snap of the half way point of ripping.

Once I finished ripping of the leaves, I spritzed the top with a little water. Those holes completely disappeared :)
The past couple of days have gone like this. Quilt. Rip. Quilt. Rip. Quilt. Rip. Quilting = fun. Ripping = no fun! I have to say though, mixing it up a bit made it a lot little more tolerable. I spent about 6 hours ripping just this area. I did not want the fabric to rip. . . I should say I didn't want to rip the fabric so I took the stitches out one.at.a.time. Being a little anal about it paid off, no rips, no snags and when I was finished and after the water spritz, there was no indication that it had been quilted previously. So here is the end result of adding Jason's name.
What added name? :D
One more thing to do to this quilt before it goes back home. . . When I showed the quilt to my niece, the first thing she said was "You spelled my name wrong!" . . . NOOOOO!!!! I felt so bad! There was no way this quilt was going back to its home without making that right. I spelled Shanee's name with two Ns. Crap. OK, how big of a deal could it be to take out an N and the last E and replace the N spot with an E. . . make sense? :) Well, I did not remember that I had gone around each letter at least twice... Makes them stand out real nice right? Not so much fun to rip out! It took me 1.5 hrs to rip out those two letters. . . and about 10 seconds to put the E back in the right spot! But it is done and now I can sleep at night! :)
For those who have been following me for awhile, know that Shanee is my Goddaughter. . . yeah, I spelled my Goddaughter's name wrong! But it is right now! :D
OK, all is right as rain with the quilt, now time to put it back together. I was shocked at how flat the quilt was after all that quilting. The quilt really didn't need to be blocked again but I did square it up. I thought I might need to make new binding. I was careful taking it off but it was pretty much shaped exactly as it was when it was on the quilt :) So I ironed, spritzed with water, ironed, spritzed, ironed. And it came out good as new! This time when I sewed the binding onto the front of the quilt (yes, by machine) I used white thread. I think it looks cleaner than the metallic thread. I never would have taken the binding off just to change that but since I now had the choice, I went with white :)

Binding the quilt went smoothly. I did have to shorten the binding by a bit. The only thing left was to hand sew the two sides of the label and about 3/4 of the hanging sleeve had to be resewn. Sewing the label on went quick and wasn't so painful. Then I had the brilliant idea to sew on the top part of the hanging sleeve with the machine using the YLI nylon thread. It wouldn't be that noticeable right? .... yes, it was that noticeable. I didn't even take pictures of it to document what a bad idea that was. I hand stitched the top of the sleeve down prior to removing the machine stitching and that made the hand stitching go a lot faster. So it wasn't a complete waste of time! :)

The quilt is packed up and ready to head back to MN! It feels really good to have this quilt finished. Completely finished. For reals this time! ;)

I have already started cutting for Jason's quilt. Goal #6 on the FAL list. Finished flimsy to hopefully follow soon! I know, I know! What about Nod to Gees Bend??? I'll be working on that too. Pinky swear ;)

Linking up with Amanda Jean for Finish it up Friday and potentially others, which I will add here when I do! Where did this week go?? Oh yeah, I was sewing :D

Until next time, keep on quilting!

Sunday, August 2, 2015

Hugs and Butterfly Kisses - Finished Quilt!

I finished this quilt over a week ago. . . since then, I have been trying to figure out how to get a good photograph! It's big. Too big for me to get hung high enough (yup, I'm vertically challenged) and if I'm honest, hung at all without having it drag on the ground or end up in a heap in the dirt. . . and that just won't do! So this morning I enlisted the help of my ever patient husband who is not even a little vertically challenged :)

I showed the flimsy here and added this quilt to my Q3 FAL list (first ever!). I'll be linking up this finish with Adrienne's (On the Windy Side) end of the quarter linky party. Two items on the list done... I need to get moving if I'm going to finish all of it! I started working on the Family Tree quilt yesterday. Have any of you tried ripping out metallic stitching? Umm. . . not.fun. I'm thinking I can cross this one off the list by the end of the week :)

When I was planning the quilting for Hugs and Butterfly Kisses, I kept thinking - overall design. Do not go crazy. Because of the prints, no one is going to see the quilting. . . . I was not able to do it. Hi. My name is Judy. And I am a dense quilting addict. ;) There is a lot of ruler work on this one. What everyone says about practice is true, I'm getting pretty good at keeping those lines straight and actually hitting the mark when I come to the end of the line! Ruler work does take time, but I find it so relaxing - I don't have to think as much about getting stuck, where am I going to go next. I have heard others say that quilting in general is relaxing and they think about other things while they quilt. I cannot do that. If I am doing FMQing I need to stay focused. The minute my mind wanders, so does my quilting ;) LOL

How about some a lot of pictures?? :D
Yup, the second hanger from the right came off the top of the patio.... I couldn't fix it so decided to roll with it ;)
Of course the wind had to come up just when I went out to take pictures. . . that piece in the corner is going to be hand sewn down and I will put my label information there. Yes, I should have sewn that down prior to washing. . .
The colors of the X blocks are a little more true in this picture. When we hung this quilt up this morning, it was the first time I got a really good look at the quilting. . . I am pleased, and grateful it turned out as it looked in my head! Obviously at this stage it is way too late to turn back ;)
The texture is truly amazing! For the border I did piano key and then I decided it needed more so I added circles in every other strip. I think it works well with the plus blocks.
I did those same lines with circles in the middle in every other row of the Xs. And ribbon candy in the alternate rows.
I did stitch in the ditch on the entire quilt before starting quilting. I did half feathers around the X blocks. The dark gray backgrounds got the twirling square design a la Angela Walters and in the light backgrounds I used a back and forth line. It's a little tough to see either of these designs but they definitely serve the purpose of mashing down the fabric around the Xs :)
Don't you just love pictures at angles? :)
Love how the front shows through the back on this picture :) This is Prisma from Studio e, procured from Backside Fabrics. I am in love with this backing fabric. . . I might have it in four colors.... OK, yes, I do ;)
Quilting is absolutely invisible on the back, but the texture is not :)
Last one, promise :) The secondary designs created by the quilting are pretty cool. Not 100% planned but definitely 100% appreciated :)
Quilt Stats:
Post Wash: 85"x 96" Not the biggest quilt I've made but it is up there :)

Threads: I used a total mishmash of threads in this quilt. And a LOT of it. I used an entire 1049 yard cone of Aurifil 40 wt and 4 bobbins of Bottom Line 60 wt thread on the back. . . so double that to include thread on top. Threads included Aurifil and Superior King Tut of various wts and colors.... This was my first encounter with Bottom Line. . . LOVE! Another useful tip from the classes I took with Gina Perkes.

Fabric: The X/+ blocks are made from a bundle of Lizzy House Butterflies. The gray text background is On Time in Ink by Whistler Studios, the white text background is from a text bundle that I bought from Pink Castle Fabrics. The two X (or plus depending on which block you are looking at) block background fabrics are Sunprint Feathers in Charcoal (Allison Glass) and Lazy Stripe in Gunmetal (Tula Pink - True Colors). The purple butterfly stop border is leftover from the backing of Cally's first quilt and I also used it in the pillow cases! :) The binding is Chalk Line Inspirations in charcoal (the same fabric I used in the pillow cases).

Batting: Quilter's Dream wool of course :) I need to source another roll of it. . . yeah, this one is down to probably two more quilts. . . I just love that I can quilt the snot out of a bed quilt and it is still soft, surprisingly so. This is a great benefit of working with a wool bat (this is not a Quilter's Dream only characteristic any wool bat will provide you with the same results).

So now to pack up Cally's quilt, pillow cases, cushion cover and wall hanging (yes, she claimed that too!) and get them sent off to her. She was initially scheduled to move Aug. 1st. Not surprisingly, this has been delayed. We'll find out tomorrow what her move in date will be. My guess is that it will be soon. I need to get this winging across country so it can provide her with mom's quilty hug on her first night of her new adventure! :)

Linking up with Pet Project with Julie over at Pink Doxies, Beth over at Cooking Up Quilts for MCM, Patchwork Times for DWM, Let's Bee Social with Lorna and Finish it up Friday.

Until next time, keep on quilting!
Follow on Bloglovin