Friday, January 30, 2015

Whole Cloth Heaven :)

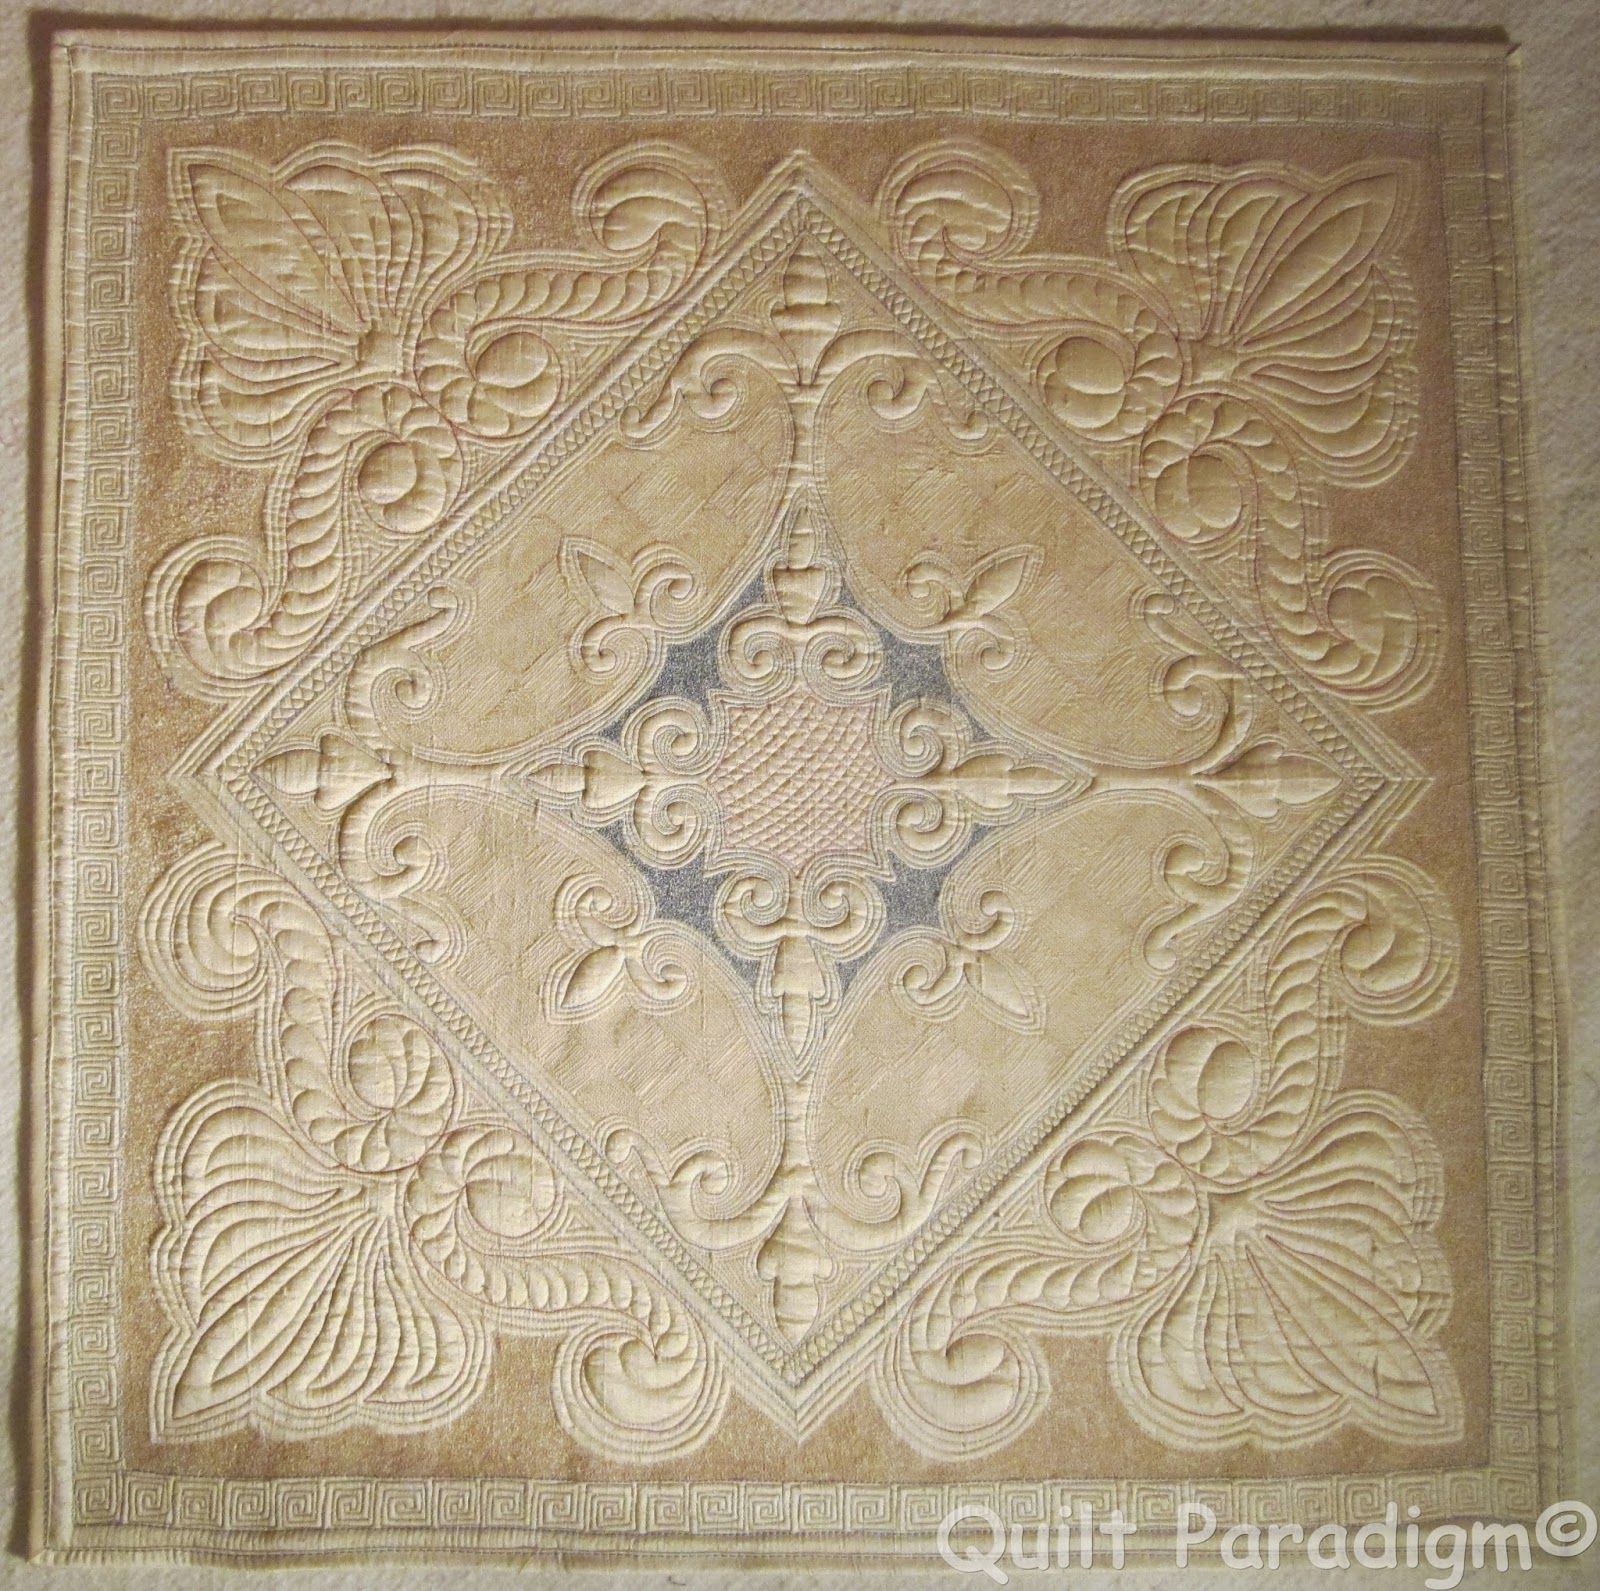
It's raining here. . . has been raining for over 12 hours straight - time to break out the ark! I finished the whole cloth quilt!! I'm impatient so I set up some lights. . . and took pictures. . . I know, not the perfect situation but the pictures are not that bad. . . ;)

I am so excited about this finish! My head is still wrapping itself around all of the things I learned in Cindy's class - both from Cindy and from the other students. That was another wonderful thing about a live class - the sharing of information was constant! Talk about information overload!! In a really good way :D Here are the pictures and then I will share with you some of the major lessons I learned in the process. Umm, this post is a little picture heavy. . .


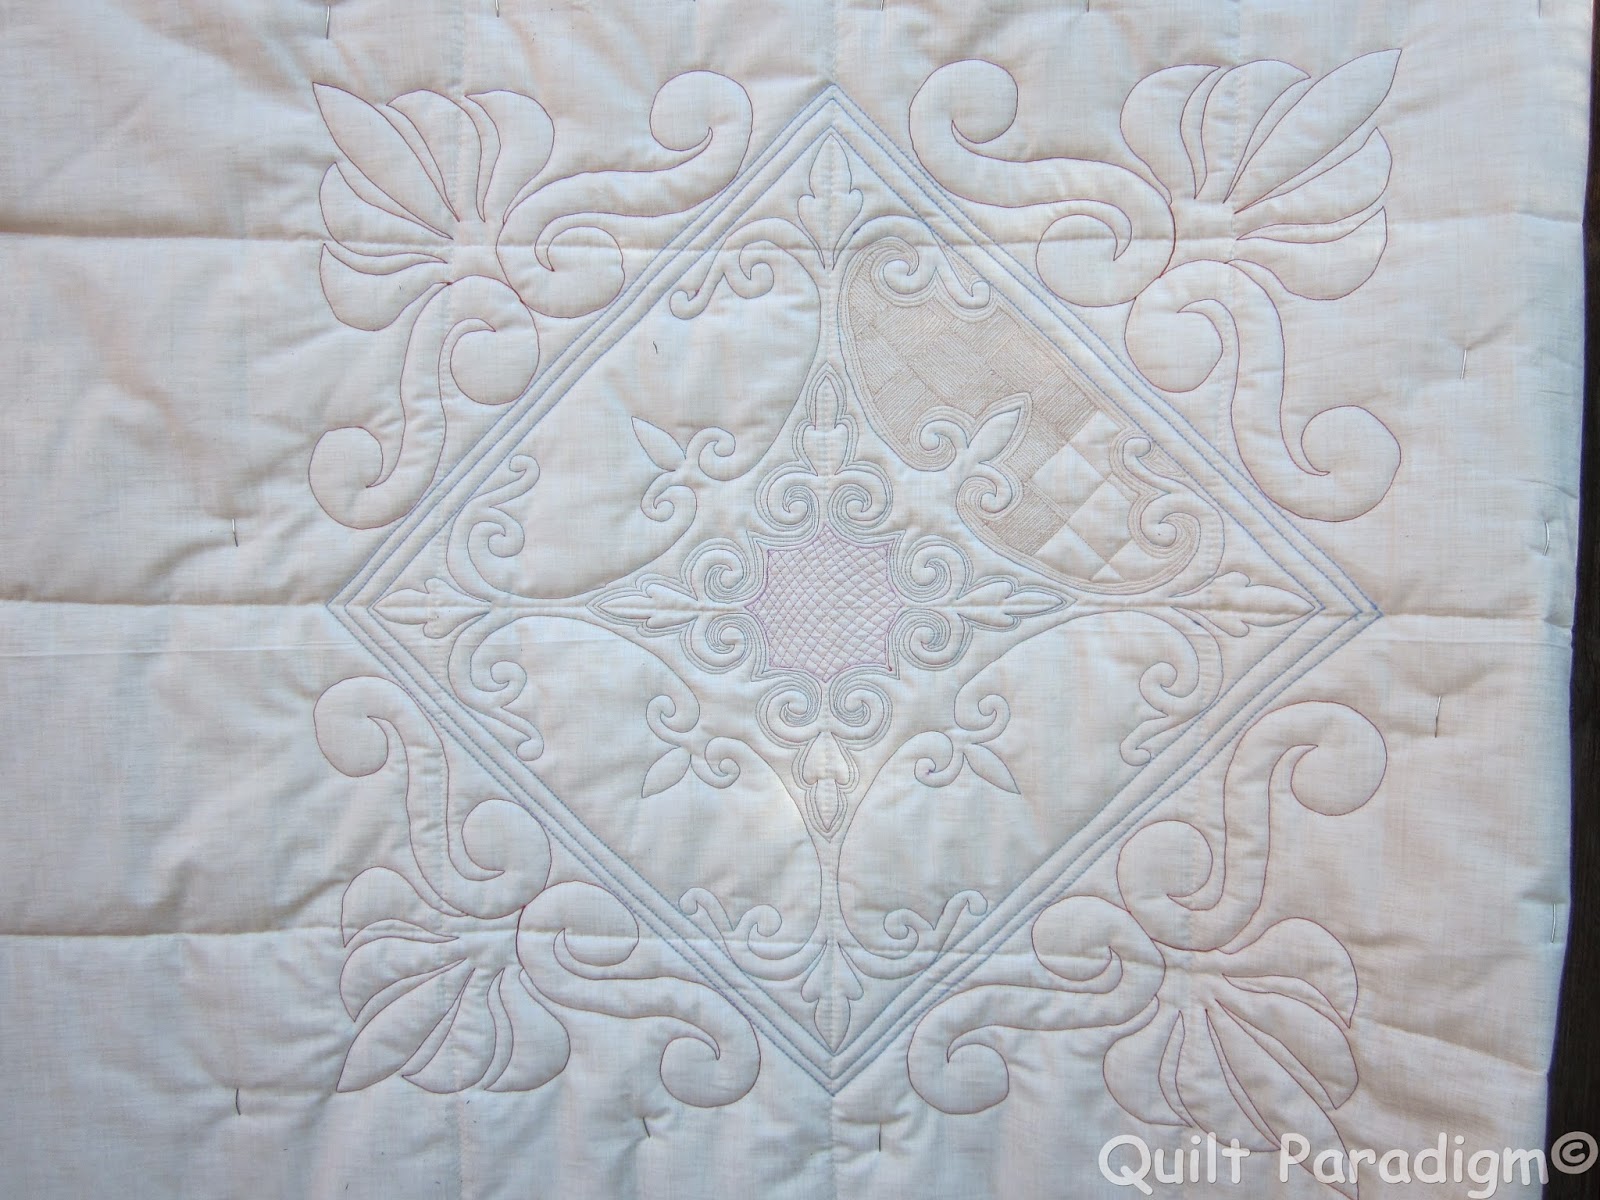
 And the back :)


Quilt Stats: 
Size: 30" x 30"
Fabric: Dupiani Silk for the front and binding (I used every inch of a 1 yard cut and got REALLY lucky that I had enough for binding! No left overs with this one!!) and the backing is from my stash.

Thread: Let me count the ways! Middle lavendar and blue just outside of that is Isocord 50 wt. The scrolls were outlined in a Superior Thread Rainbow. The blue border outlines were done in 12 wt Aurifil (LOVE!!). The ribbon candy and square spirals were done with Superior Thread Metallics. The red outlining the palm prongs is King Tut 40 wt.

Batting: Quilter's Dream Wool. . . of course ;)

What did I learn in making this quilt? Biggest lesson, if you have a chance to step outside your box and comfort zone, DO IT!! I came very close to deciding not to go to the class. I would have missed out on so much! 

This quilt design was done 100% with stencils! Isn't it amazing what you can do with stencils?? I had tried stencils in the past with way less than spectacular results! I now find myself looking at them in an entirely different light . . . and yes, there might be one or two new ones on their way to my house ;) 

The order of quilting when doing a WCQ is important. . . I wish I had known that when I did the family tree quilt! The rule of starting from the middle and working out (on a domestic) is thrown out completely. The 'big bones' of the quilt are done first (for this one I did the inside scrolls first and then the palm prongs around the outside). Then go to the secondary lines - like the blue borders in my quilt and the echoing. Then the fill can be started. At this point the quilt is completely secured so it doesn't really matter where you start filling.

Fills take time. . . and thread. . . and patience! :) And they can be done too densely (I think the scribble fill that I did in the blue and around the palm prongs could have been a little less scribbled) but once you have started it one way - you are committed. . . ripping is NOT an option. Especially on silk. I also think that the lines on the cross hatch fill could have been a little farther apart. 

Doing some semi dense quilting around the outside border of the quilt helps with getting it squared up and with binding. I mean quilt where the binding is going to cover - tack that outer edge down enough so it is not bobbling around just looking for the chance to form a tuck when the binding is attached.

There were many more things learned while making this quilt. It's my first one and I certainly was not expecting perfection. It has been a wonderful learning experience! I already have my next several in the planning stages. . . they will involve linens!! More on that soon. . . 

Linking up with Finish it Up Friday. Always SO much inspiration to be found on Fridays!

Until next time, keep on quilting!
Follow on Bloglovin

Monday, January 26, 2015

DWM. . . Unexepected Wonderfulness :)

When I last posted, I was working on another HST quilt, HSTs made out of black and white 9 patches. . . and I was excited about how this little experiment was going to turn out. I also talked about taking Cindy Needham's Craftsy Whole Cloth quilt class. I was talking about how excited I was about starting a whole cloth quilt. . . but I was going to make myself wait. I needed to finish the HST top first. . . then I remembered something I had read on Cindy's blog. . . she was coming to Phoenix. Hmmm. . . I thought it was some time in February. . . Let's go check that out. . . That was Tuesday last week. I checked her calendar. . . OMG, she is here! NOW! I've never done an in person class. . . would there be room? Do I really want to do this? I don't really want to drag my big ole machine out. . . but it's Cindy. . . She was doing a talk on thread that night. It was an open talk, there had to be room for that. I called and not only was there room for me in that talk, AND there was room for me in the class!!! I would make student number 10 - SWEET! Small class - you know I am very shy - no really, I am! :) 

I went to the talk. It was awesome. I signed up for the class and paid the fees. YAY, in two days I was going to be sitting in class with Cindy. . . I was so excited!! I couldn't wipe the smile off of my face. All of my reservations about walking into a situation where I knew no one (except Cindy, she has such an easy going attitude in her Craftsy class I totally felt like I knew her) and had to haul half of my sewing studio to a hotel. . . OK, not half but what did I know - I've never done this before. . . didn't want to go without something I might need!

The class was nothing short of AMAZING! Cindy is even more wonderful in person! :) The first day I had my quilt design drawn on the whole cloth and it was pin and straight basted with water soluble thread. I don't have any pictures of that stage of the quilt. I don't have any pictures from the class. . . yes, I took my camera. I forgot I had it with me. . . I was having way to much fun! So here are some pictures of my quilt over the past two days! WARNING - a little picture heavy ;)

I took a picture as soon as light was good Saturday morning. . . But I couldn't wait that long to continue quilting!! :) By the end of class on Friday, I had all of the outlines complete. Saturday morning, pre sun in right position pictures, I started quilting the background in the cross hatch section on the top left.
Close up of the cross hatch section. Yup, that last square on the bottom has the lines going the wrong way. . . and yes I ripped it out. . . and no, it was not fun!
Here is a picture of the back. The quilting shows a little better in the pictures of the back. In person, there really is no difference.
And this is what the quilt looks like after two FULL days of quilting :) It makes me smile! The fabric is Dupiani Silk - YUMMY!! Threads are varied. . . Aurifil (that blue frame is 12 wt!! OMG it is amazing!!!), Isocord and Superior including King Tut and Rainbow poly (the inside outline of the scrolly thingys (that's a technical term!)
I was going to use the red thread for the inside of the outside motifs. . . and then I thought two things, first, every mistake I made would be GLARING and I was sckeered, second, I decided it would be too much and take over the quilt. . . Focus is meant to be on the middle of the quilt, not the outsides. . .

This is the back, again, quilting is much more visible on the back in the pictures. I'm happy to report that's not the case in real life :)

Side view of the back. That piece of fabric for the back is from my stash. . . I have no idea what it is, but it was perfect in color and tone for the back of this quilt. YAY for usable stash :)

And one more of the back. . . I contemplated using all of the same color thread on the back. . . and then was quickly talked out of it (not that it took much!) by one of my classmates, Wendy - thanks Wendy!
There is still a good amount of quilting to be done to complete this quilt. . . I will replicate the blue border starting an inch out from the tip of the outside motifs. I will fill the inside with the ribbon candy fill. Did I mention that fill was done using metallic thread? Another suggestion by Wendy. . . My new quilty friend that actually lives in the state! I know I'll be seeing Wendy again . . . another retreat or a trip up the mountain in the dead heat of summer to cool off :) Oh, back to finishing this quilt . . . I also need to fill all of the background between the borders, around those red motifs. I'm thinking some sort of McTavishing. . . or McMurphying ;) This piece will finish around 32" square.

So to wrap this post up. . . I am SO glad I stepped completely outside of my comfort zone and went to this class. Quilty people are as nice in real time as they are in blog land!! Attending this class was meant to be - I stumbled on it at the very last minute, I got to meet a wonderful teacher in person (if you ever have a chance to take a class by Cindy, DO IT!! You will not regret it!!), I met some wonderful women, I got the chance to step out of my life (which has been pretty spectacularly awful to date in 2015) if just for a couple of days, and I came away with new friends and a renewed quilting energy! I'll post more about the making of this quilt when I post the finish. . . maybe this week. . . :D It's official, I'm going to be obsessed with this until it is finished. And then I will go back to black and white. . . it is calling my name, but I am one person. . . and I am on a mission!

Linking up with Judy over at Patchwork Times for DWM. If you haven't been, head over and feast your eyes on all of the amazing projects! 

Until next time, keep on quilting!!
Follow on Bloglovin


Monday, January 19, 2015

Black and White DWM

It's Monday, a start of a new week and I am having a little quilter's ADD. . . I have started a new project, I'll share a bit about this process in a moment. . . I watched Cindy Needham's Craftsy class yesterday on whole cloth quilts. . . Oh MY! I need to make another WCQ. . . I started watching this class and could not stop! I'm not kidding. I took Cindy's other class (Design It, Quilt It), loved it. I don't know why but I could watch Cindy FMQ all.day.long. My only complaint about the class? Cindy didn't FMQ enough ;) I just had to share that. It is taking all of the restraint I have to set everything aside and start a WCQ. . . but I'm not going to do that. . . yet ;)

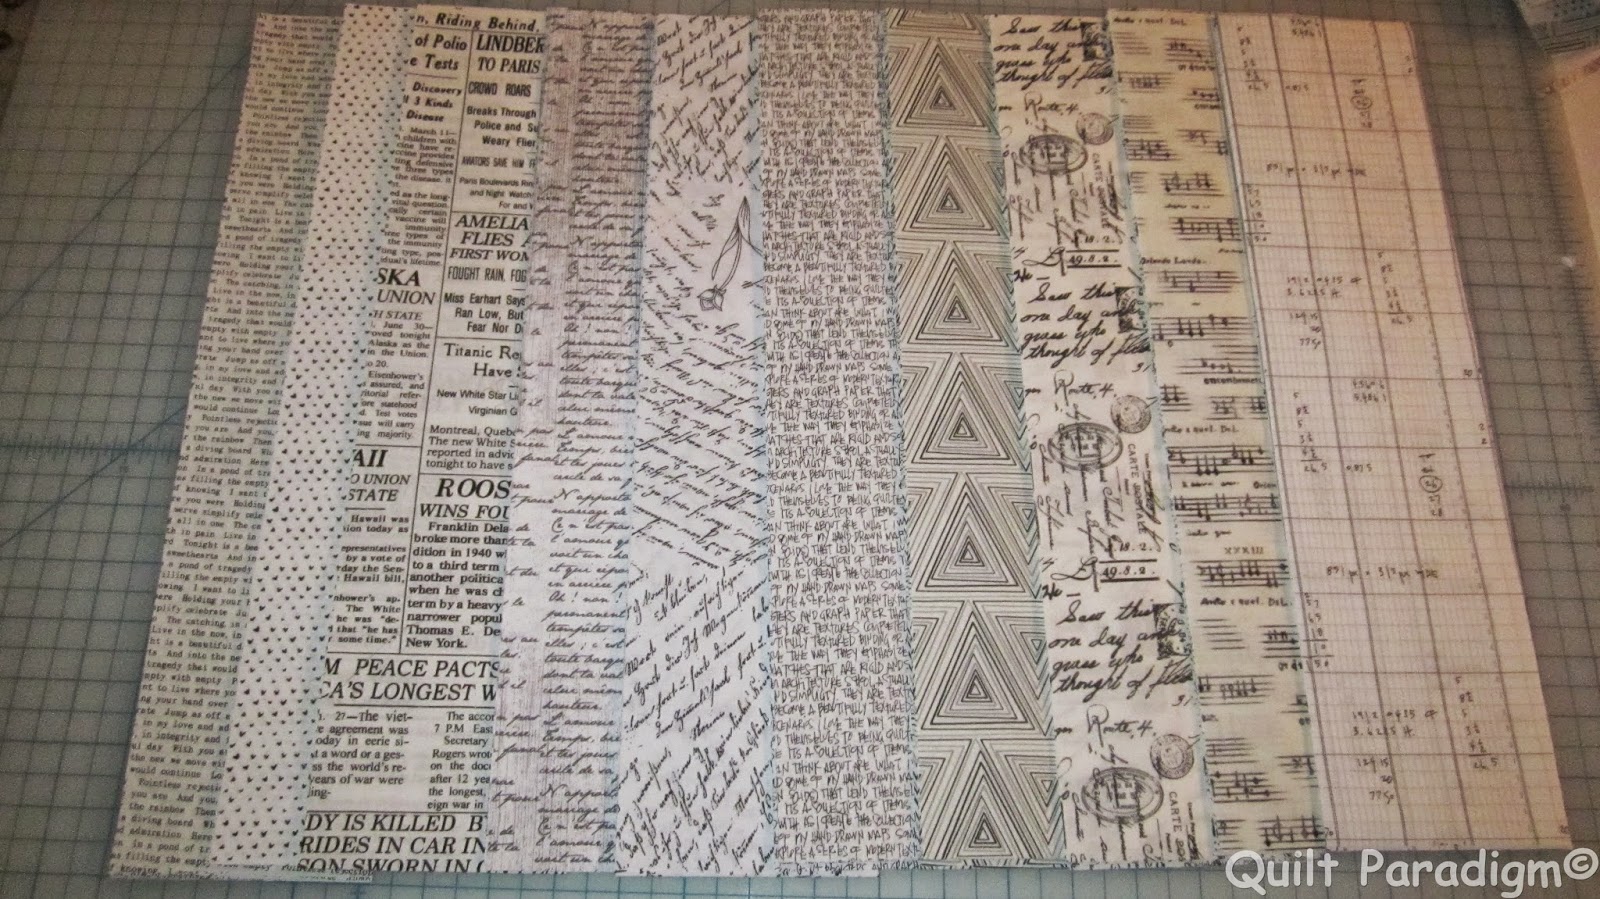
On to my new project. I have always wanted to make a black and white quilt. I lurve lurve lurve text fabrics. . . so first I pulled these fabrics:
Most of these came from a low volume fat quarter bundle. . . I don't remember where I got it. . . BUT Pink Castle has a Word Up bundle of 10 different text prints right now and they are all black on white. I might need another bundle:)
These are various cuts. . . some from bundles, some from an awesome fat quarter sale at Thousands of Bolts
So now I have my fabrics pulled. . . what to do with them?? I made the mistake of taking a little skip around the internet doing an image search for black and white quilts. . . Why do I do these things to myself??? I had a pattern picked out for this quilt (prior to the search). . . even bought the fabric (none of which is in the photos above. . . LOL). It was this quilt. Then I saw this quilt on Vicki's blog. . . I even bought the book and the ruler. . . And then I did the image search. . . UGH! I saw lots of black and white star quilts - love. Lots of black and white HSTs - love. Wonky block black and white quilts. . . darn it, loved those too!! Yeah, going to have to make more than one. . . But what to do with this one and these fabrics???

Here's how my thought process went (I'll spare you the details, this is the abbreviated version haha): I love HSTs. . . I love how various text prints look when they are used as backgrounds of blocks. My solution? I'm going to sew the black on white fabrics into nine patch blocks. Then I'm going to sew the white on black fabrics into nine patches. AND THEN. . . I'm going to cut those 9 patches on the diagonal and sew them into half white/half black HSTs! What's the final layout going to be? IDK (I Don't Know). . . I'm going to make the blocks. Then I'm going to play :)

Here's where I am:
Here are the black on white fabrics cut into 4"x16" strips. Once I had them cut, I randomly placed them into piles of three strips to be sewn together.
Here they are all sewn together. I chain pieced these. It went quick :) we like that!
And ironed. It was at this point that I realized. . . I am going to be 8 blocks short. . . :( and no more fabric. . . The good thing about ultimately needing 4" squares out of fat quarters? BEST use of a FQ... The bad thing? No leftovers for those of us who are mathematically challenged and when they divide 56 by 2 they get 24. . . They will remain nameless ;)
I am in the process of cutting these into 4" strips. Then I will mix them up again and sew them into 9 patches. I think I might make those other 8 blocks by using the Kaufman Spot On fabric . . . solid instead of cutting a 9 patch in half. . . I'll play with that once I get the blocks finished and start playing on the design wall.

Today on the agenda is to get the back on white 9 patches done. The white on black fabric prepped, cut and hopefully sewn together so I can sew the 9 patches tomorrow. . . and maybe even get the HSTs sewn together. . . I can't wait to start playing with the layout! :) 

I'm also prepping fabric for another project. This one is pattern testing so I won't be sharing much about it. . . yet :) And I will be trying to resist that overwhelming urge to start a whole cloth quilt.... SO tempting!!

Linking up with Design Wall Monday and Let's Bee Social. If you haven't been, check out these great linky parties for a major dose of inspiration :)

Until Next time, keep on quilting!!
Follow on Bloglovin

Friday, January 16, 2015

20 Year Old UFO - FINISHED :D

Remember my sister's blocks? You know, the ones she started 20 years ago. . . ? :) Follow that link for their story. Today I am happy to report - they have been assembled into a quilt that is quilted and bound - yes, it is officially a finished quilt :D I couldn't be happier with how it turned out. Also, I worried through this entire process that my sister was not going to like what I did. She saw the post yesterday and texted this "Love the quilt. I'm so excited" WOOHOO!! Now that makes me even happier :) Probably silly of me to be so worried about it but I was. And now I don't have to be anymore, YAY! 

I'll post more of the details of how I put this together in a separate post. Honestly, I don't have time to write it all up as I have been at the machine since 7 a.m. and the pups have no food. . . and I still haven't taken a shower. . . but I had to get this done, I was so close and the closer I got the more obsessed I got and the more excited I got to see it finished :) So here are pictures. I promise I'll post more about the process over the weekend - I'll even put the link here so you can check that out as well if you are interested :)

The front.

I went with the yellow for binding. It worked well :) It was the overwhelming favorite of those of you who commented on binding color.
 And the back.

The back is all flannel. SO soft :)
And some close ups.
I think these blocks are just too darn cute!!
Putting this together was an experience. I have been asked many times about adding borders to a finished quilt. Actually adding borders to what essentially was a finished quilt took a little more time and fiddling than what I had imagined. But totally doable :)
The yellow from the front matches well with the yellow on the back so the yellow binding was pretty much a no brainer :)
Quilting shows up SO well on flannel!
Now I'm excited about starting my next projects. Projects - as in plural. . . me? Yup. I'll be sharing about them soon :) 

Also, thank you all so much for all of your very supportive and heart felt comments on my last post. They are all very much appreciated and I am still in process of responding to them so if you have not heard from me, please know that I will be responding soon :)

Linking up with TGIFF over at Val's and Finish it up Friday. If you have not been, make sure you go check them out for some awesome inspiration.

Until next time, keep on quilting!
Follow on Bloglovin

Thursday, January 15, 2015

Life. Interrupted.

I don't post much about my personal life. Typically there isn't much to post. My husband and I lead a pretty quiet, calm and good life. I have thought a lot about whether or not to post anything about this. . . Because I have been absent from reading and commenting on blogs and posting here, I am going to post a bit of what has been happening over the past couple of weeks.

I posted last week when I announced winners to my 1 year anniversary that I unexpectedly had to travel. . . Quite honestly, I couldn't have imagined having to make a trip back to MN for this reason. . . On 1/2 my nephew was killed in a car accident. He was on his way to work. It was a devastating phone call for me. I was in high school when Shawn was born. He lived just miles from our house. We spent SO much time together. He was 'my' boy. :) We went through a LOT together over the years. There was the time he dove into a lake in MN. . . flew back to AZ and I met him at urgent care. . . I ended up spending several days at Barrow's Neurological Institute as he had broken his neck! The doctor there was amazed. He had flown half way across the country with not just broken but shattered C4 and C5. . . (I think that is right, it was the lower part of the neck). The amazement was that the doctor said there was no reason why he shouldn't be paralyzed. He was a risk taker. . . a thrill seeker. . .  a rebel. He had literally broken pretty much every bone in his body. Motorcycle accidents caused many of his broken bones. With all of this, who would have thought that, on a Friday morning, his life would be cut short driving to work. No one. He was really getting himself together. He had started a job with the railroad. He was a conductor and loved it. I had spoken to him on New Years day. I am so happy I got the chance to tell him how very proud I was of him. When a loved on dies unexpectedly, having regrets of lost opportunities to share with them the pride and love you feel really sux. There was much more we could have said, but at least I got the chance to tell him how proud I was and that won't be a regret I struggle with in the coming years.

So I got back home this past Saturday night. I spent Sunday getting my house 'in order.' Grocery shopping, cooking for lunches for the week, all those mundane things that felt so good to be doing. Then on Monday, I got hit hard with the body ache, respiratory type flu. . . I don't get sick. EVER. Quite honestly, I don't remember the last time I was really sick. I spent two days in bed. Mainly because I couldn't get up! I am happy to report that I feel MUCH better. Today, it is back to sewing :) And because of this nasty bug, I did not get the fabric from my giveaway mailed out until yesterday. Sorry ladies, you should get your fabric on Friday (yes, tomorrow!).

Before the crud hit on Monday, I got the bottom half of my sister's quilt sewn together. I was not going to post this before it was done but this post needs pictures and some good news. This is where I am. I need to add the borders and binding. I am hoping for a Friday finish :) Barring any unforeseen interruptions, this is totally doable.


I'm going to admit, the borders have me a little bit concerned. I'm not sure how I am going to get them quilted without puckers. . . The easiest solution would be straight line stitching but I really think it will look best with a border the same width as the sashing and quilted with the same candy ribbon design. . . Going to have to just put my big girl panties on and do this. . . 

I'll post more details of the quilting process and putting the blocks together QAYG in my finish post. Unfortunately, I did not take any photos along the way :( I think I can give you a good short description and provide the link again to the tutorial I used.

I'm off to vacuum and then finish this up. I'm thinking I will use the yellow I used for the sashing/border for the binding. . . what do you think? I have a pale green that will work. . . I have white flannel (but it does not match the white in the blocks). . . I have yellow flannel that matches the sashing. That could be an option as well. If you have any thoughts, or a different idea, I'd love to hear it!

Until next time, keep on quilting!
Follow on Bloglovin

Wednesday, January 7, 2015

Fantastic Fabric Giveaway Winners!

I have winners to announce!! I am happy to announce that those that asked for a specific bundle got them. I am not on my regular computer and I can't get the screen grab to work on this computer so I'm not able to share the number generator pictures BUT I did have witnesses ;)

And the winners are:

Comment Number 18

Congratulations! I follow you via BlogLovin. All of these bundles are lovely, but I really like the Citrus Tattersall.
Citrus Tattersall - Fat Quarter Bundle
Comment Number 3

Congratulations! You've done a great job with your blog. I follow on RSS feed. I love the stripes bundle.
 
 
Comment Number 74

You had a very productive year. Congrats! I follow via Bloglovin'. Thanks! notwendy gmail
Legacy Fat Quarter Bundle in Topaz Traditions
Congratulations to all of you :) I have sent you all emails.
 
Welcome to all new followers and thank you to all of you who have been following along for longer, some of you since the beginning. It was so fun exchanging emails with many of you reminiscing about our first exchanges :)
 
I have been unexpectedly had to travel so have not been able to sew, blog or answer emails. I will be catching up with emails over the next couple of days but unfortunately will not be near a sewing machine for the rest of the week :(
 
Until next time, keep on quilting!