Monday, June 23, 2014

Quilting and Planning on A Monday

Happy Monday! First, thank you, thank you, thank you to all of you that responded to my last post about thread breaking.  I was overwhelmed with the response! What a wonderful community this is!  The culprit seems to be leaving the presser foot down.  Sarah was the first to answer and it turns out I have gotten into the very bad habit of threading the machine with the presser foot down. I started being more observant about what I was doing and yup, presser foot was down. Who woulda thunk it? :)

Because I was able to get through more than two square inches without a thread break, here is where Spin (THANK YOU to Jasmine for the name suggestion!!)

I hope to have the last of the blocks done today.  I don't think the negative space will take as much time. . . I know, famous last words.

Love how that dense quilting makes the geese pop right off the quilt :)

Still pondering flattening out at least a portion of the middle part of the upper star. . .

I decided to flip the grid in the outer stars :)
I have been watching the back pretty closely, I had a wrinkle (I have to say that I have not had a wrinkle or tuck in a quilt back in a long time).  Thankfully there were just two very short straight lines of quilting to pick to get the tuck out.  I requilted and guess what? Still there!!  Ripped again and did a lot more smoothing. . . and was successful with the second try :) 

As I am working on this I am planning. . . my next quilt. That's normal right? :)  I have all of the fabric. . . Remember this design?

Off Course
It is going to become reality. . . with a few tweaks of course :) I am so excited about this one. I am using the New Colourshott cottons from Oakshott Cottons. I worked with Michael Oakshott to get the colors.  Michael was absolutely awesome to work with and so encouraging! If you have not worked with these new Colourshotts, you have to get your hands on some and give them a try! 

These beauties are going to be geese :)

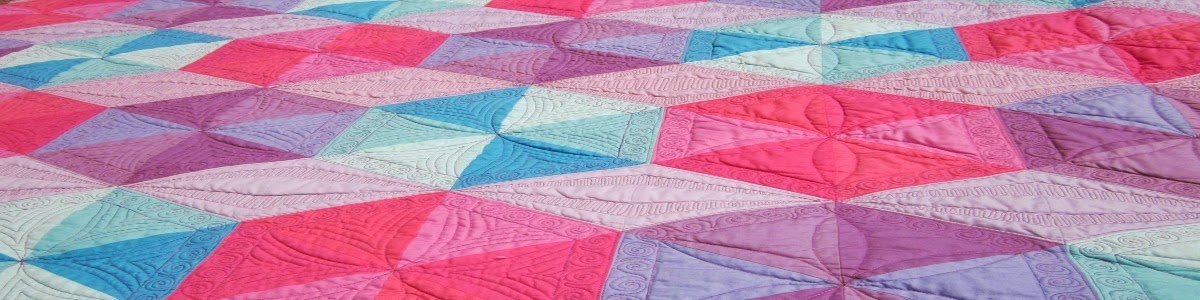
Another angle because these fabrics really are just so gorgeous and take on different colors depending on the angle.

The backing is going to be black Widescreen and the negative space will be made up of the three grey fabrics and the black will be the wings for the geese.
Again, another angle.  Capturing the richness of these fabrics is SO difficult.
More on this as soon as I finish Spin! OK, I gotta get back to that quilt :) My goal is to have Spin finished by Friday. . . I have a plan for the negative space.  I'm certain of one thing, there will be no micro quilting in the negative space :D

Linking up with Marelize for Anything Goes Mondays and Judy for Design Wall Mondays.

Until next time, keep on quilting, don't sweat the small stuff AND it is ALL small stuff!!! 


Follow on Bloglovin


Wednesday, June 18, 2014

AAAAHHHHKKK!! What is causing this???

I had been quilting along after multiple thread breaks.  I got an entire wing quilted and then this... This mess was not present with the other thread breaks. :(
I am dealing with multiple thread breaks this morning. This happened when I first got Roseanne and I chalked it up to my threading the machine wrong.  Every time it broke, I would undo everything and start again.  Everything has been going well since the first couple of days that I quilted on her. It started again this morning.  PLEASE, can someone tell me what I am doing wrong?

Linking up with Lorna for Let's Bee Social.  Any suggestions would be GREATLY appreciated!

Thanks!

Monday, June 16, 2014

Thread Stash. Who knew?

I'm done stripping grin so now I am back at my flying geese quilt.  I just realized, I need a name for this one.  And I am coming up with zilch, nadda, zippo.  Any suggestions?  The finished top looks like this:

I should have ironed this before taking pictures ;)
I thought I had a pretty iron clad quilting plan for this quilt. . . and it turns out I have scrapped some of it. . . Part of what I decided was that I want the thread to match, in all parts of the quilt. I had bought thread when I bought the background fabric to match it (the lovely ladies at Pink Chalk did a spectacular job) and I also had them match the lighter grey fabric I bought at the same time that I thought I was going to use in the quilt.  It just happened to match the back perfectly!  And then, I started to panic. . . What about the rest of the colors, what about all those nightmare horror stories I have seen of the mess that happens when mixing types of thread on the top and bottom? Calm yourself, Judy, what was that quilting tip you gave just days ago?? Oh yeah, don't sweat the small stuff. . . have a glass of wine (never mind that it was about 7 a.m.) and think. . . My LQS has some Aurifil but mostly the neutral colors people use to piece. . . ordering online is a gamble and once again puts off any notion of starting quilting for days. Not happening.  So, I open my 'thread' drawer. . .

I don't have 'much' of a thread stash. . . no really, I don't, it all fits in one drawer, can't be that much ;) I started laying out threads.  The hardest one is going to be that maroony purply red color. . . I have only ever done one red quilt and quite honestly, red is not one of my favorite colors. Anyway, I pulled that spool, held my breath and holy wow! It actually looked like it was going to work! OK, that is good, and it is Aurifil! Extra points. Now, the blues.  Those light blues may present a problem. . . BUT I had two lighter blues of Isocord that I bought for my dad's quilt (didn't use either of them LOL) and guess what? Perfect. . . but, Isocord, mixing thread types... not good. What about that middle diamond, it is a very dark grey. . . When I first started quilting, I just happen to have bought a spool of black Isocord (just in case, one always needs black right?). It looks like it is going to work but more mixing...  Now, that other grey is going to present problems. . . hmmmm. What about the grey that I am using for the negative space? Not a perfect match, not really close. . . but those spaces are going to be very densely quilted. . . I think it might work!

What I did next is something I have never done before starting to quilt a top.  I took scraps of each color of fabric and tried each color to see how it worked.  I'm mixing a poly and a cotton thread. . . gasp Is that going to work? Also, the backing is a wide back (Wide Screen by Carol Friedlander in grey).  I didn't want to use different color threads on the back. . . and what about those pesky dots I have seen that result in mixing thread colors like this? Surely this is going to be a disaster in the making? Must test.  Here are the results:


Can you believe that??? I haven't said it yet in this post but I'm saying it now - I just love my new machine!!! The tension is PERFECT!  Not one dot! Front or back! OH YEAH, I am in business! Did I mention I am using a double bat with this one? Wool and 100% cotton (I'm a Quilter's Dream girl... in more ways than one LOL). And still, it is perfect.  And I was going fast, slow and scribbling and that amazing machine just whipped right through all of those layers like a hot knife through butta! Color me happy ecstatic :)

I've got one full star block finished.  That micro quilting is taking some time and makes me tense LOL but it is looking good. Oh alright, here's a picture:


OK, I'm getting back to it and I have assembled all needed parts for my next quilt. . . no hints.  Just know I will be posting soon, very soon ;) 

Linking up with Judy for Design Wall Mondays, Marelize for Anything Goes Mondays, Connie for Linky Tuesday and Heather and Megan for Fabric Tuesdays

Until next time, keep on quilting. . . and. . . don't sweat the small stuff and it is all small stuff :)
follow us in feedly


Follow on Bloglovin


Friday, June 13, 2014

Whew! A Friday Sprint to the Finish Line!

It's still Friday and despite the odds, I finished the strip quilt! WOOHOO! I was able to mostly tame the wavy borders that plagued the quilt.  I had two feet of sewing left on the binding and . . . WTF?? No really, that was actually uttered and I think you will agree, it was appropriate - the spool of thread RAN OUT!! And it was 5:26 p.m., guess what time the quilt shop closes? So, I did what any industrious person would do. . . I popped that bobbin right out (which did not have much thread on it either) and manually spun about half of it onto the empty spool and off I went. . . I did this THREE times. . . I have about a foot of thread left. No really, a foot.  That's it! Talk about way too close for comfort!

For your viewing pleasure, here is my strip quilt (which I did not like making, LOVE the way it turned out and quite honestly, like the back better than the front):

The quilting on the front adds loads of texture but can't really be seen, except in that black border :)

I was afraid I was going to have problems with tucks in the main part of the quilt, but I did not YAY!  There are a few in the border but I'm hoping that washing will make what is now not too bad considering how wavy (think HUGE tidal wave) those borders were.


This is a close up of the back, never mind those wool flecks :) I took this to show you the stitch quality I am getting with the Janome 8900 - freakin AMAZING! Those are curves and no, I was not going slow!


TA DA! This is the back, if it were my quilt, this would always be the front!! :)
And a few lot more close ups of the quilting on the back - I looked.  I could not find ONE place in which the tension wasn't pretty much perfect.


Quilt Stats:
Size: About 65" x 70"
Fabric:  Timeless Treasures Tonga Batiks Falling Leaves collection
Batting: Wool of course!
Thread: Two full spools of Superior Threads Butternut 40 Wt

What did I learn in making this quilt? First, I do not like making strip quilts. I absolutely love the look.  Do not like the process one little bit.

Second, if your gut tells you that the back should be a front - go with it :)

Third, if your gut tells you to remove those borders, remove the borders.  I actually could have gotten away with just removing one side.  I chose not to.  I was then going to add another layer of batting in the border - do a little creative tapunto ;), but I didn't. It was slow going on one side but the design in both borders made it almost painless and wrinkle free :)

Fourth, there is a reason quilting 101 says to measure the width and length of the quilt and cut borders accordingly. . . I am now sheepishly grinning and red faced because here is another confession. . . I have never not once done it and have never had a problem. . . . now I know. And I'm never making another quilt with a border ;) haha

I am now off to sandwich my problem child OK, OK, it wasn't the quilt top that was the issue, it was bad planning on my part - at least I know there are NO waves!  I have thread (better order more of that just in case. . . ), I have batting and I have the backing.  I will start quilting in the morning! YAY 

Linking up with Finish it Up Friday, TGIFF, SewJo Saturday and maybe a few more ;)

Until next time, keep on quilting!


Follow on Bloglovin

Tuesday, June 10, 2014

2014 New Blogger Blog Hop - WELCOME!

Welcome blog hoppers and regular readers! Today is my day to be a part of the 2014 New Quilt Blogger Blog Hop being hosted by Beth over at Plum and June!  I'm so excited! :)

http://www.plumandjune.blogspot.com/


My name is Judy and this is my little corner of the internets :) I hope you stay and look around a bit.  I blog about the process I go through in making quilts.  The majority of my quilts these days are made sans any pattern. I show how I make my quilts and anything I learn along the way.  I share the good, the bad and the really ugly and hopefully a smile or two :) I just celebrated my 1 year anniversary of being bitten by that quilty bug.  In that time, I have made over 30 quilts.  Yup, I got bit hard.

Here are a few of my favs: 
This was a quilt of many firsts for me.  QAYG, Curves and  Reversible Binding.


I used the Split Seconds Ruler by Karla Alexander for Creative Grids.  I call it The Wave.
Since this is such a large hop, I am going to keep this post brief (oh stop rolling your eyes, I can do it!).

The best tip I received as a result of being a part of this hop is offer people simple and easy ways to follow your blog (after all, none of us likes to think we are talking to ourselves).  I had no idea what Feedly was before I got involved in this hop.  Now you will find a shiny new button in my sidebar.  AND when I added the button, I found out I had 8 people already following me with Feedly!! Who knew?! It took me a couple of times to figure out what worked, it seems some ways work and others do not for adding the Feedly button. Go here for initial basic instructions. Email me if you have issues. I'll help if I can :)

My quilt tip that I also apply to life is short sweet and simple - Don't sweat the small stuff. . . and it is all small stuff! Most of us are quilting for fun.  Adding stress to the mix because I am freaking out about a crooked seam or mismatched point takes the fun out of it. I know, sometimes this is easier said than done!

OK, on with the hop! Check out these other great blogs (feel free to look around before you go)!

Until next time, keep on quilting!

Follow on Bloglovinhttp://cloud.feedly.com/#subscription%2Ffeed%2Fhttp%3A%2F%2Fquiltparadigm.blogspot.com%2Ffeeds%2Fposts%2Fdefault


Jill @ Pie Lady Quilts

Chelsea @ Patch The Giraffe

Daisy @ Ants To Sugar

Rachael @ The Floral Suitcase 

Elizabeth @ And Pins

Jennifer @ Never Just Jennifer 

Alice @ Blossom Quilts

Megan @ Sew Stitching Cute

Stephanie @ Late Night Quilter

Kelsey @ Lovely And Enough
 

Monday, June 9, 2014

On My Design Wall

Good Monday morning to one and all :) hehe  Sorry, I'm still a little giddy about this. Once I have a little more time with her, you can bet I will write more.  For now, let's just say that the 1/4" foot is AWESOME and when used with the 1/4" presetting it has been DEAD ON :) These are things that make me smile :)

What's on my design wall? The backing for the strip quilt.  Here's a picture of the front:

This picture shows the colors truer than previously posted pics.
I think I am going to add another border. . . my concern is that this top is a bit wavy.  Not quite as wavy as it looks in the picture but the black border is wavy. . . so do I rip it off and start over or do I forge ahead with the outer border and hope for the best?  Really, I'm asking.  What would you do? I'm thinking I am going to regret not taking the borders off, but I have an overwhelming urge to just forge on ;)

Here's the back. . . I really think this back could be a quilt all by itself.  I LOVE it! It is not finished.  I will add borders wide enough to be big enough for the back out of the fabric that is between the square panels and the leaf panels.  WTH is she talking about???  This is what I'm talking about ;)

Love, Love, Love, how this is looking :)
The scrolly (new descriptive term) fabric will be the borders.  Here's the 'little' glitch with this one (and those of you who are very observant know exactly what you are going to see. . . )

See the difference in the width. . . I knew I should NOT have made that cut :( It's over a half inch off.  The cut is slanted starting from the scrolly fabric below the leaf panel to the scrolly fabric above the leaf fabric. . .
What's my fix going to be? The only thing I have come up with is to sew in a piece of the scrolly fabric to fill the angle.  I know it is going to be noticeable.  But I don't have any black fabric that comes even close to the black in the leaf fabric. If you have any suggestions, I'm listening ;)

Just keeping it real folks.  This one has plenty of issues to discuss... If I were going to do it over again, I would definitely use foundation for the strips for the top.  There's a lot of bias going on in that top and that is what I think caused my wavy border. Which makes me question if taking the borders off and resewing them is going to make any difference. . . Again, if you have thoughts or tips with this, please share :)

One more thing, Wednesday is my day to be a part of the 2014 New Blogger's Blog Hop being hosted by Beth over at Plum and June.  Get ready to check out all of the great new blogs out there! The group has been working hard to improve the appearance of the blogs and sharing all kinds of cool tips and tricks.  You'll notice several (ok, maybe a complete revamp!) changes to my blog.  All thanks to the techy things I have learned from the wonderful dialog going on behind the scenes.  A HUGE thank you to all of the great bloggers that are involved!  Get ready for a hopping Wednesday! :)

Linking up with Design Wall Mondays and Anything Goes Mondays. Check out what everyone else is doing!

Until Wednesday, keep on quilting!
Follow on Bloglovin 
follow us in feedly  


Friday, June 6, 2014

I have a confession. . .

to make. . . based on my posts, some of you may have figured this out. I can be a little lot impulsive. Not "look! everyone is jumping off the cliff I think I'll join them. Tally hoo!" kind of impulsive (that's more crazy than impulsive IMHO).  I mean the kind of impulsive that you see something, it really makes sense to you, you read more, you get more confirmation that you must do something.  You do more reading, look scan quickly for reasons you shouldn't do it and then. . . . sometimes it takes hours. . . sometimes it takes days OK a day and BAM! POW! WOW! You have this sitting on your sewing throne:

Isn't she pretty? :) I haven't even plugged her in yet and I am sharing her with you :)

Yup.  Can you believe it? :) :) :) I can't wipe that off my face! It is a brand sparkly new Janome 8900 QCP. I had the 7700. I loved the machine. Except one thing. That permanent hanging attachment for the AccuFeed system. The quilt sandwich would get caught on it. The batting would get stuck in it. When using rulers, I was constantly running into it. Minor inconveniences? Maybe to some but it drove me crazy and I would get wiggles where there were not supposed to be wiggles. Inconsistent stitches because I was having to tug and didn't realize a part of the quilt was caught in the dreaded hanging thing (that's what I called it). But I LOVE the AccuFeed system, LOVE LOVE.  Actually used the walking foot even when piecing, always.

Janome has made many upgrades to the 8900. Getting rid of the dreaded hanging thing was just one. I found one or two 'negative' reviews. They were reviews by seamstresses who do not quilt.  I don't know why someone would buy this machine and have no intention of FMQing on it. Anyway, I took the plunge. Impulsive? Don't answer that, it was a rhetorical question.:)

Her name is Roseanne. She is named after my Jr. High Home Ec teacher. She was a gem. She had the patience of a saint and taught me how to sew a garment and figure out a household budget, take care of an egg as if it was my newborn (remember that, do they still do that?) and cook from a recipe (recipe? what is that?? haha). Remember when those shirts that had no arms? The seams went from the cuff or end of the sleeve almost straight across to the hem of the shirt? I don't remember what it was called. Bad fashion is what I call it now. LOL Bat wings. That was my first foray into patterns and garment sewing (ok, and probably one of the last haha). It was maroon and black plaid flannel. And yes, I wore it. . . a lot. Anyway, my inability to follow a pattern was alive and well way back then. And she would explain the same thing over and over again. Look, this thing had FOUR seams holding it together! Not rocket science. It took weeks. But she stuck by me and I got 'er done :) I think she might be impressed with my new found sewing abilities. :)

I am now going to play and get to know Roseann better :) Until next time, keep on quilting! 
Follow on Bloglovin


Wednesday, June 4, 2014

It's a flimsy finish!

Before I get to the flimsy finish - the New Bloggers Blog Hop has started over at Plum and June!  Head over there and check out all of the great bloggers on the hop today AND she is having a give-away! WAIT! Don't leave yet! You have to see this! :)

OK, not going to blather on, just going to do a brief recap. . . here is the design I made in EQ7:


Previous posts here and here and here it is!
 
I'll square up those sides when I am done quilting.

Paper is still attached to the back which makes the flimsy hang a little better, another bonus to PPing! Who knew?

I'm testing spots and angles in my back yard ;)

This spot, at this time of the day is pretty darn good! YAY

Must remember this spot.  The colors are coming off perfectly.

I tweaked color placement a bit, I liked this better. And once I made the decision, unless I was willing to start ripping, they were staying put. I did enough ripping with this one. . . A LOT of ripping.  Matching those seams and points was a bit tedious and here's what I learned - the more I obsessed about it as I was sewing, the further off my sewing was! Need to chillax! I looked at the rows for a long time before I sewed them together. . . pondering. . . shaking my head. . . knowing there was no way I was going to get them all perfect. And I didn't.  And that is OK.  It is finished now and it looks exactly as it did in my head - don't you love it when that happens??

I ordered the backing fabric. . . for some reason they decided to send it on the slow boat. . . It's not going to be here until next week :(  

I'm off to finish the backing for the strip quilt top and get it quilted.  It's feeling neglected ;)  Linking up with Lorna for Let's Bee Social, Lee for WIP Wednesday, Kelly for NTT and Amanda Jean for Finish it up Friday.

Until next time, keep on quilting!
Follow on Bloglovin